CertGen Dashboard
Login, Registration, Forms, Templates, Attributes and User certificate ? User Manual
A step-by-step guide to account sign-up and sign-in, organisation setup, departments and staff onboarding, certificate types and role assignment, and building certificate templates with the field designer. creating forms and quizzes, organizing sections and question pools, adding questions, configuring settings, and previewing, approving and publishing forms. Guide to generating, approving, issuing and tracking certificates, plus form responses and question analytics.
Table of Contents
1. Account Registration and Sign-In
Step 1.1.0: Create a Personal Account
Step 1.2.0: Sign In via the Student Wallet Tab
Step 1.3.0: Register for a Student Wallet
Step 1.4.0: View the Student Credentials Dashboard
Step 1.5.0: Register as an Organisation Admin
Step 1.6.0: Choose Personal or Organisation Login
Step 1.7.0: Sign In to an Organisation
Step 2.1.0: View Your Organisation
Step 2.2.0: Auto-Created Personal Workspace
Step 2.3.0: Open Organisation Settings
Step 3.3.0: Department Created
Step 5.2.0: Confirm the Invitation
6. Certificate Types and Staff Role Assignment
Step 6.1.0: Open Certificate Types
Step 6.2.0: Add a Certificate Type Creator
Step 6.3.0: Choose the Target Department
Step 6.4.0: Check Assigned Creators
Step 6.5.0: Creator?s View: No Certificates Yet
Step 6.6.0: Revoke a Creator Role
Step 6.7.0: After Revoking Access
Step 6.8.0: Create a New Certificate Type
Step 6.9.0: Certificate Type Created
Step 6.10.0: Review All Certificate Types
Step 6.11.0: Open Assign Staff and Choose a Workflow
Step 6.12.0: Review Certificate Creator and Assigned Staff
Step 6.13.0: Pick a Role for Single User Flow
Step 6.14.0: Assign the Approver Role
Step 6.15.0: Set Granular Permissions for an Issuer
Step 6.16.0: Switch to Approval Workflow
Step 6.17.0: See All Approval Workflow Roles
Step 6.18.0: Assign a Document Creator
Step 6.19.0: Assign an Issuer under Approval Workflow
Step 6.20.0: Assign an Approver
Step 6.21.0: Assign a Verifier
Step 6.22.0: Confirm Pending Role Assignments
Step 6.23.0: Accept or Decline a Role Invitation
Step 6.24.0: Confirm Active Roles
Step 7.0.1: Open the Forms Manager
Step 7.0.2: Choose the Target Certificate
Step 7.0.3: Fill in Form Details
Step 7.0.5: Explore the Actions Menu
Step 7.0.6: Review the Form Overview
7.1 Sections and Question Pools
Step 7.1.3: Confirm the Section
Step 7.1.4: Open Question Pools
Step 7.1.5: Create a Question Pool
Step 7.2.1: Open Form Questions
Step 7.2.3: Set the Field Location
Step 7.2.4: Configure Multiple Choice Answers
Step 7.3.1: Open Edit Settings
Step 7.3.2: Set Access Control
Step 7.3.3: Configure Time Management
Step 7.3.4: Configure the Timer
Step 7.3.5: Set Navigation Options
Step 7.3.6: Enable Security Features
7.4 Previewing, Approving and Publishing
Step 7.4.2: Walk Through the Live Preview
Step 7.4.3: Confirm Submission in Preview
Step 7.4.4: Submit the Form for Approval
Step 7.4.6: Confirm Approved Status
Step 7.4.7: Publish a Frozen Form
Step 8.1.0: Open Certificate Templates
Step 8.2.0: Create a Certificate Template
Step 8.3.0: Open Attributes for a Template
Step 8.4.0: Manage a Template?s Attributes
Step 9.0.1: Open the Design Certificate Fields Canvas
Step 9.0.2: Start with an Empty Page
Step 9.0.3: Configure a New Page
Step 9.0.4: Blank Page Ready for Fields
Step 9.0.5: Upload a Certificate Background
Step 9.0.6: Adjust the Background
Step 9.0.7: Add a Dynamic Text Field
Step 9.0.9: Add an Image Placeholder
Step 9.0.10: Add a QR Code Field
Step 9.0.12: Add a Shape and Lock the Page
Step 9.0.16: Review the Full Template Preview
9.1 Attribute Approval, Profile and Approvals Inbox
Step 9.1.1: Submit Attributes for Approval
Step 9.1.2: Attributes Approved
Step 10.0.1: Open the Generate Certificate Page
Step 10.0.2: Select a Certificate Type
Step 10.0.3: Enter Student Information
Step 10.0.4: Fill Additional Dynamic Fields
Step 10.0.5: Confirm Generation and Submit for Approval
10.1 Approving and Issuing Certificates
Step 10.1.2: View the Certificate in the List
Step 10.1.3: Submit for Approval from the List
Step 10.1.4: Approval Confirmation
Step 10.1.5: Issue the Approved Certificate
Step 10.1.6: Certificate Marked as Issued
10.2 Tracking Certificate Signatures
Step 10.2.1: Check Signature Status
Step 10.2.2: Spot Pending Signatures
Step 10.2.3: Review Certificate and Signature Details
10.3 Bulk Certificate Generation via CSV
Step 10.3.1: Switch to Bulk Upload
Step 10.3.2: Download Template, Upload CSV and Generate
Step 11.1.0: Open Form Responses
Step 11.2.0: View a Submission?s Details
Step 11.3.0: Return to the Responses List
Step 12.1.0: Open Question Analytics
Step 12.2.0: Review the Full Chart View
Step 12.3.0: Check Attempts Breakdown
Step 12.4.0: Switch to Table View
Step 12.6.0: Review Question Analytics Insight
Step 13.1.0: Check the Approvals Inbox
Step 14.1.0: Manage Your Profile
Step 1.1.0: Create a Personal Account
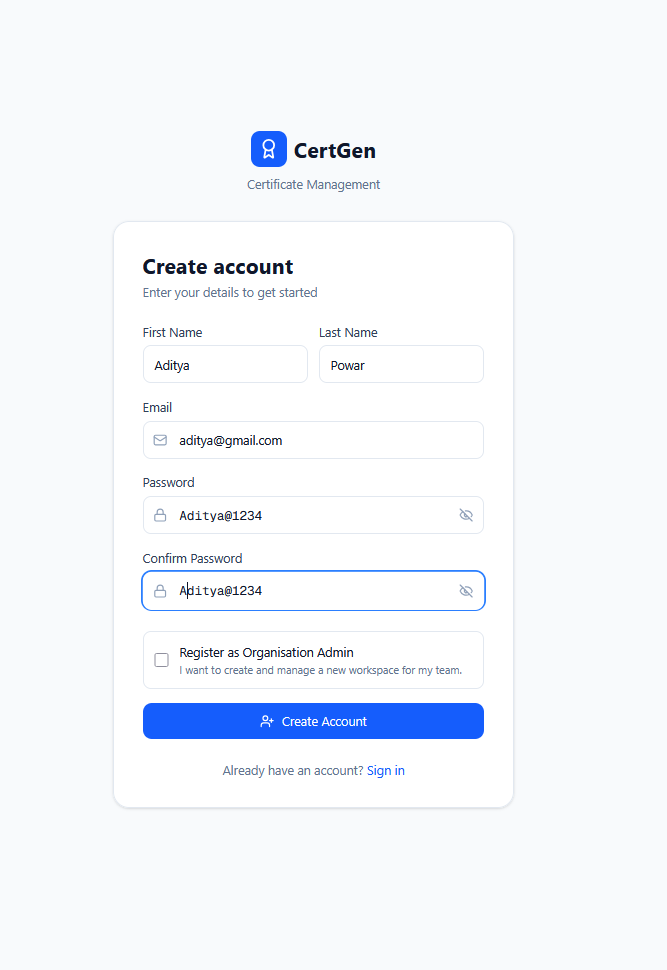
Open the CertGen sign-up page and fill in your First Name, Last Name, Email and Password to create a personal account.
Step 1.2.0: Sign In via the Student Wallet Tab
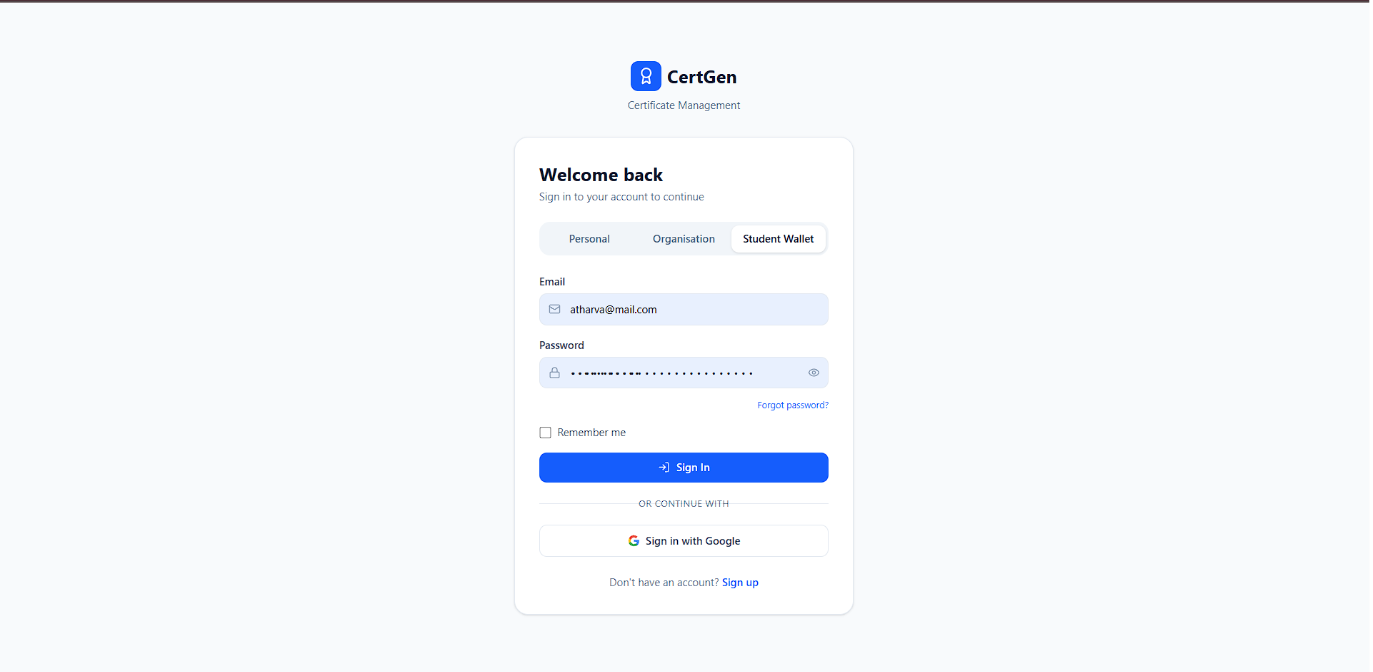
On the sign-in page, choose the Student Wallet tab (alongside Personal and Organisation) to log in with a student email and password. Also sign in with Google option can be used.
Step 1.3.0: Register for a Student Wallet
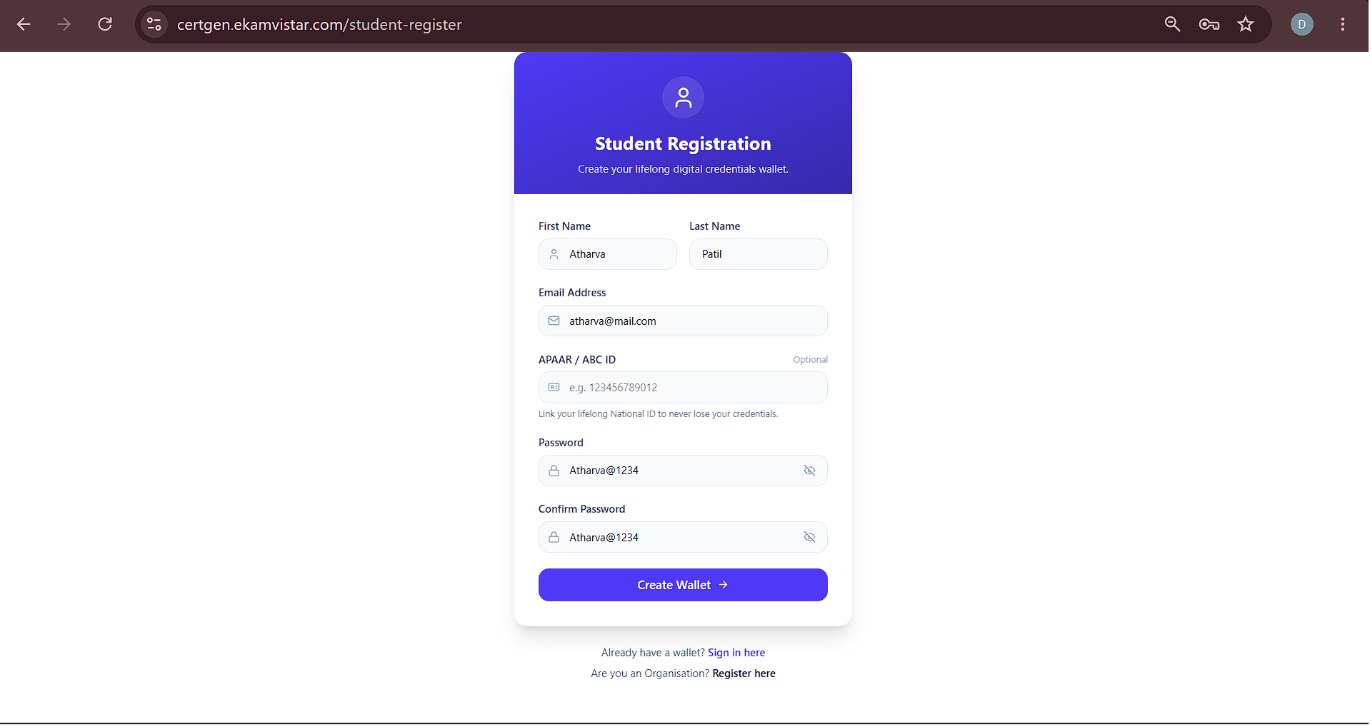
From the student-register page, enter First Name, Last Name, Email, an optional APAAR/ABC ID and a password, then click Create Wallet.
Step 1.4.0: View the Student Credentials Dashboard
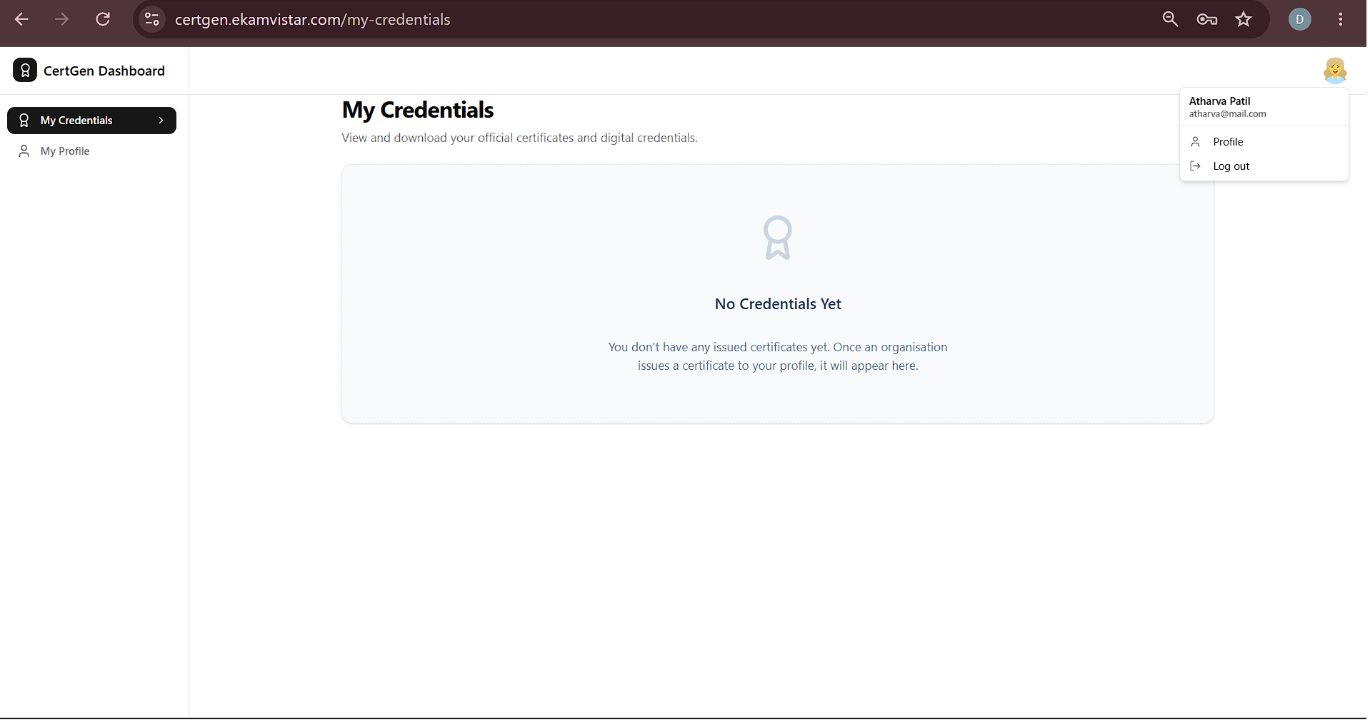
After signing in, the wallet opens on My Credentials, where issued certificates will appear once an organisation issues them.
Step 1.5.0: Register as an Organisation Admin
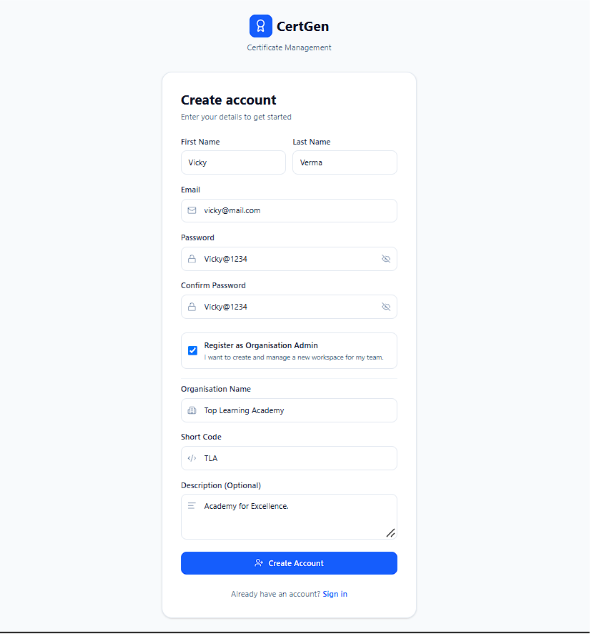
On the Create Account page, check Register as Organisation Admin to reveal Organisation Name, Short Code and Description fields, then click Create Account.
Step 1.6.0: Choose Personal or Organisation Login
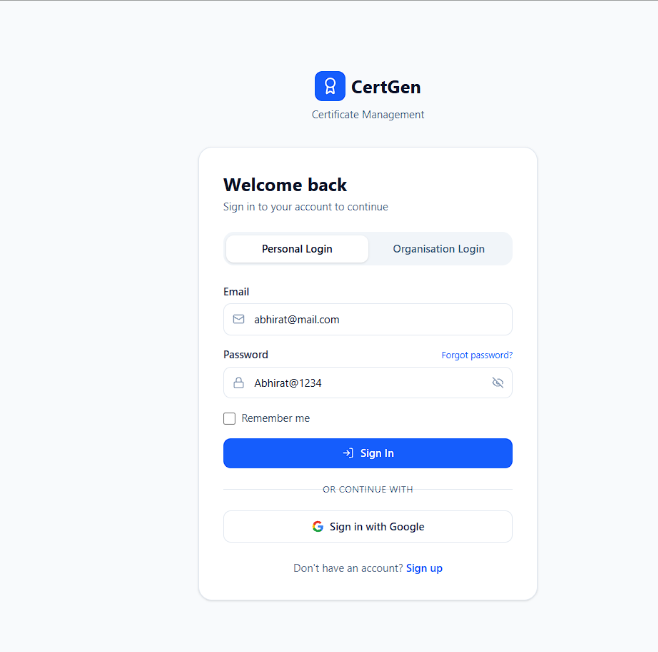
On the Welcome Back screen, switch between the Personal Login and Organisation Login tabs depending on your account type.
Step 1.7.0: Sign In to an Organisation
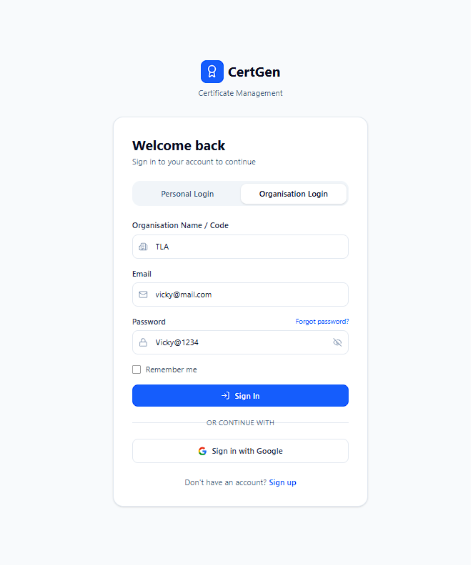
Under Organisation Login, enter the Organisation Name/Code along with your email and password, then click Sign In.
Step 2.1.0: View Your Organisation
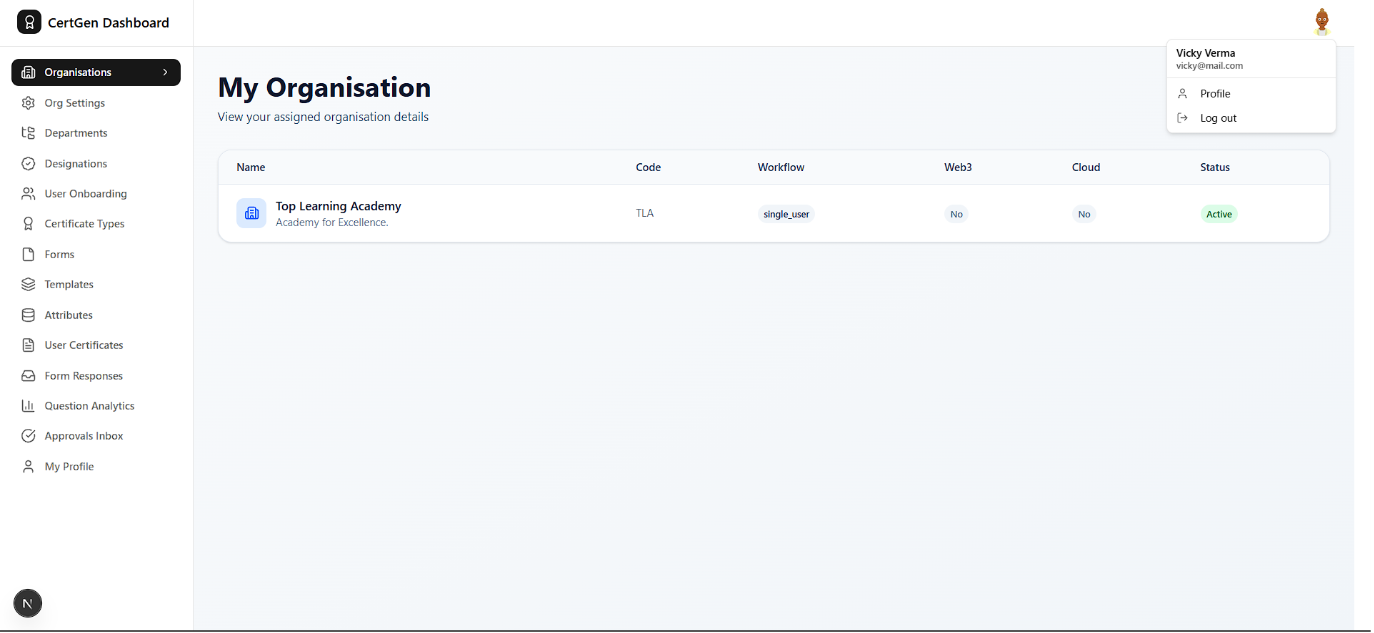
After signing in as an Organisation Admin, the Organisations page lists your organisation?s name, code, workflow mode and status.
Step 2.2.0: Auto-Created Personal Workspace
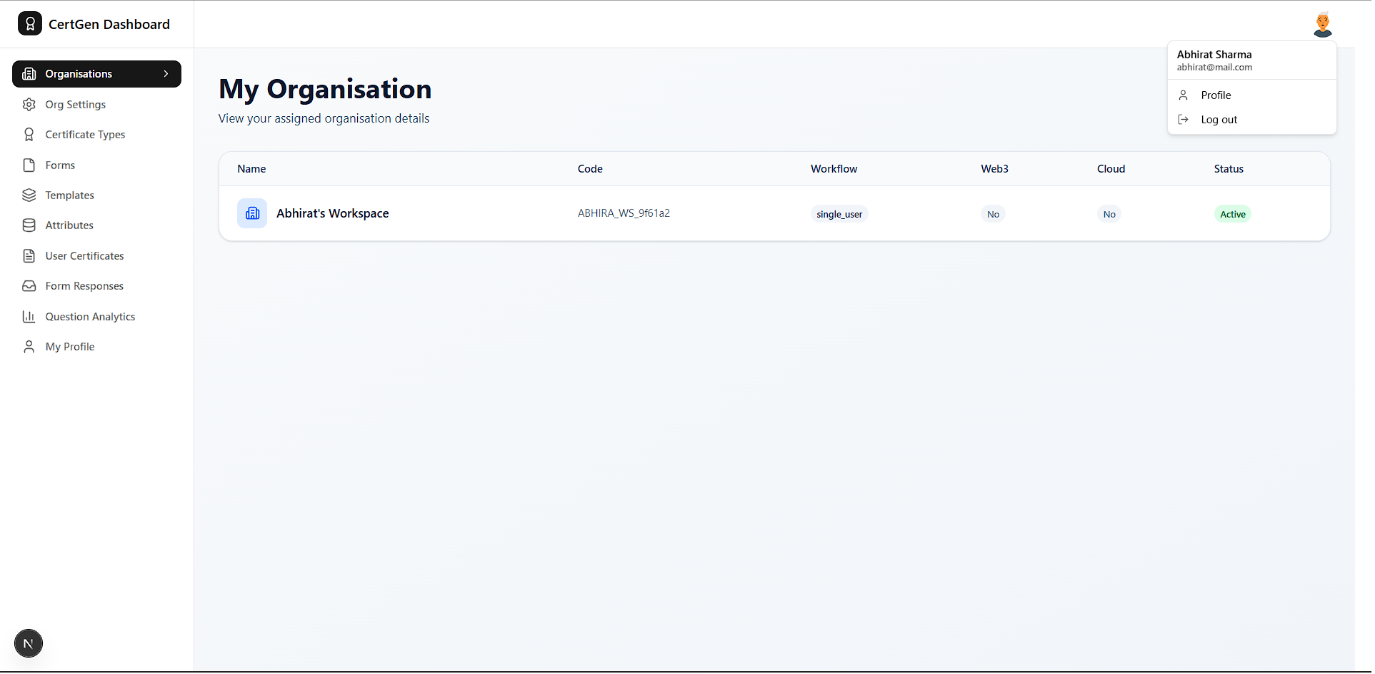
A personal account (not registered as Org Admin) still gets an auto-generated workspace, shown here with a single_user workflow.
Step 2.3.0: Open Organisation Settings
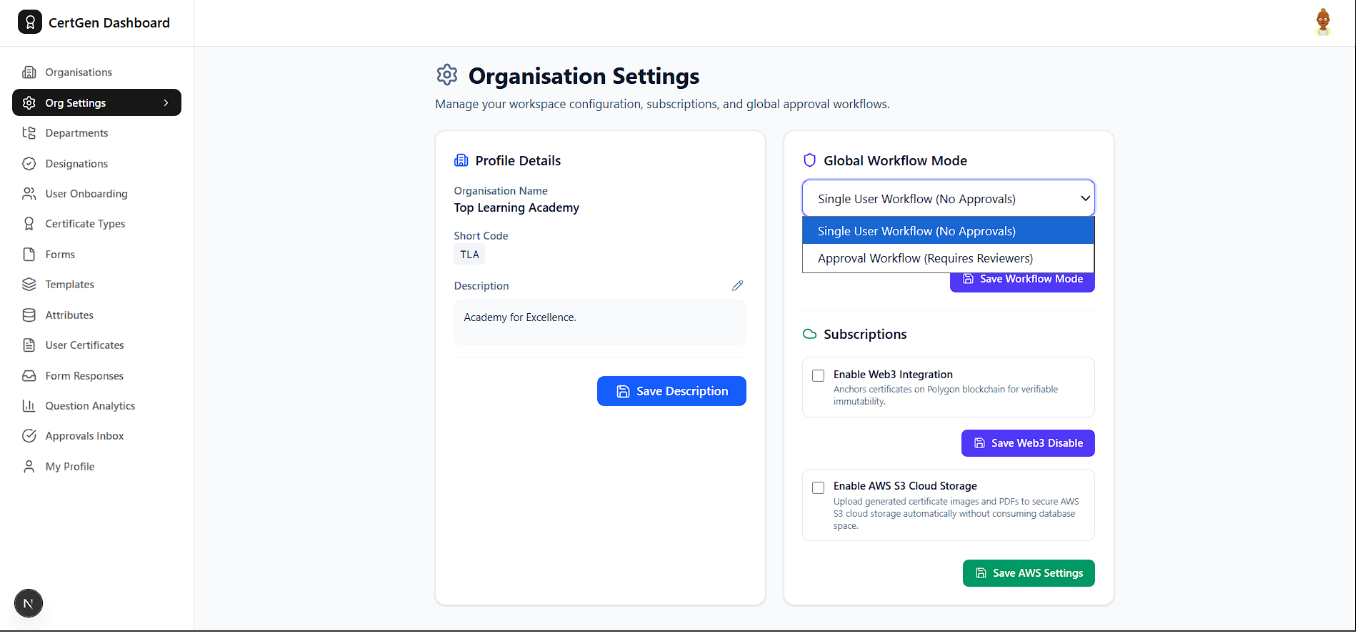
Go to Org Settings to manage Profile Details and set the Global Workflow Mode ? Single User (No Approvals) or Approval Workflow (Requires Reviewers).
Step 3.1.0: Open Departments
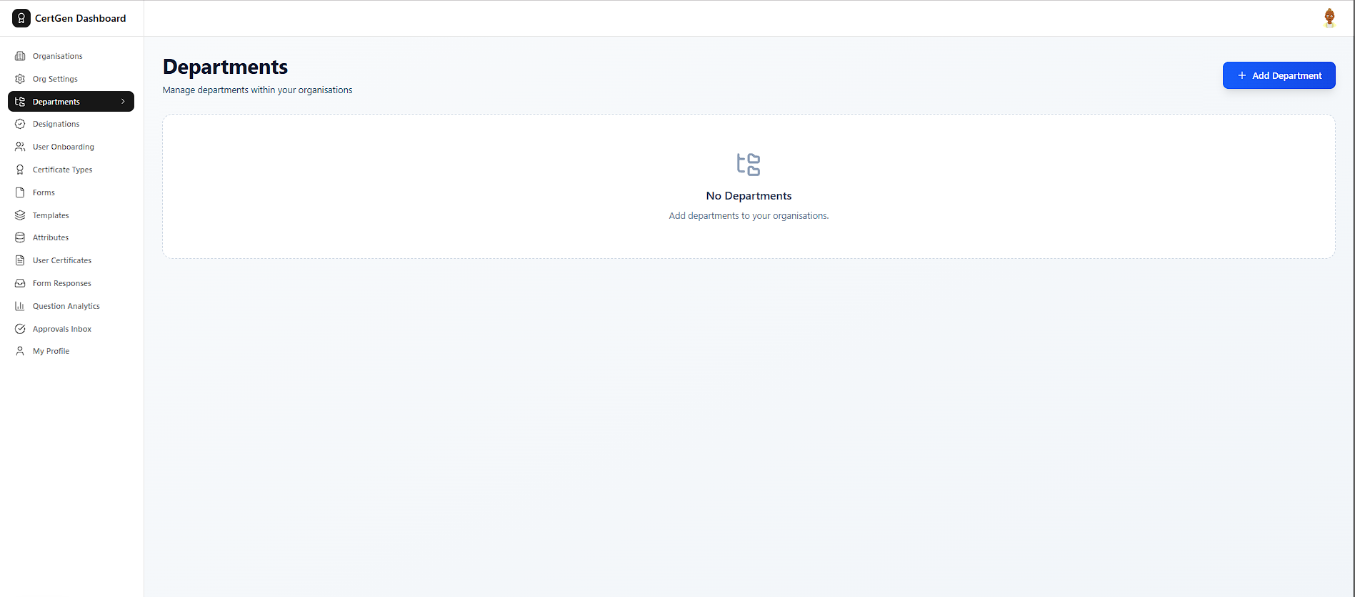
Go to Departments to manage the departments within your organisation; it starts empty until you add one.
Step 3.2.0: Add a Department
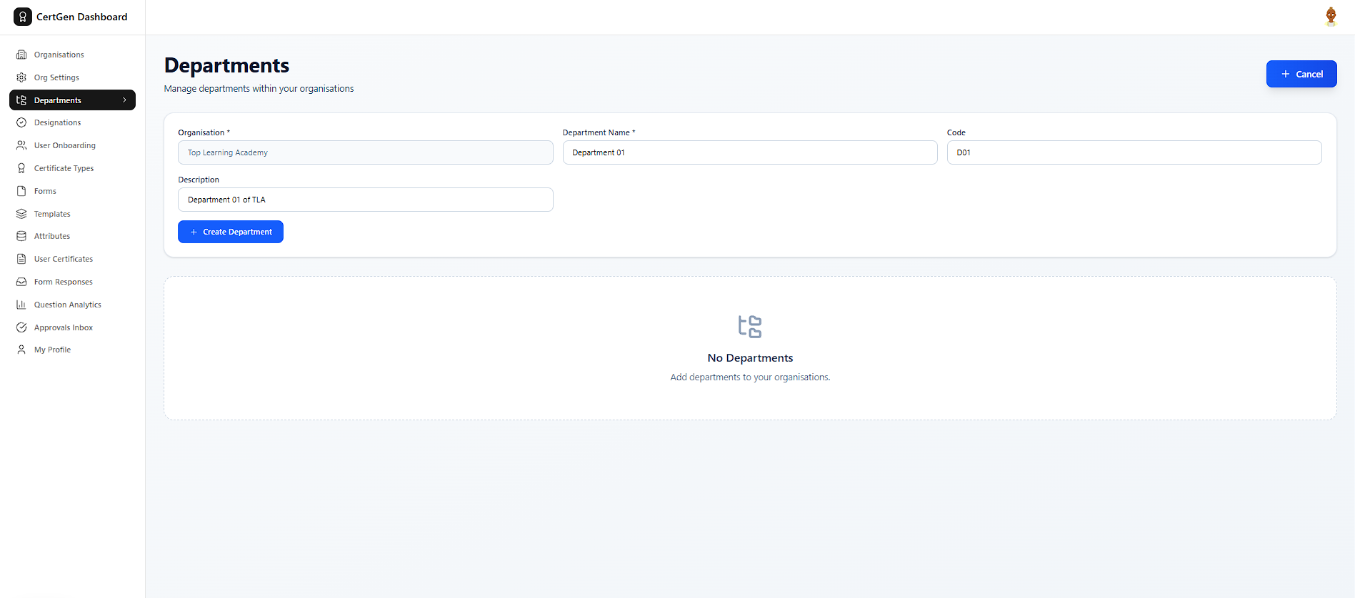
Click Add Department, select the Organisation, and enter a Department Name, Code and Description, then click Create Department.
Step 3.3.0: Department Created
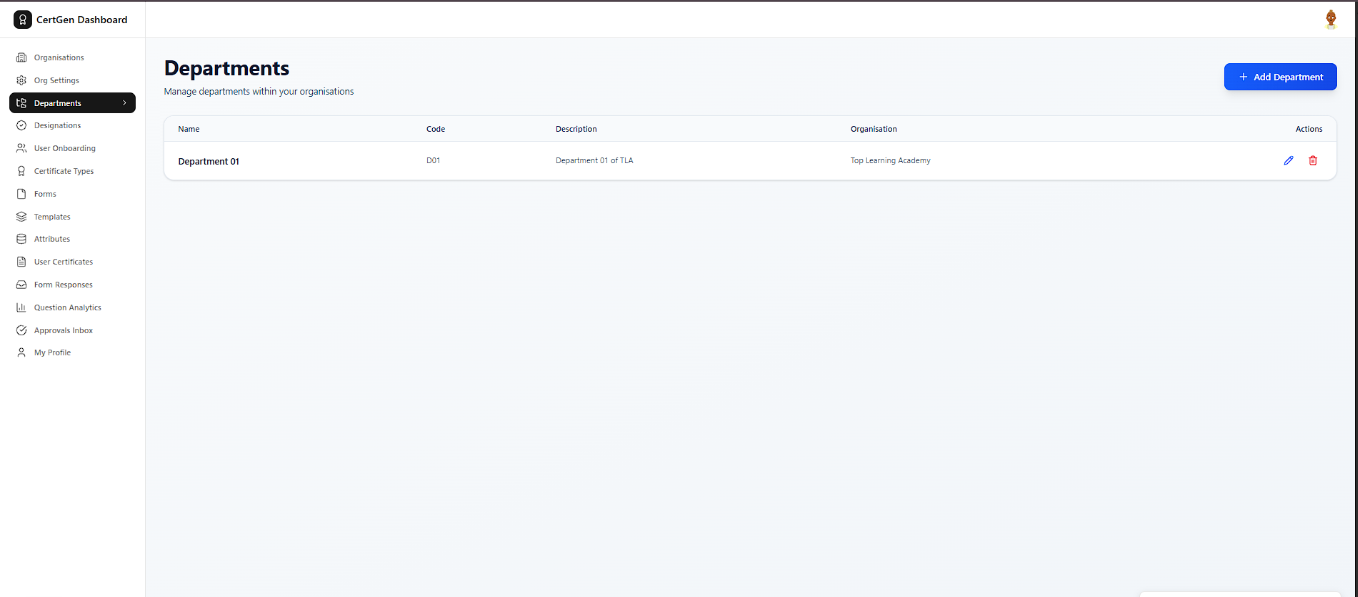
The new department now appears in the list with its code, description and parent organisation.
Step 4.1.0: Open Designations
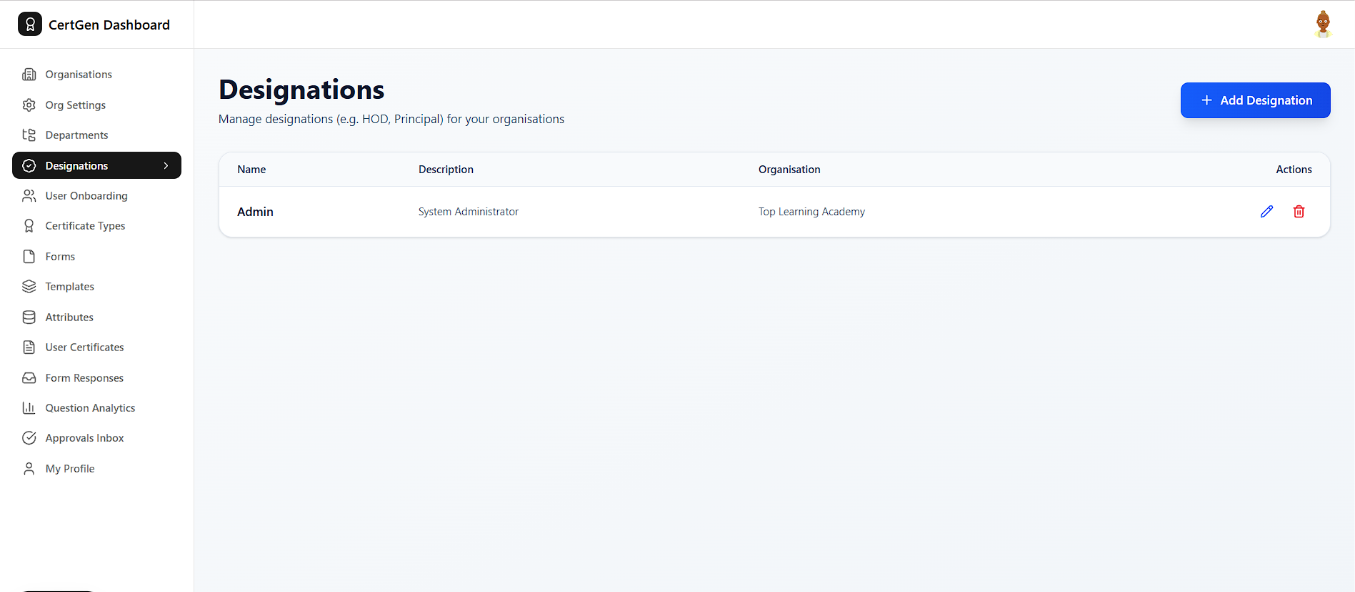
Go to Designations to manage roles such as HOD or Principal for your organisation.
Step 4.2.0: Add a Designation
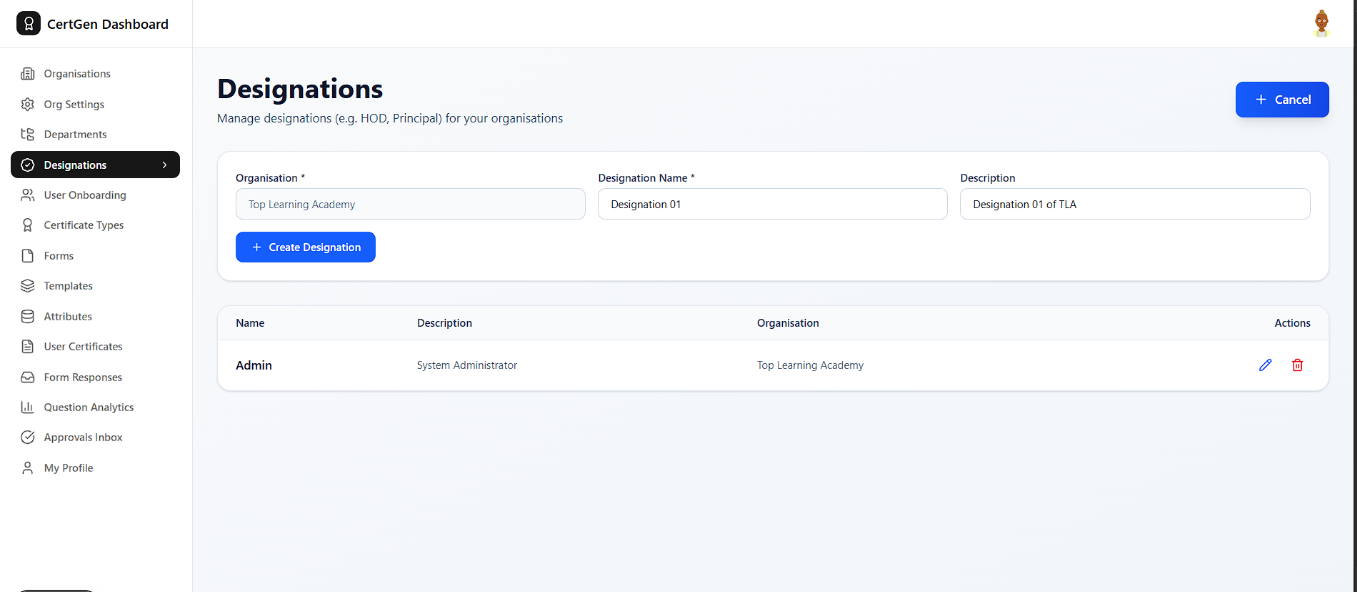
Click Add Designation, fill in the Organisation, Designation Name and Description, then click Create Designation.
Step 5.1.0: Invite a User
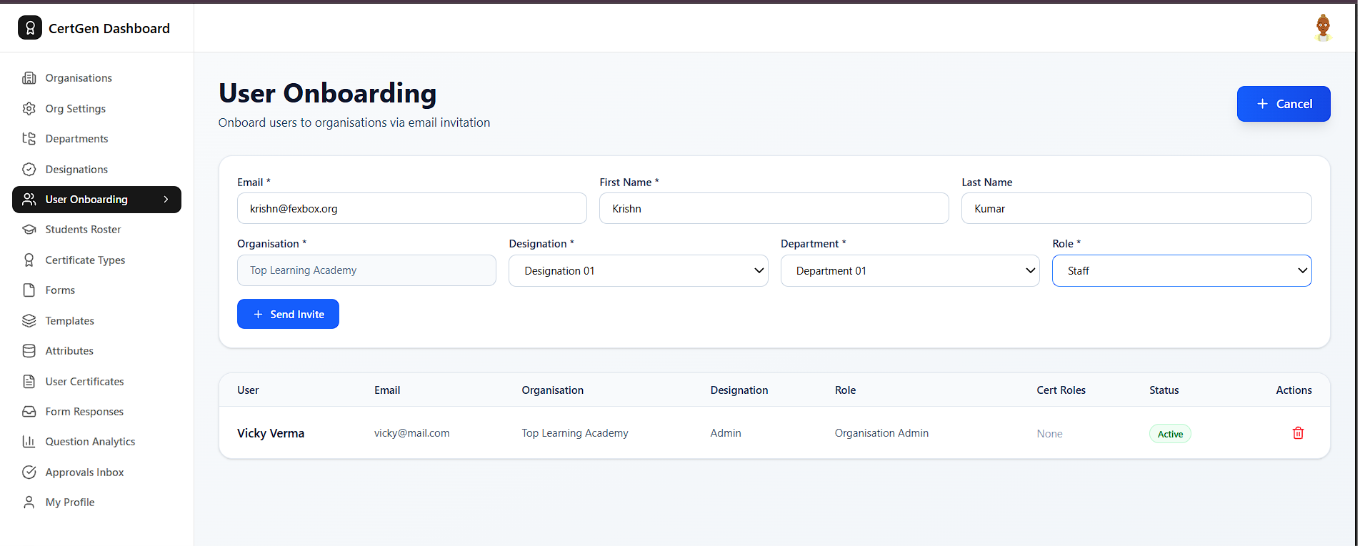
Go to User Onboarding, fill in the invitee?s Email, Name, Organisation, Designation, Department and Role, then click Send Invite.
Step 5.2.0: Confirm the Invitation
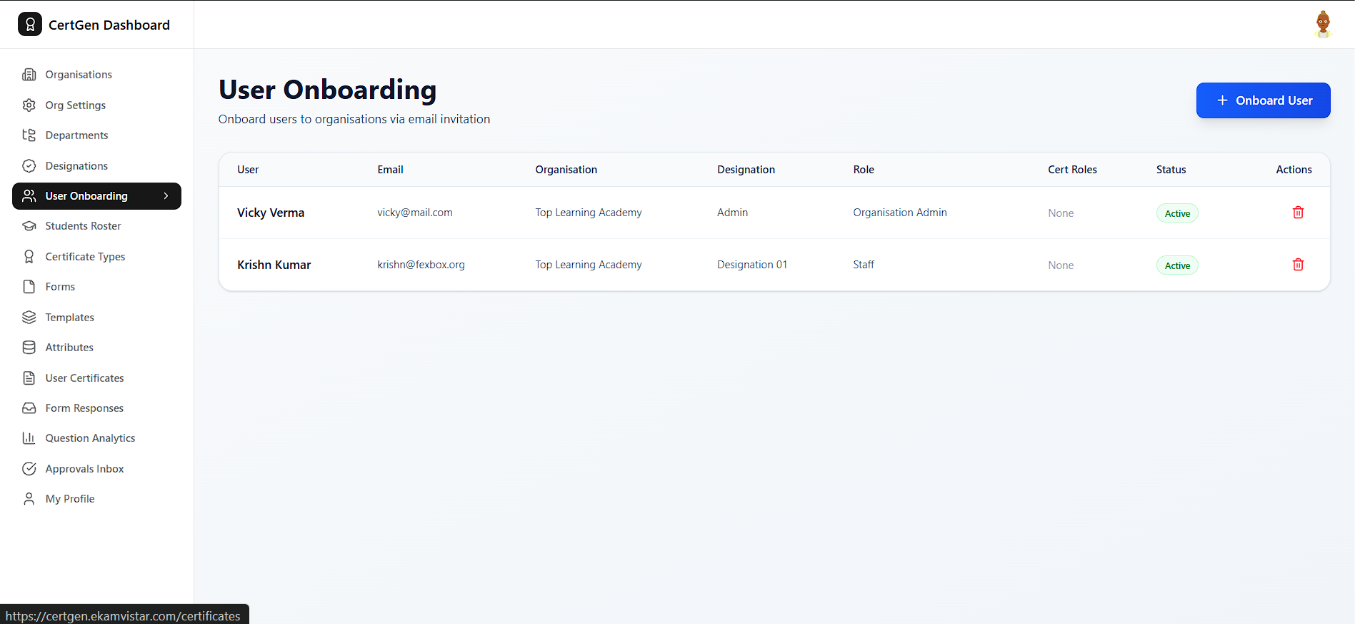
The invited user appears in the list with their Designation, Role and an Active status.
Step 6.1.0: Open Certificate Types
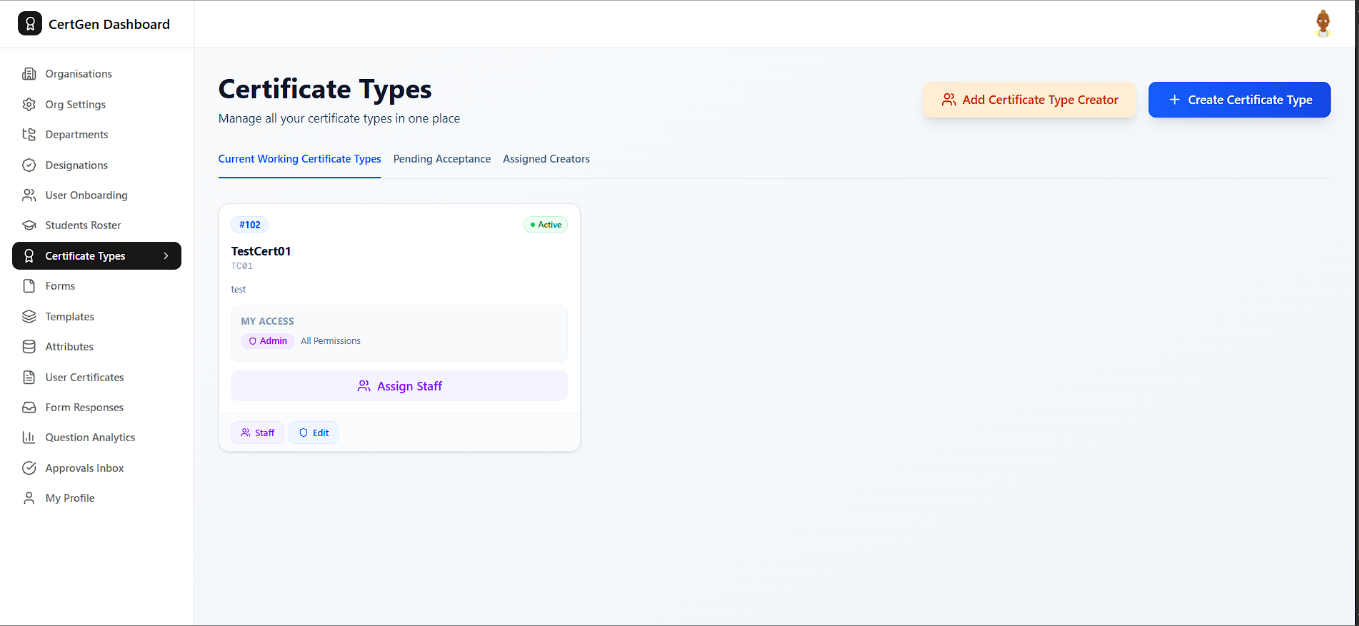
Go to Certificate Types to view existing types; each card shows your access level and lets you Assign Staff or Edit.
Step 6.2.0: Add a Certificate Type Creator
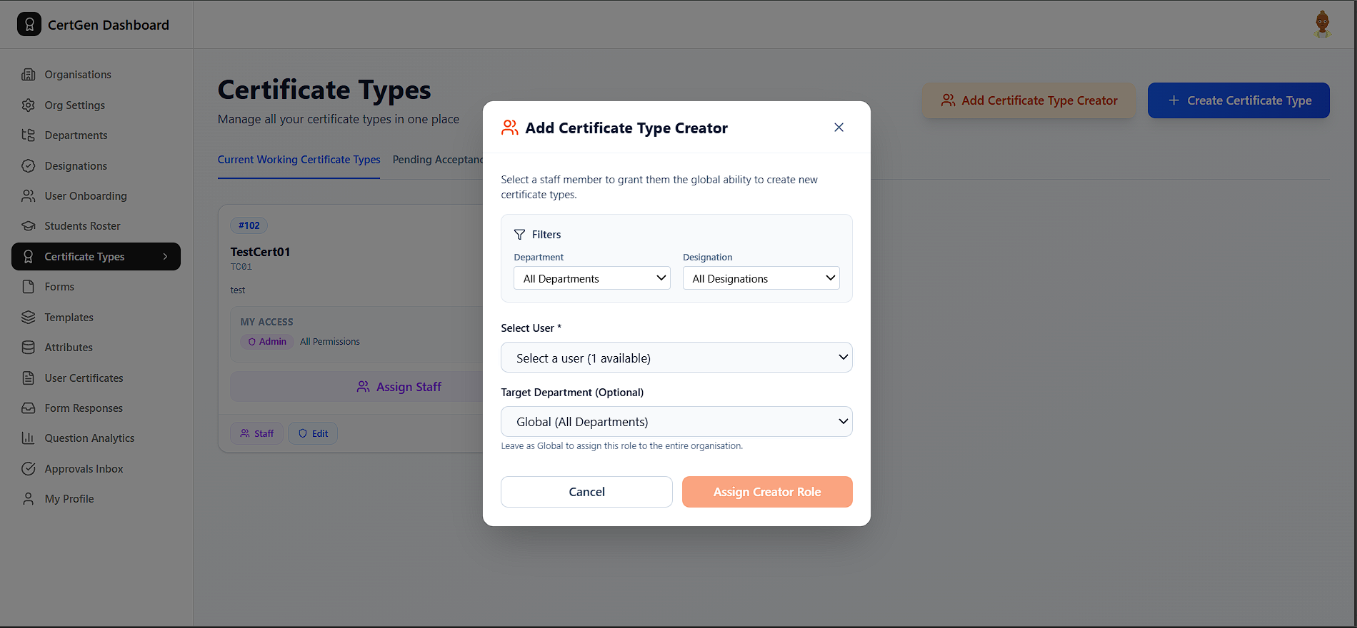
Click Add Certificate Type Creator, then filter by Department/Designation and pick a user to grant them the ability to create new certificate types.
Step 6.3.0: Choose the Target Department
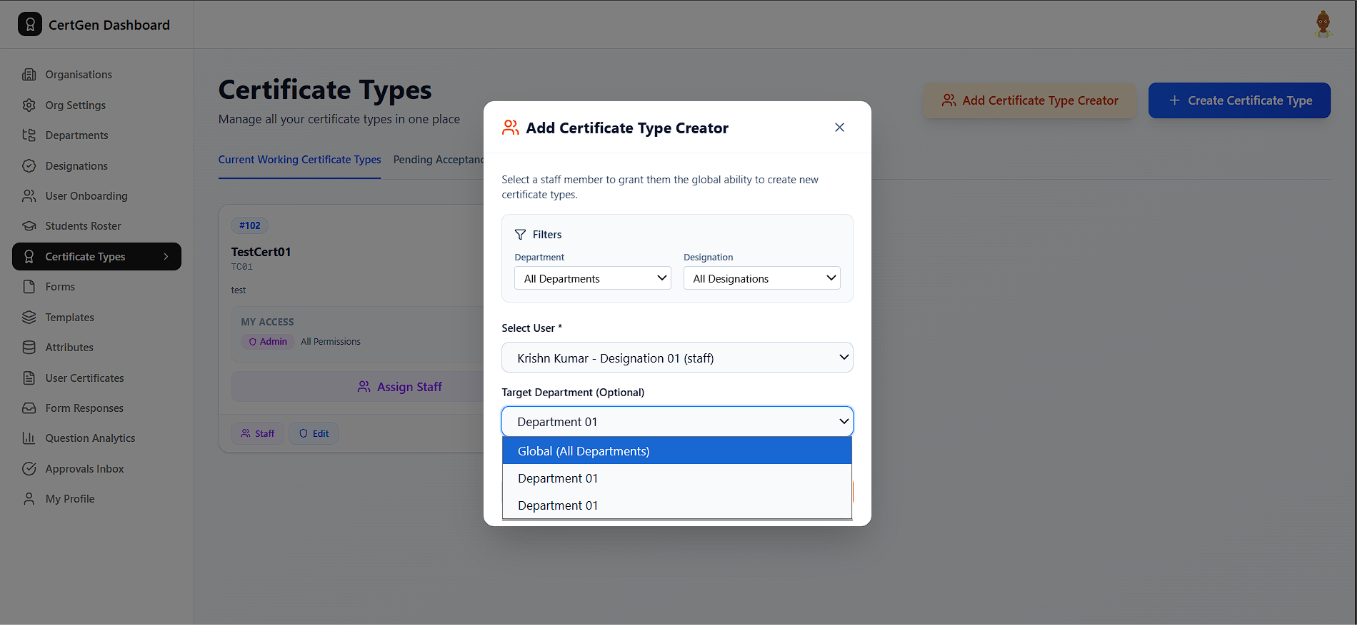
Select the staff member, then choose a Target Department or leave it as Global to apply the role organisation-wide.
Step 6.4.0: Check Assigned Creators
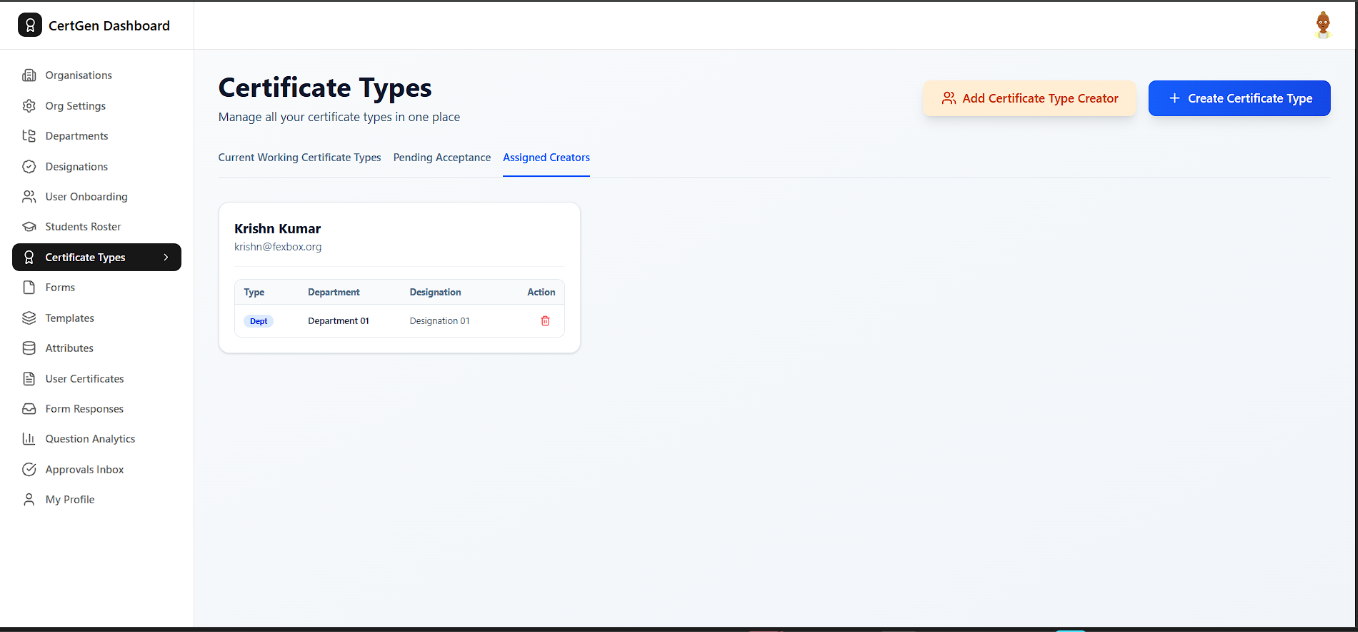
The Assigned Creators tab lists each user with creator access and the department/designation it applies to.
Step 6.5.0: Creator?s View: No Certificates Yet
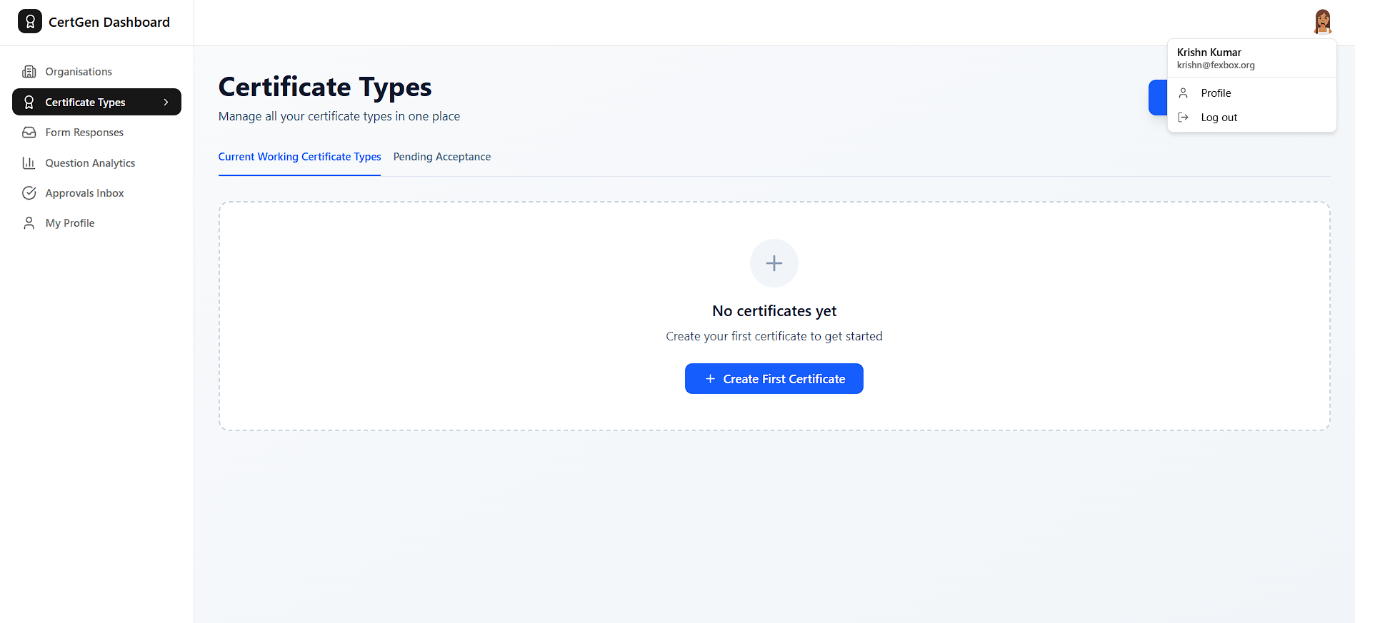
The assigned creator sees a simplified menu and can click Create First Certificate to add a new certificate type.
Step 6.6.0: Revoke a Creator Role
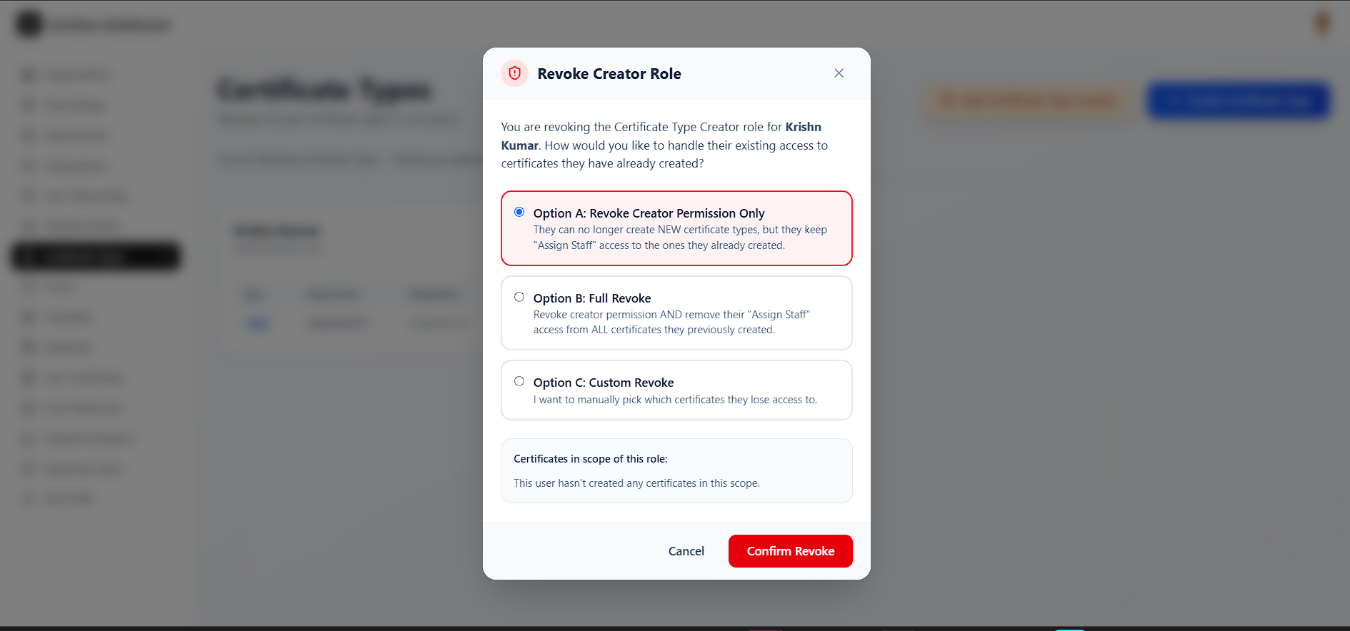
To remove creator access, choose Revoke Creator Permission Only, Full Revoke, or Custom Revoke, then click Confirm Revoke.
Step 6.7.0: After Revoking Access
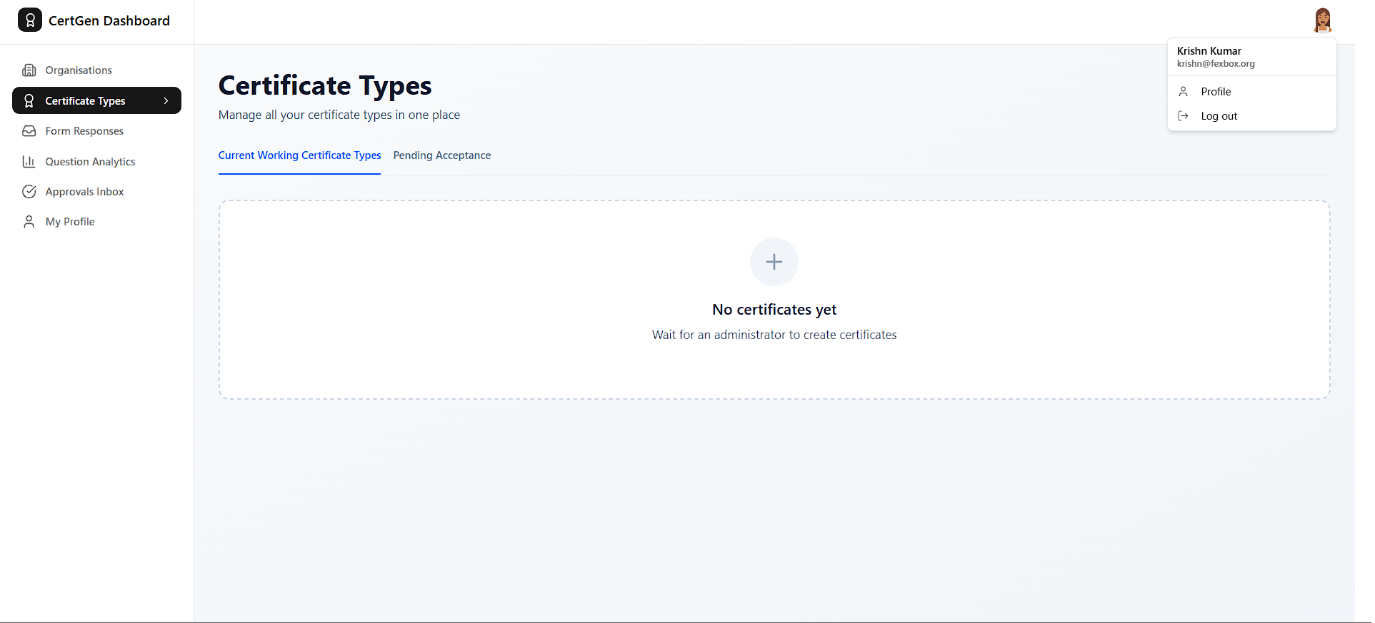
Once revoked, the user?s Certificate Types page shows ?Wait for an administrator to create certificates.?
Step 6.8.0: Create a New Certificate Type
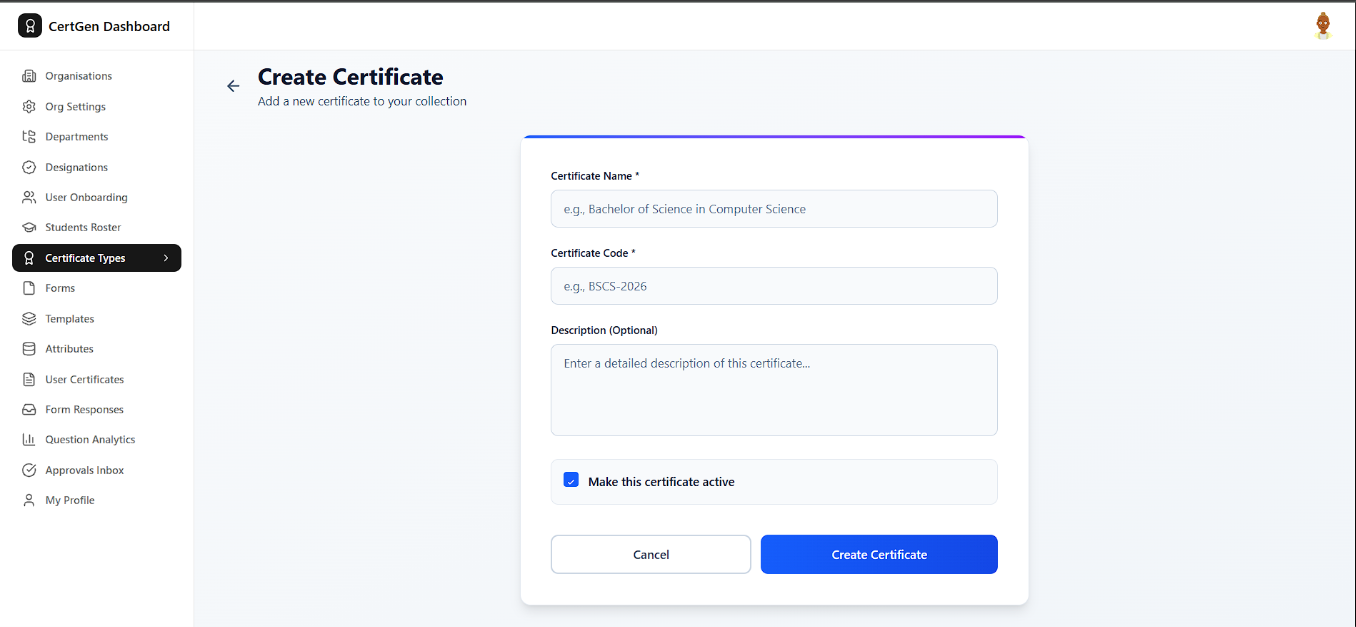
Click Create Certificate Type and enter a Certificate Name, Code and optional Description, keeping Make this certificate active checked.
Step 6.9.0: Certificate Type Created
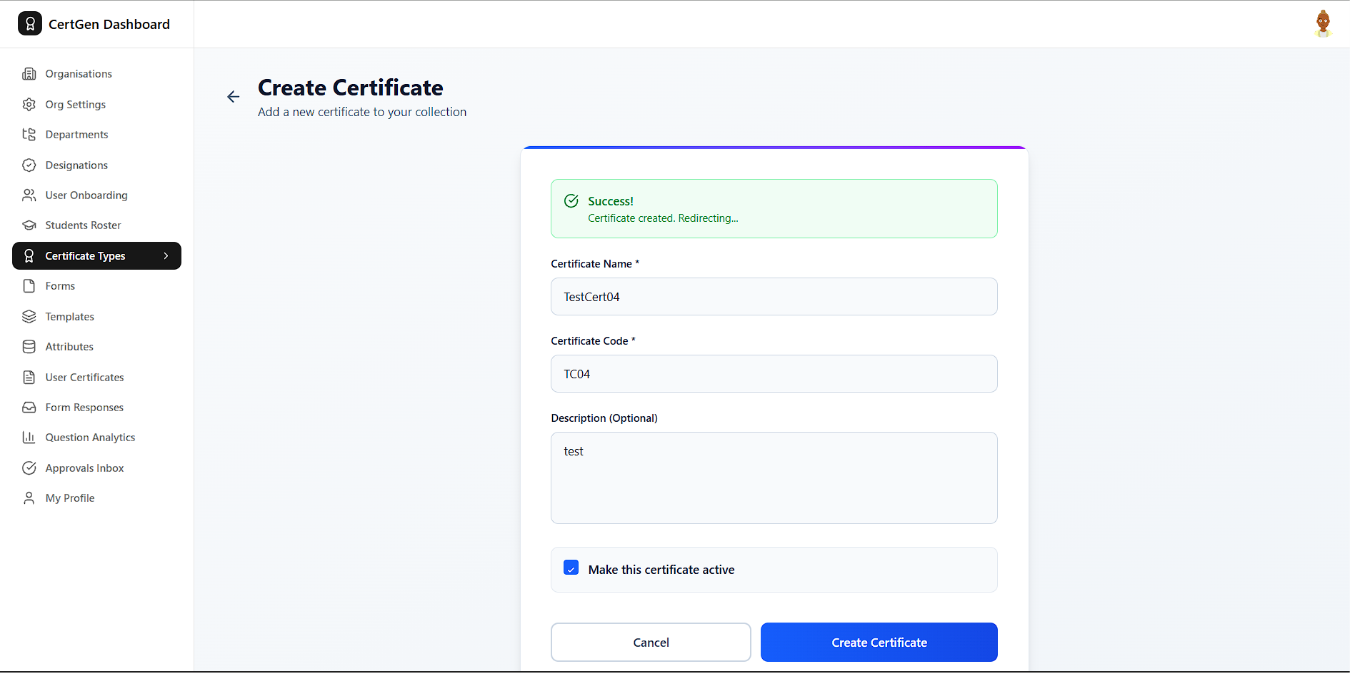
A success banner confirms the certificate type was created and the page redirects automatically.
Step 6.10.0: Review All Certificate Types
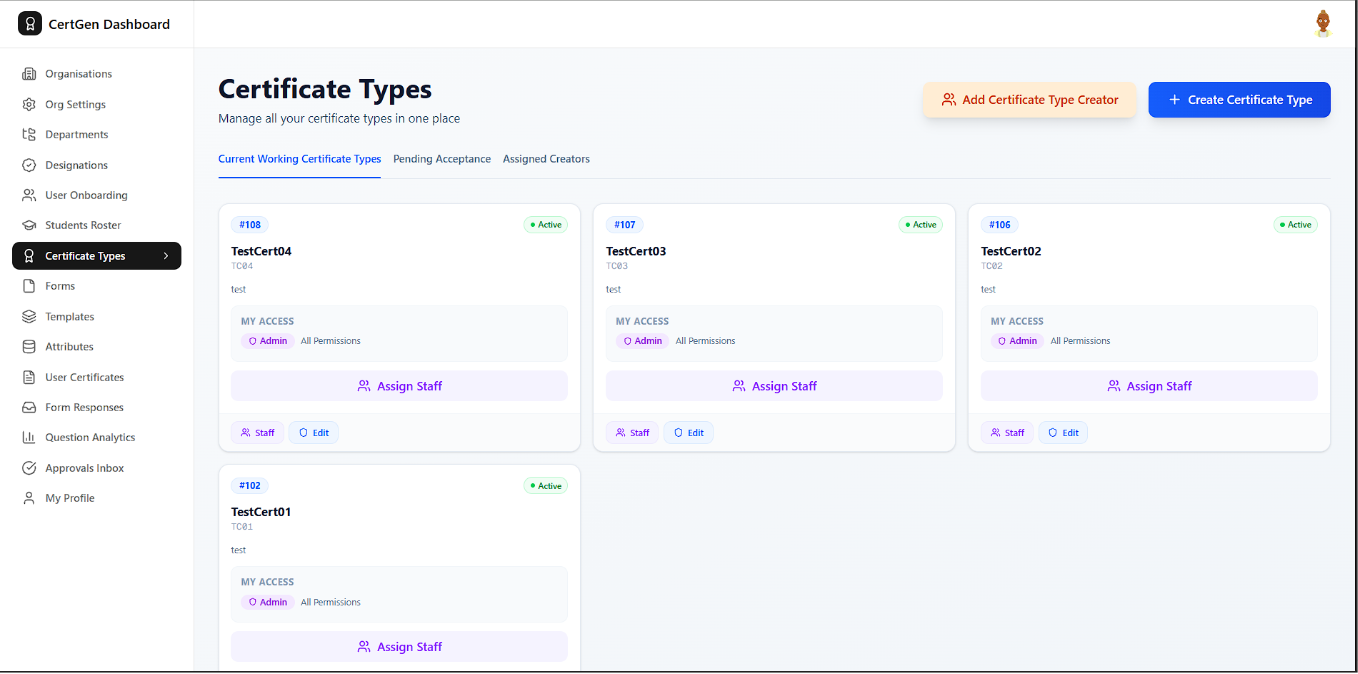
The Current Working Certificate Types tab now lists every active type as a card with quick access to Assign Staff.
Step 6.11.0: Open Assign Staff and Choose a Workflow
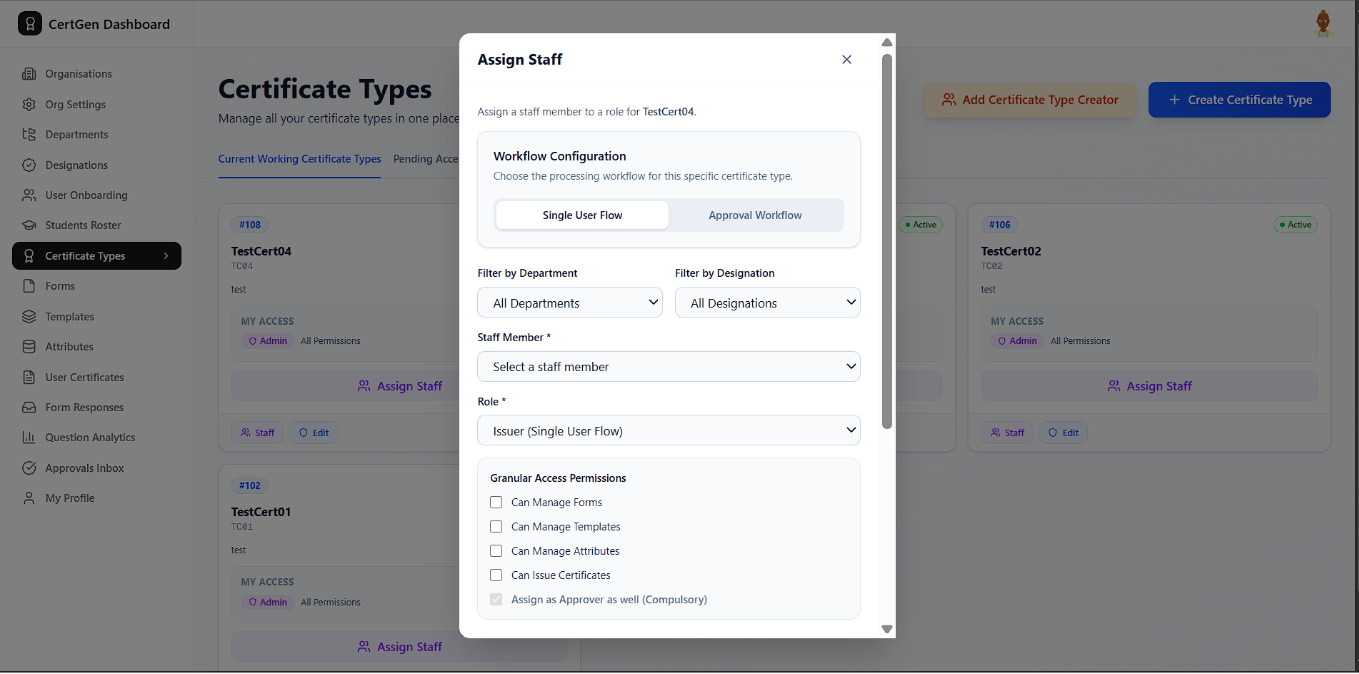
Click Assign Staff on a certificate type, then pick Single User Flow before selecting a staff member.
Step 6.12.0: Review Certificate Creator and Assigned Staff
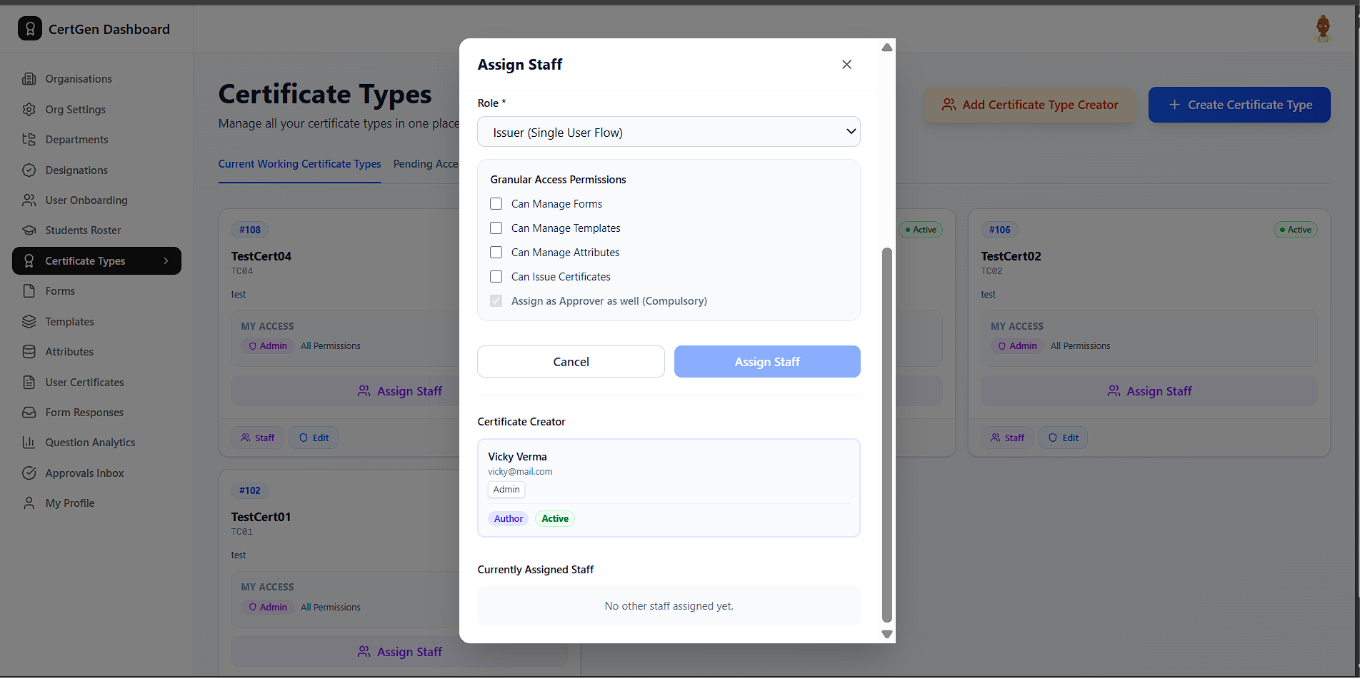
Scroll down in the same dialog to see the Certificate Creator and any staff already assigned to this certificate type.
Step 6.13.0: Pick a Role for Single User Flow
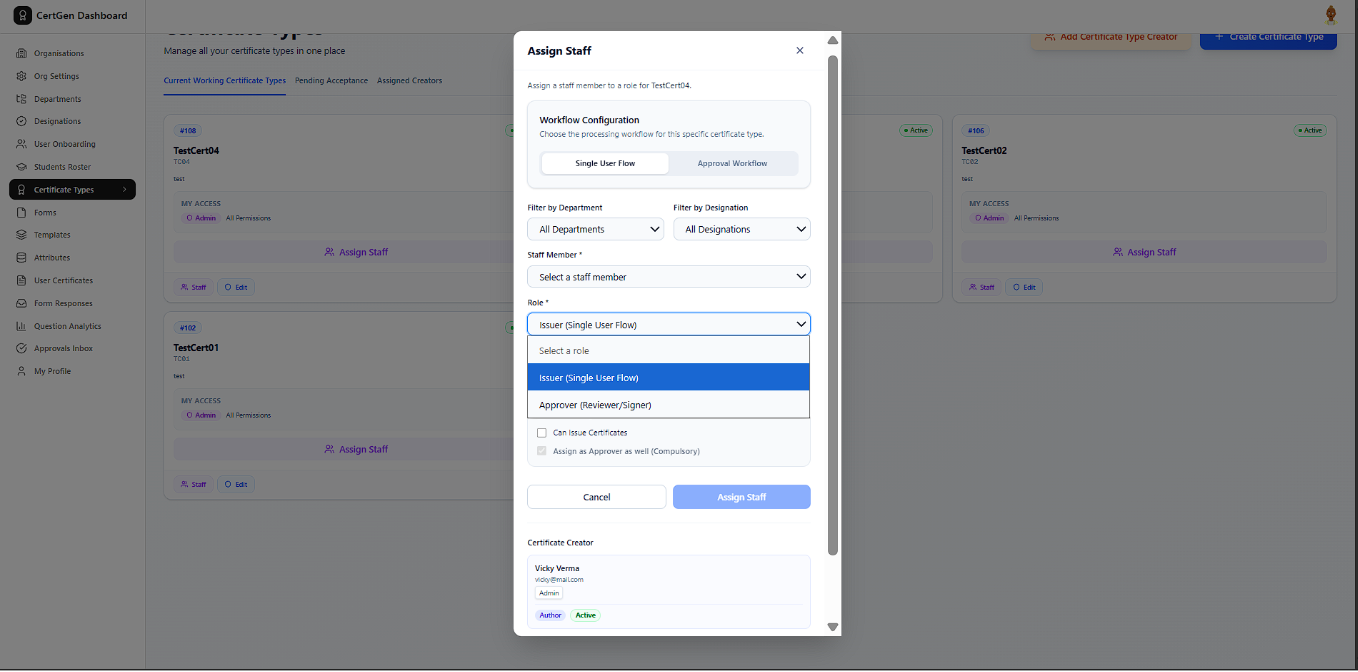
For Single User Flow, choose a Role ? Issuer or Approver ? from the dropdown.
Step 6.14.0: Assign the Approver Role
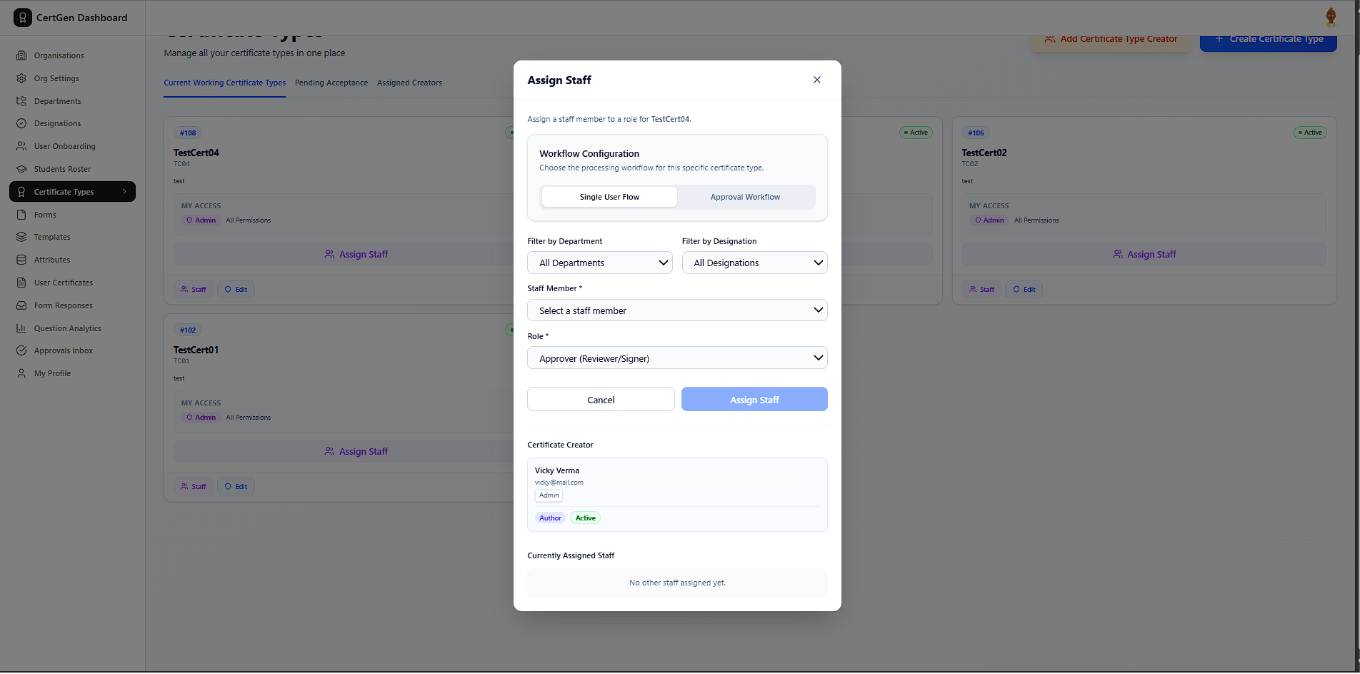
Selecting Approver (Reviewer/Signer) removes the granular permission checkboxes, since approvers only review and sign.
Step 6.15.0: Set Granular Permissions for an Issuer
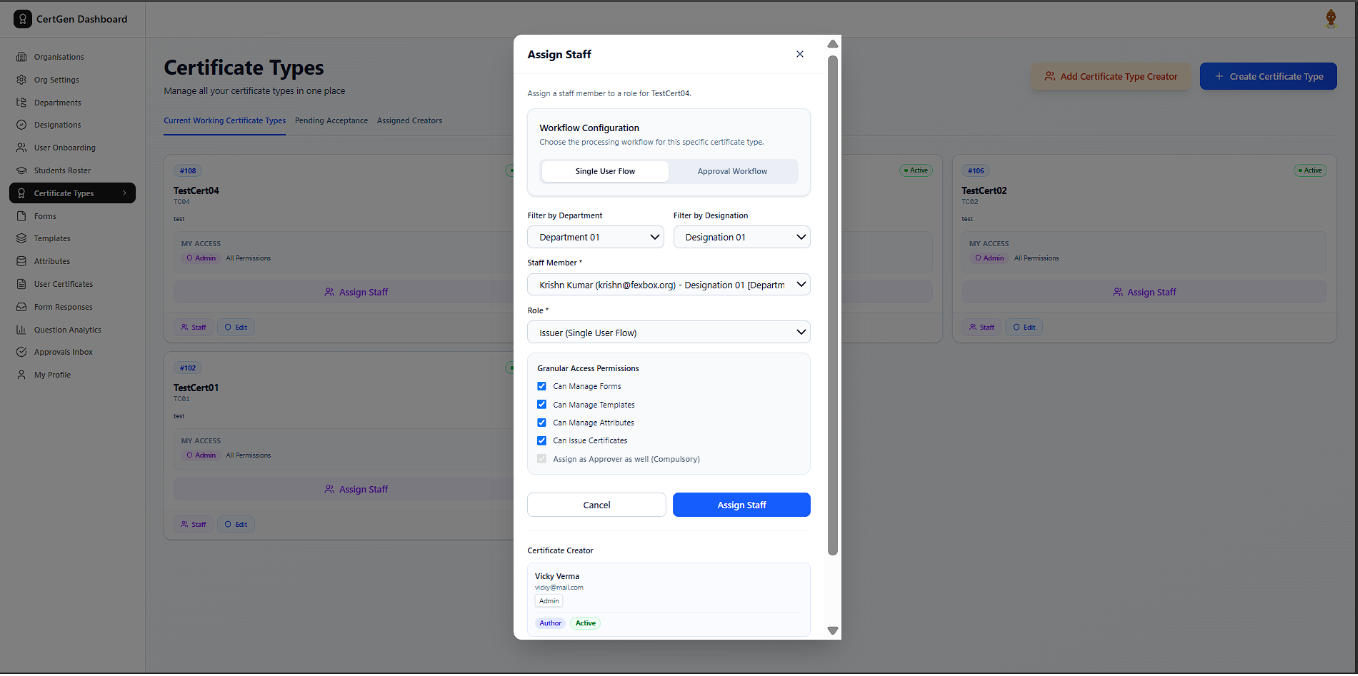
For the Issuer role, filter by Department/Designation, pick the staff member, and check the specific permissions to grant (Forms, Templates, Attributes, Issue Certificates).
Step 6.16.0: Switch to Approval Workflow
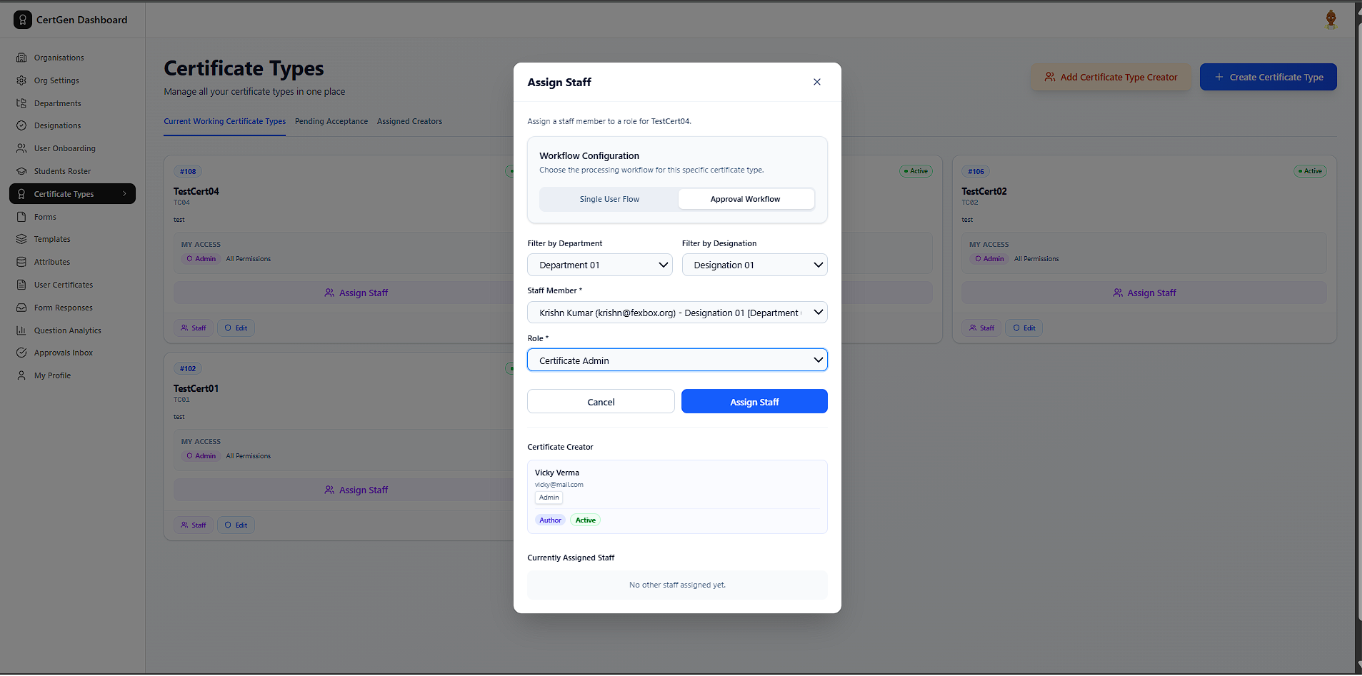
Toggle Approval Workflow, then choose a Role such as Certificate Admin for a broader administrative assignment.
Step 6.17.0: See All Approval Workflow Roles
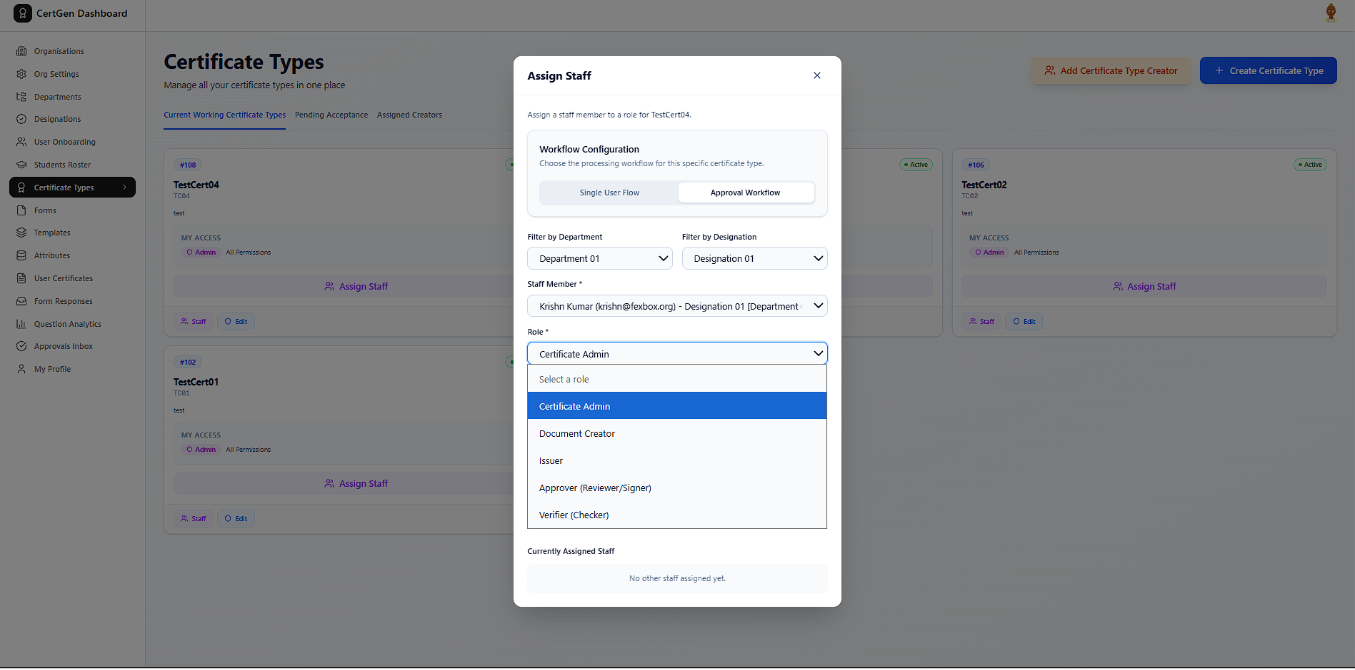
The Role dropdown for Approval Workflow offers Certificate Admin, Document Creator, Issuer, Approver (Reviewer/Signer) and Verifier (Checker).
Step 6.18.0: Assign a Document Creator
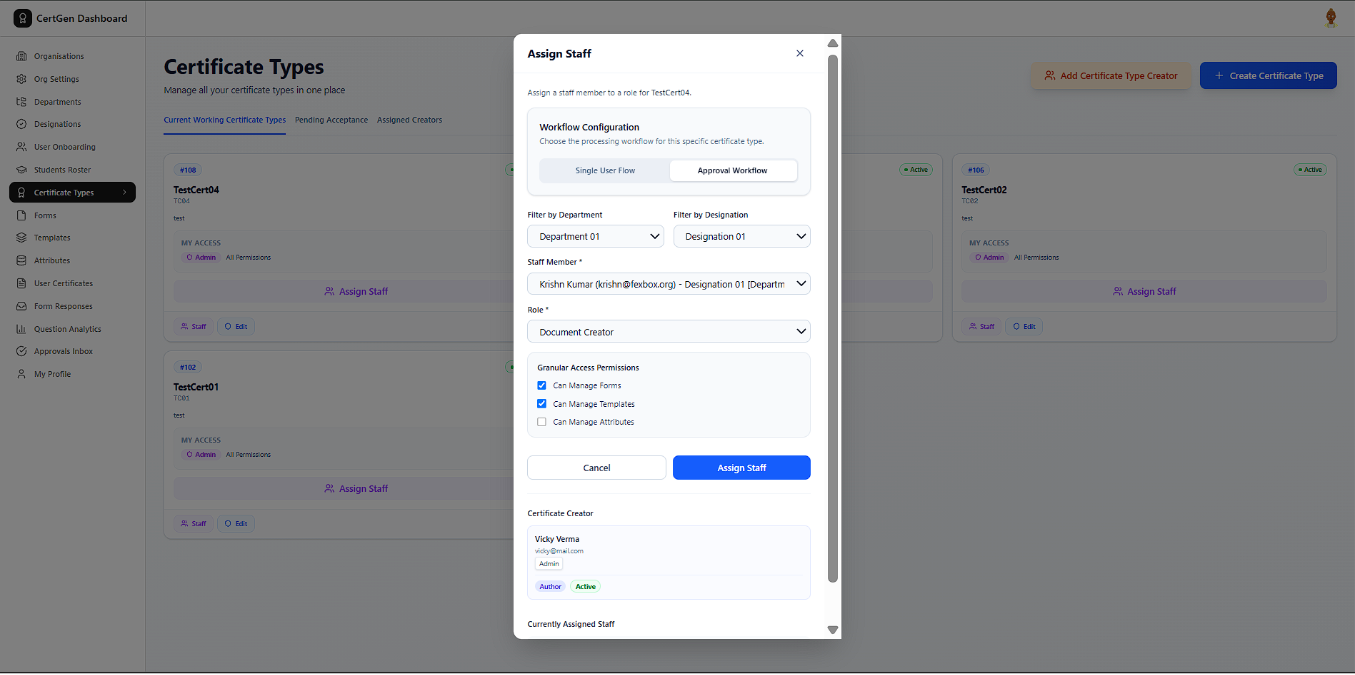
Document Creator grants permissions like Can Manage Forms and Can Manage Templates.
Step 6.19.0: Assign an Issuer under Approval Workflow
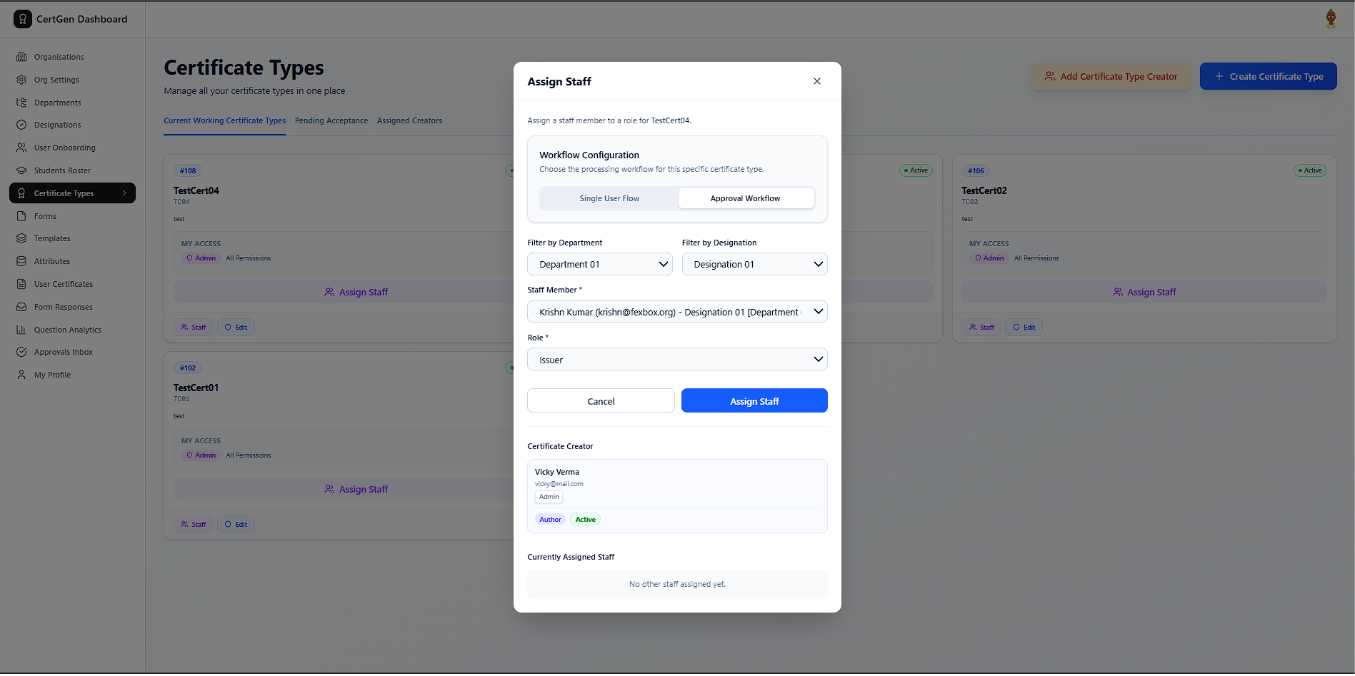
Choosing Issuer under Approval Workflow lets the staff member issue certificates once approvals are complete.
Step 6.20.0: Assign an Approver
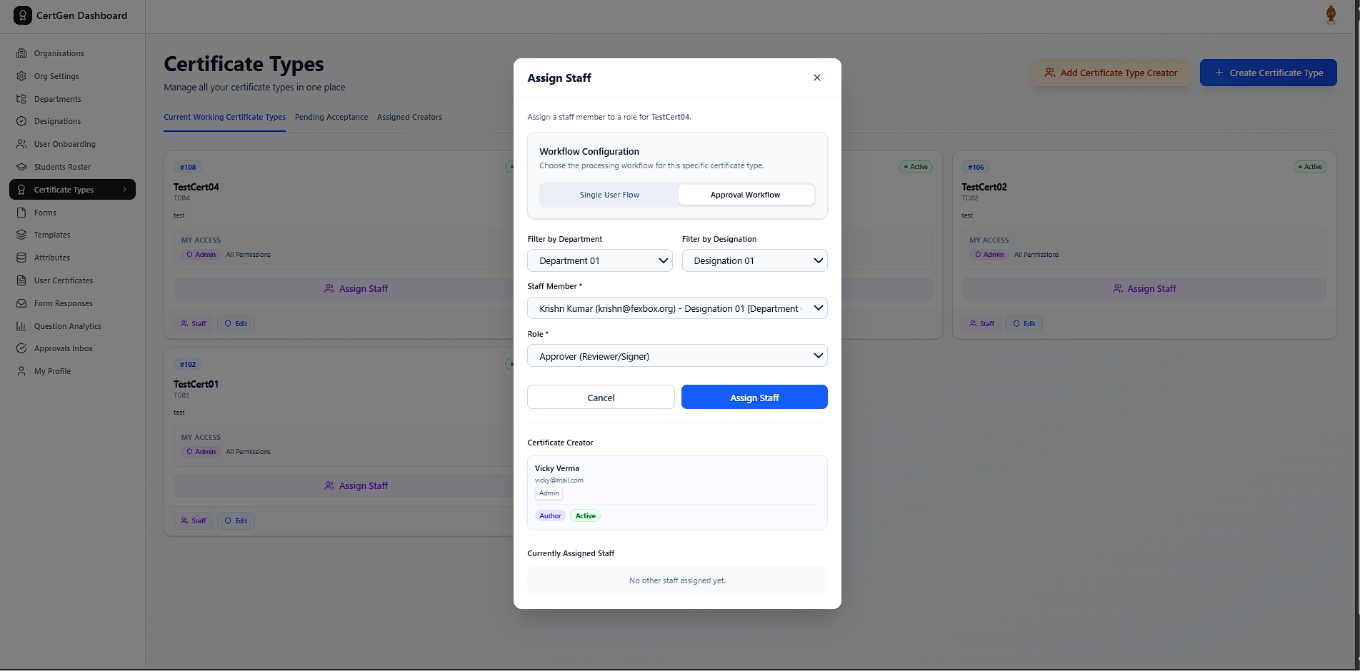
Approver (Reviewer/Signer) marks the staff member as a required reviewer before a certificate is finalized.
Step 6.21.0: Assign a Verifier
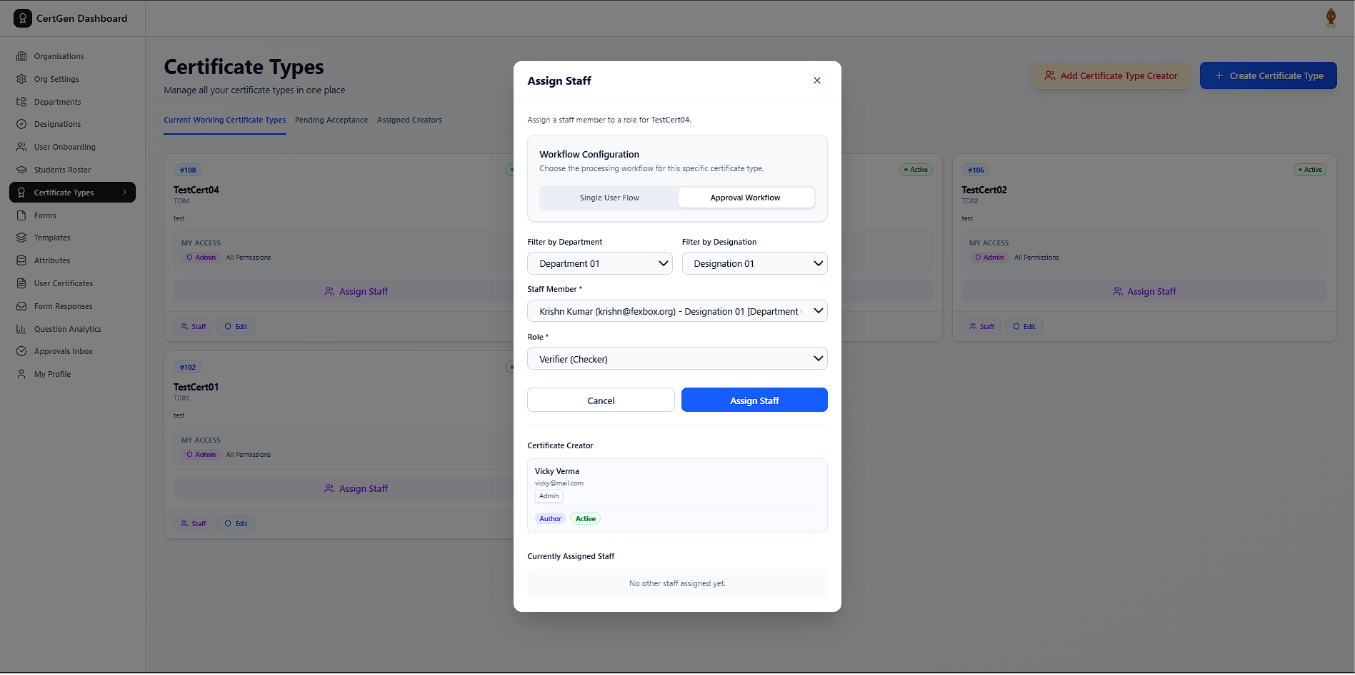
Verifier (Checker) adds an extra checking step in the approval chain.
Step 6.22.0: Confirm Pending Role Assignments
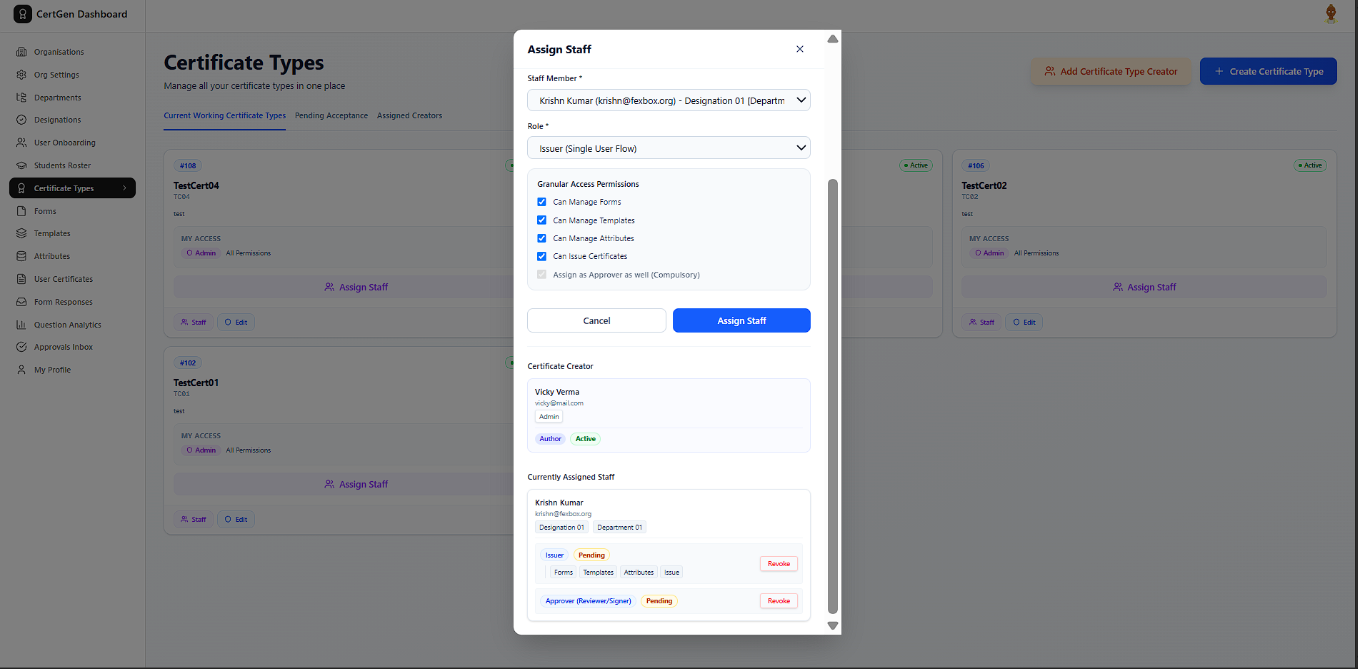
The Currently Assigned Staff list shows each role as Pending until the staff member accepts it, with a Revoke option available.
Step 6.23.0: Accept or Decline a Role Invitation
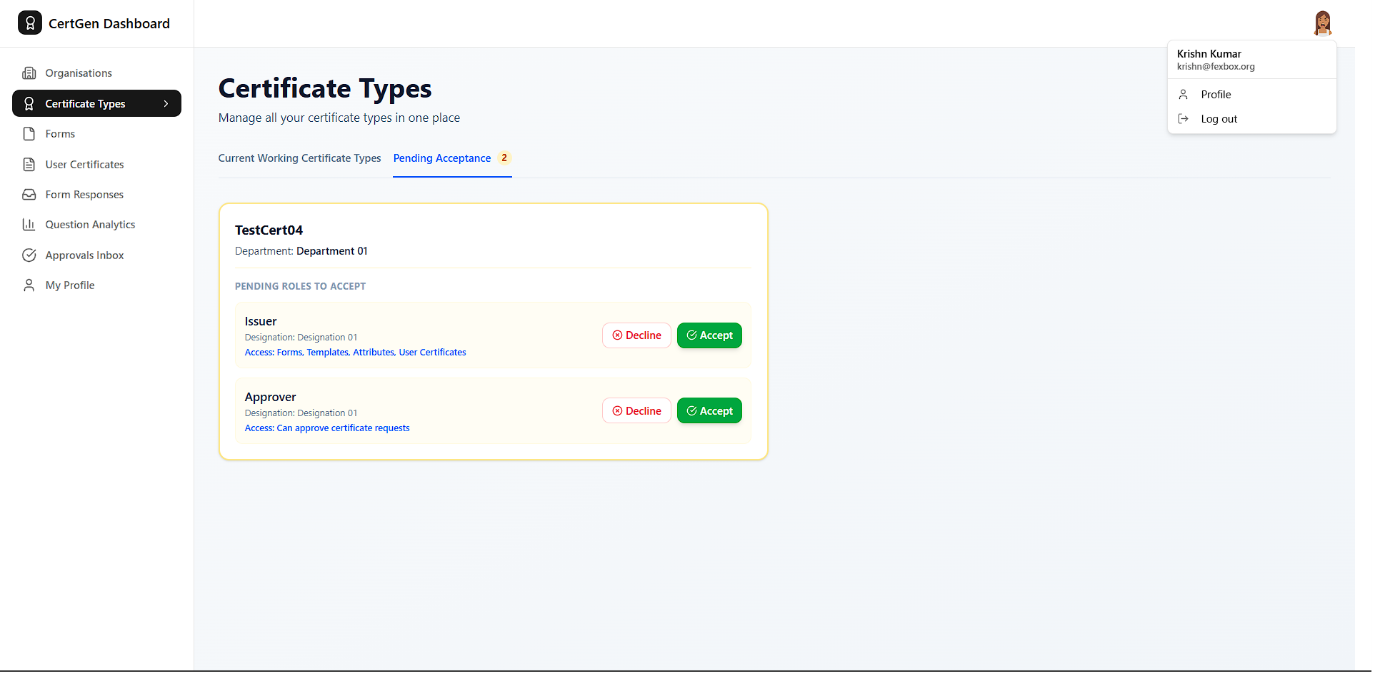
The invited staff member sees pending roles under Pending Acceptance and can Accept or Decline each one, along with its access details.
Step 6.24.0: Confirm Active Roles
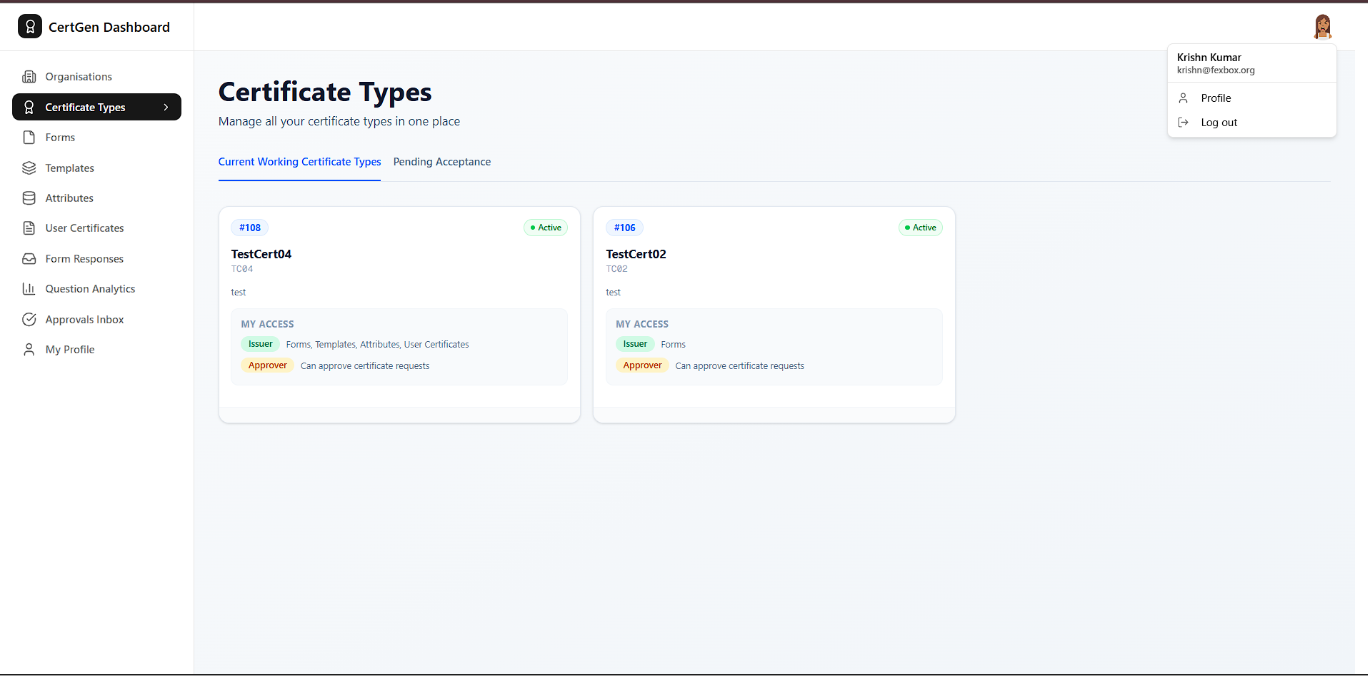
Once accepted, the certificate type cards show the user?s active Issuer and Approver access with the specific permissions granted.
Step 7.0.1: Open the Forms Manager
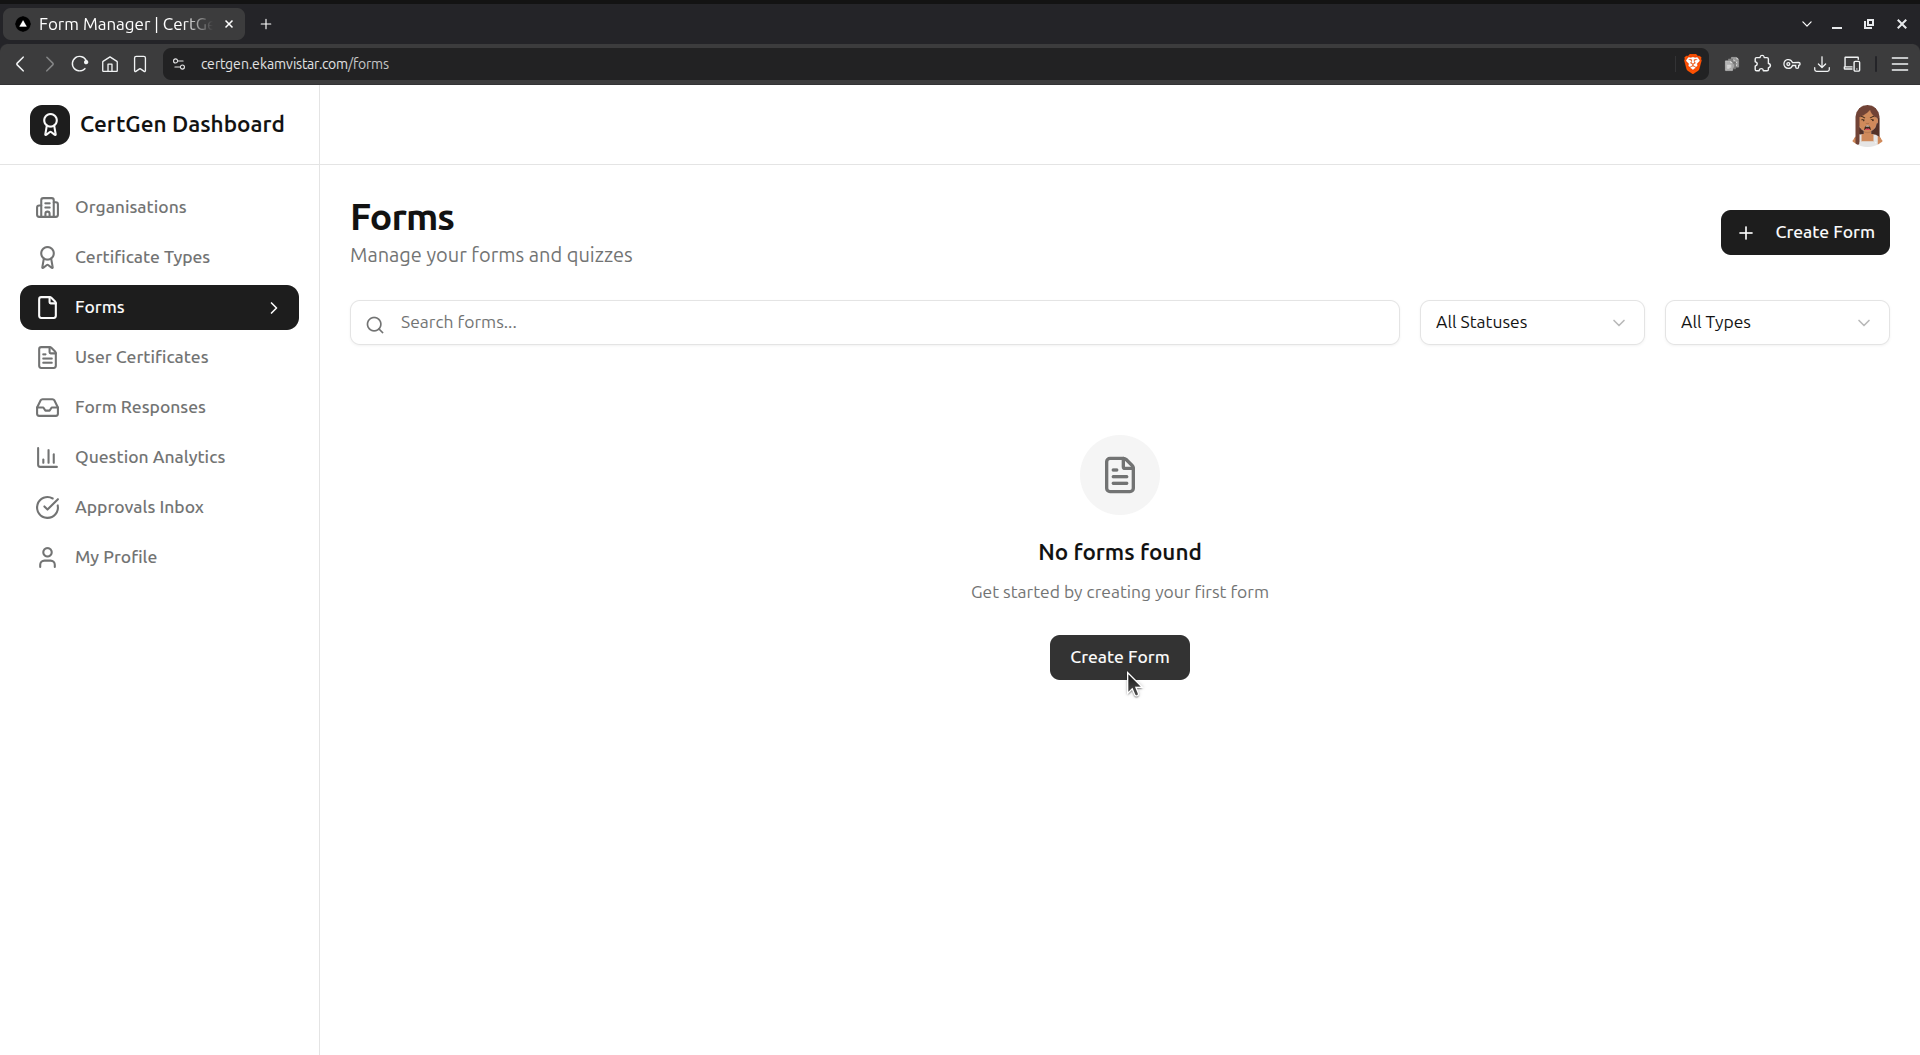
Go to Forms to see all forms and quizzes for your organisation; click Create Form to start a new one.
Step 7.0.2: Choose the Target Certificate
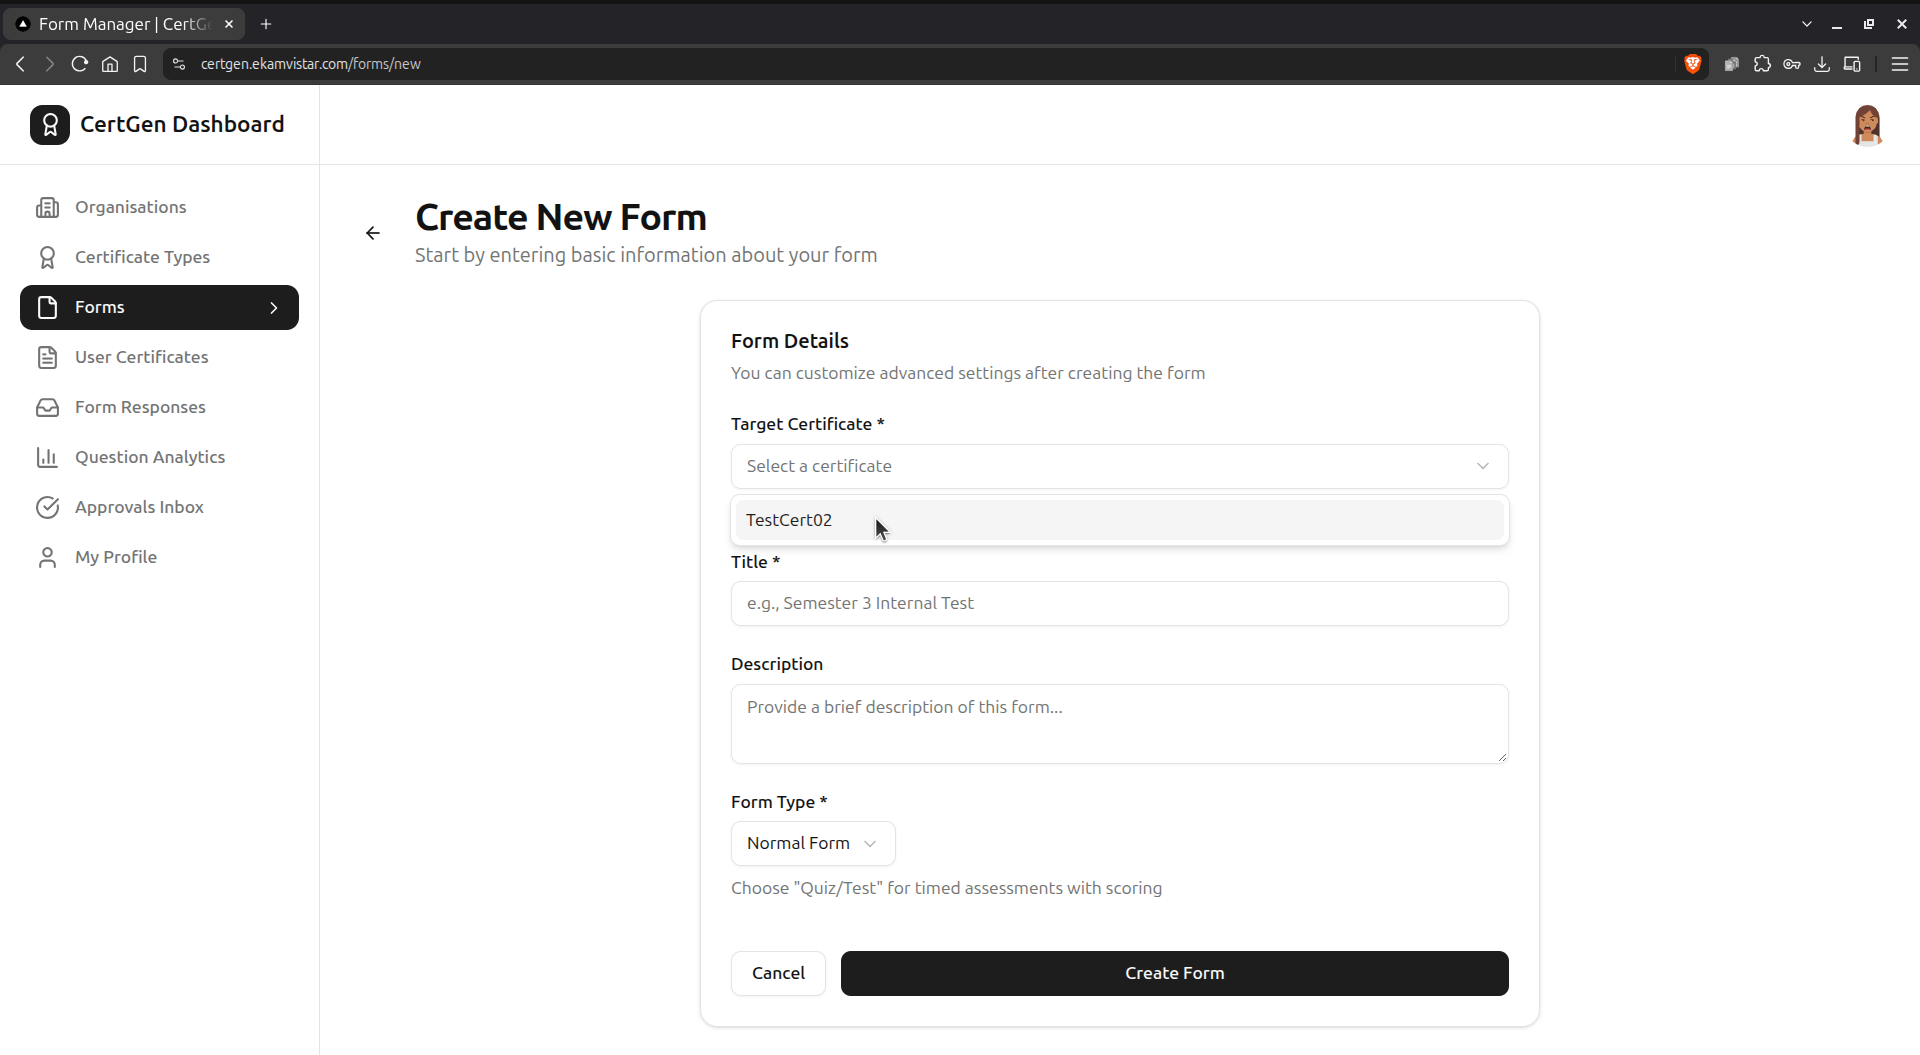
On Create New Form, open the Target Certificate dropdown and select which certificate this form will collect data for.
Step 7.0.3: Fill in Form Details
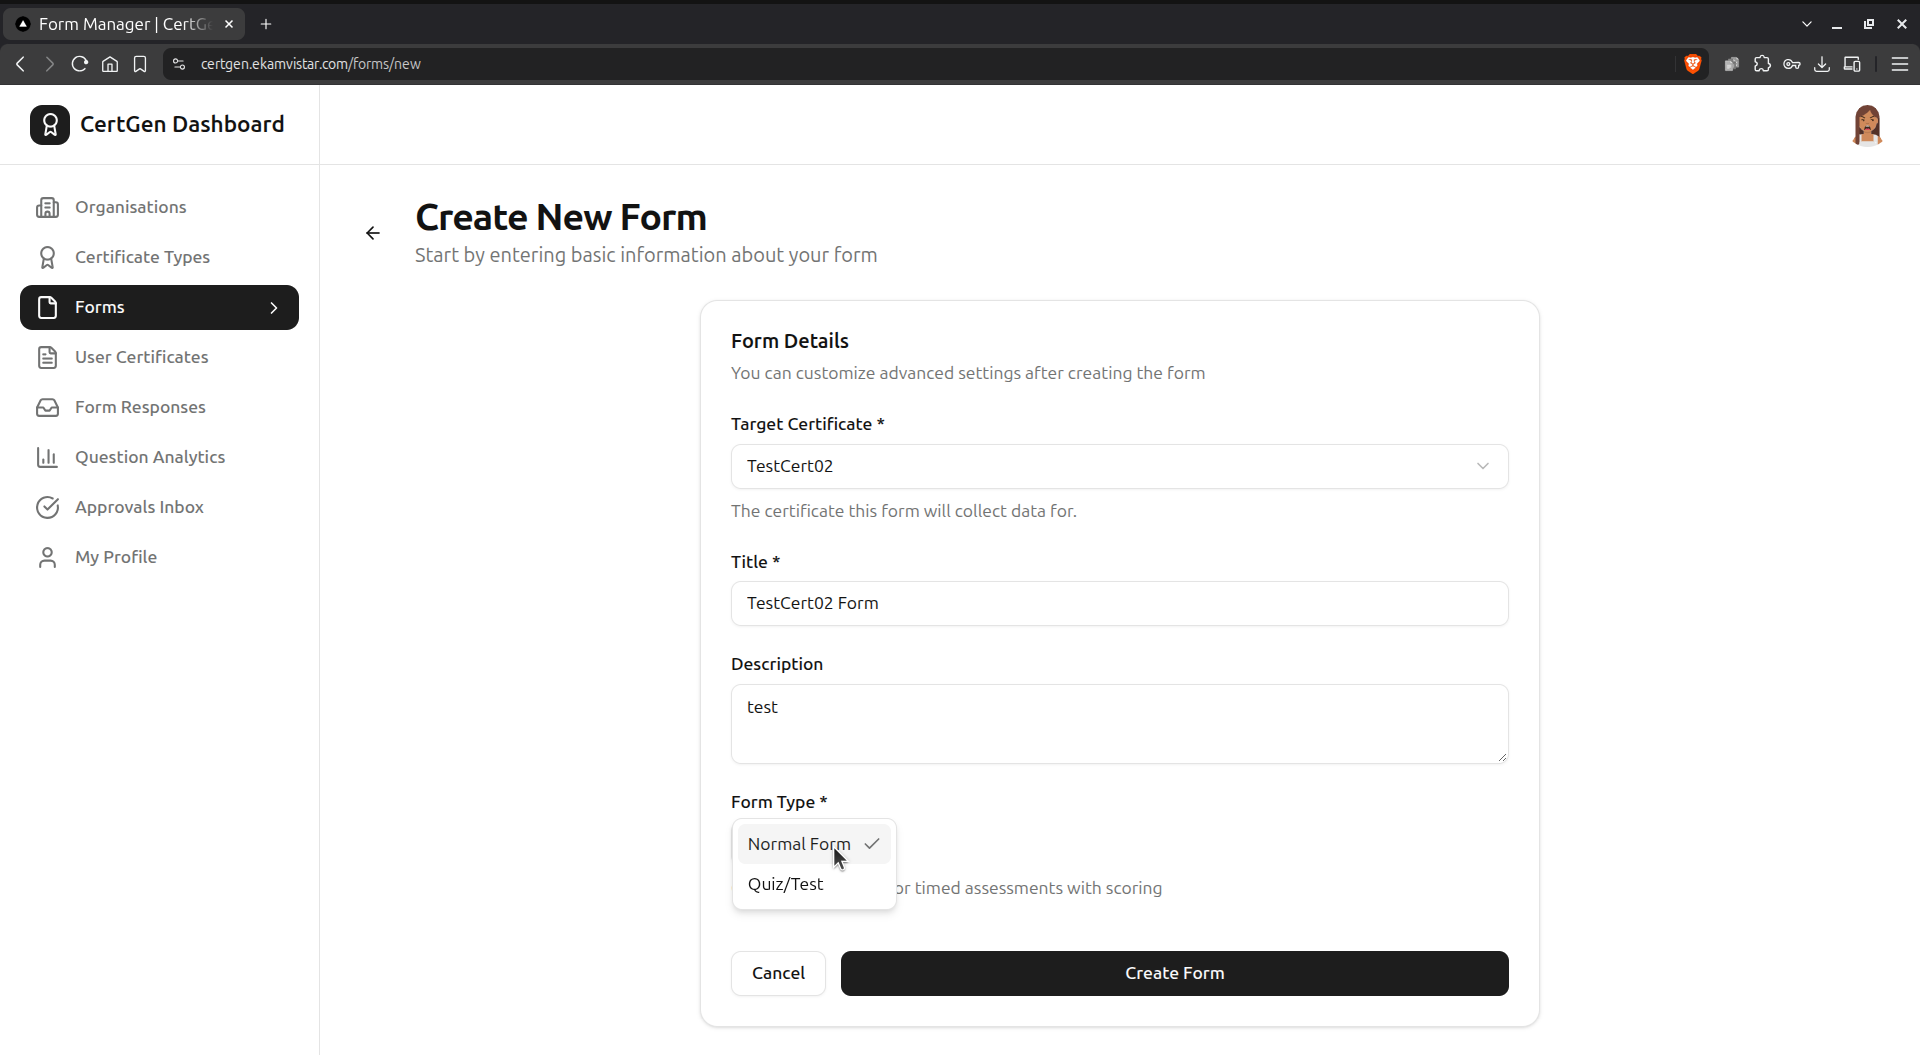
Enter a Title and Description, then choose a Form Type ? Normal Form or Quiz/Test (for timed, scored assessments).
Step 7.0.4: Create the Form
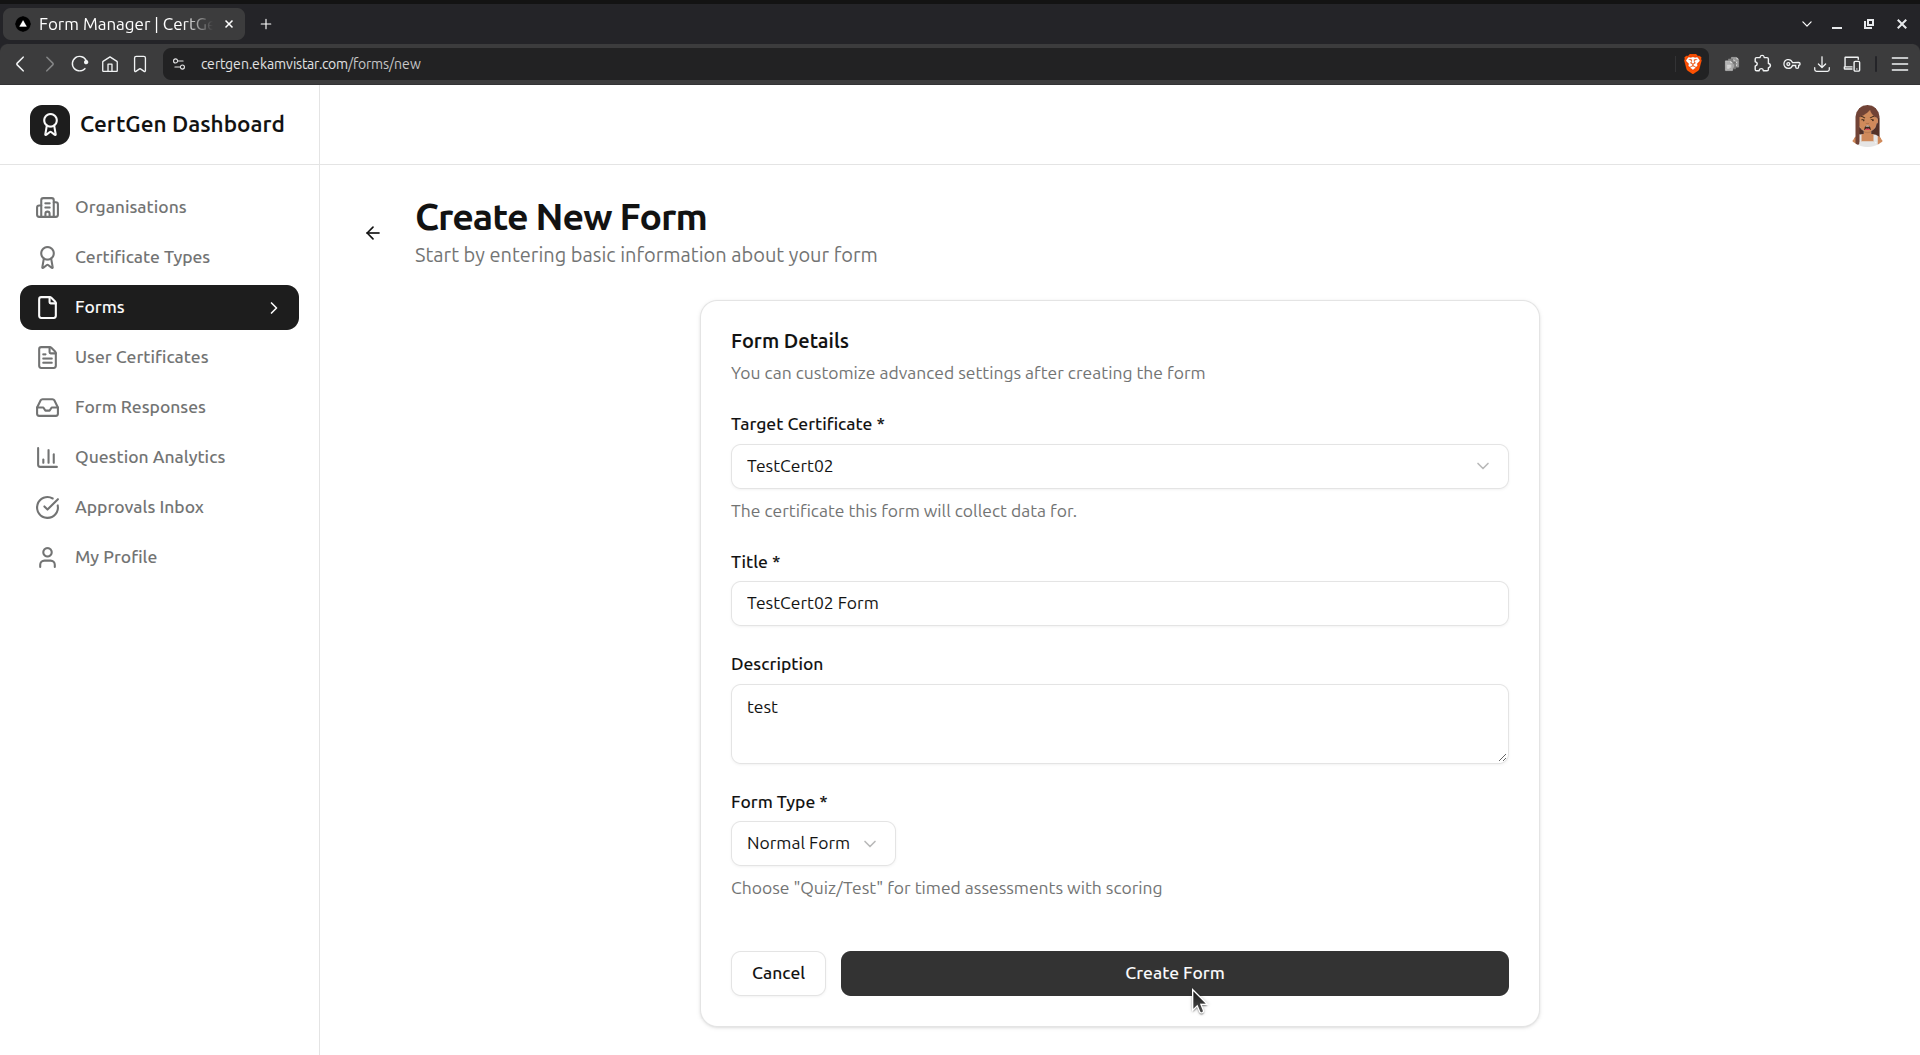
With all details filled in, click Create Form to save it as a draft.
Step 7.0.5: Explore the Actions Menu
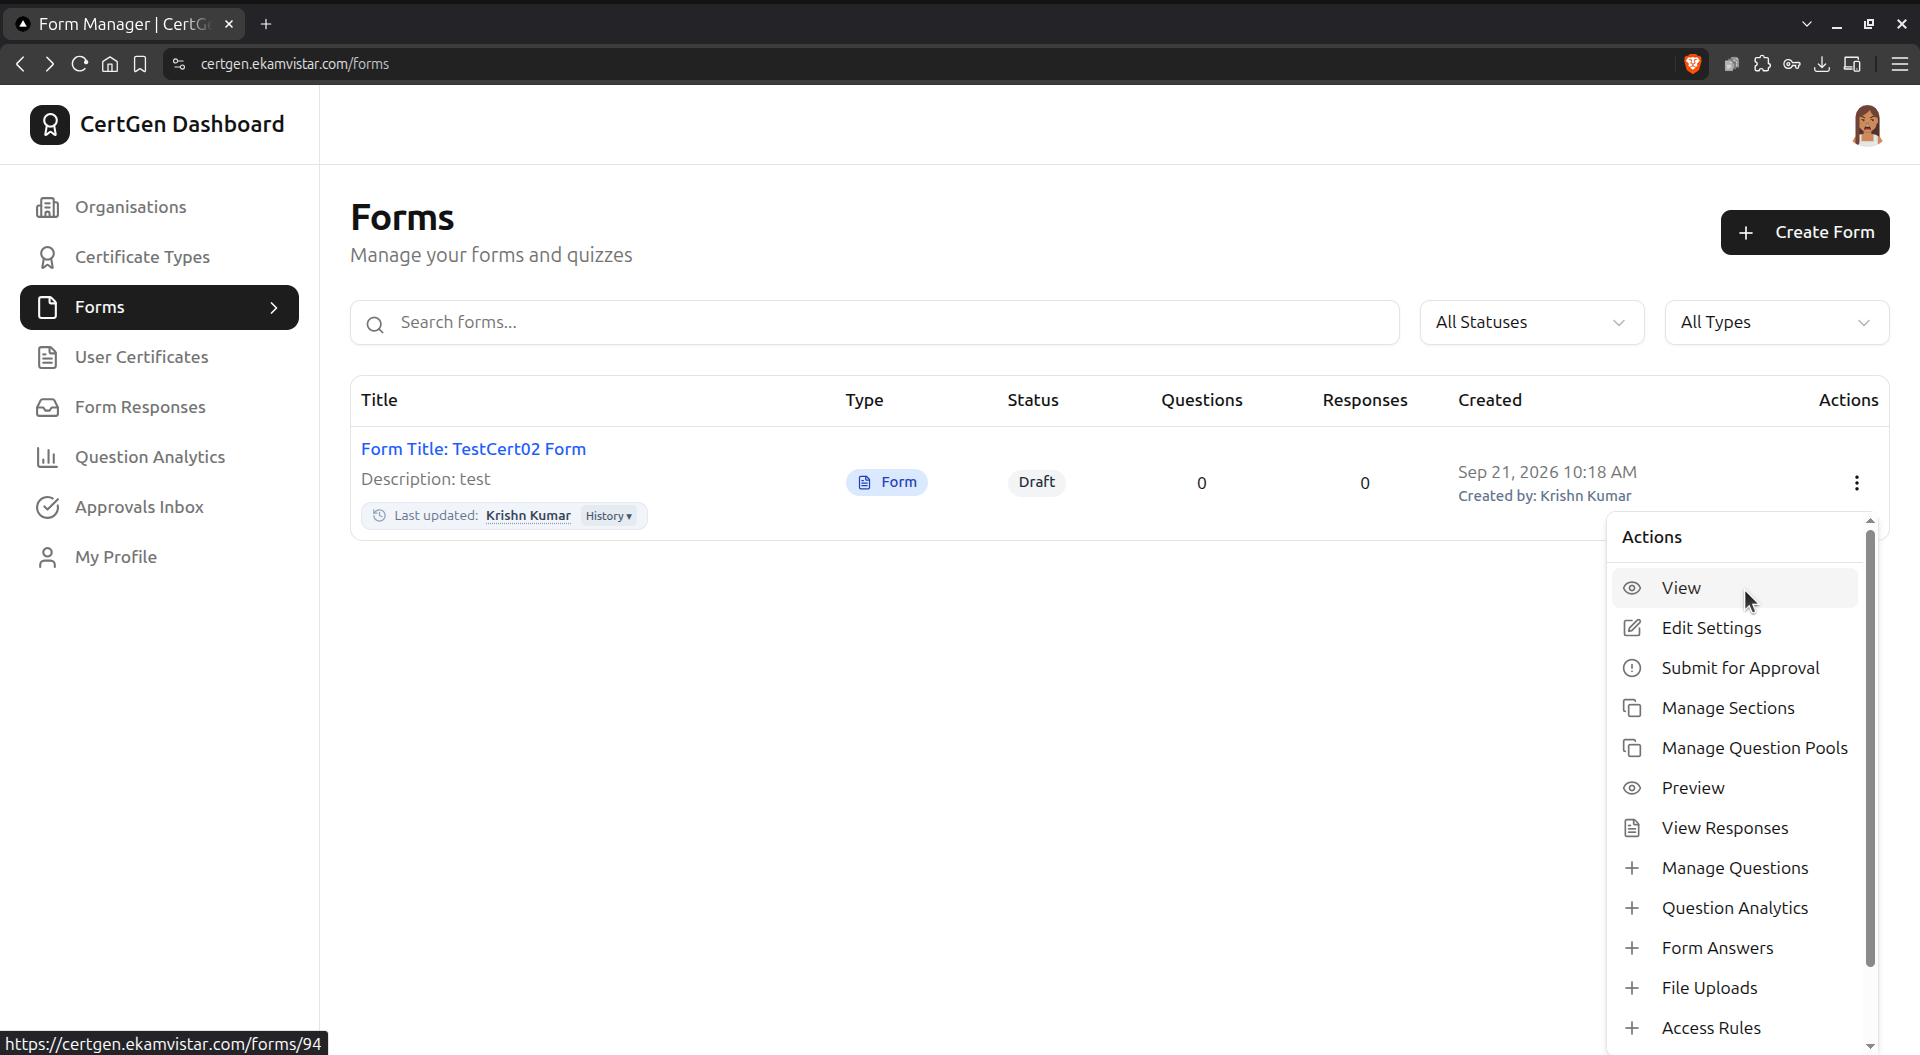
The new form appears in the list with a Draft status; click the ⋮ icon to see all available actions ? View, Edit Settings, Submit for Approval, Manage Sections, and more.
Step 7.0.6: Review the Form Overview
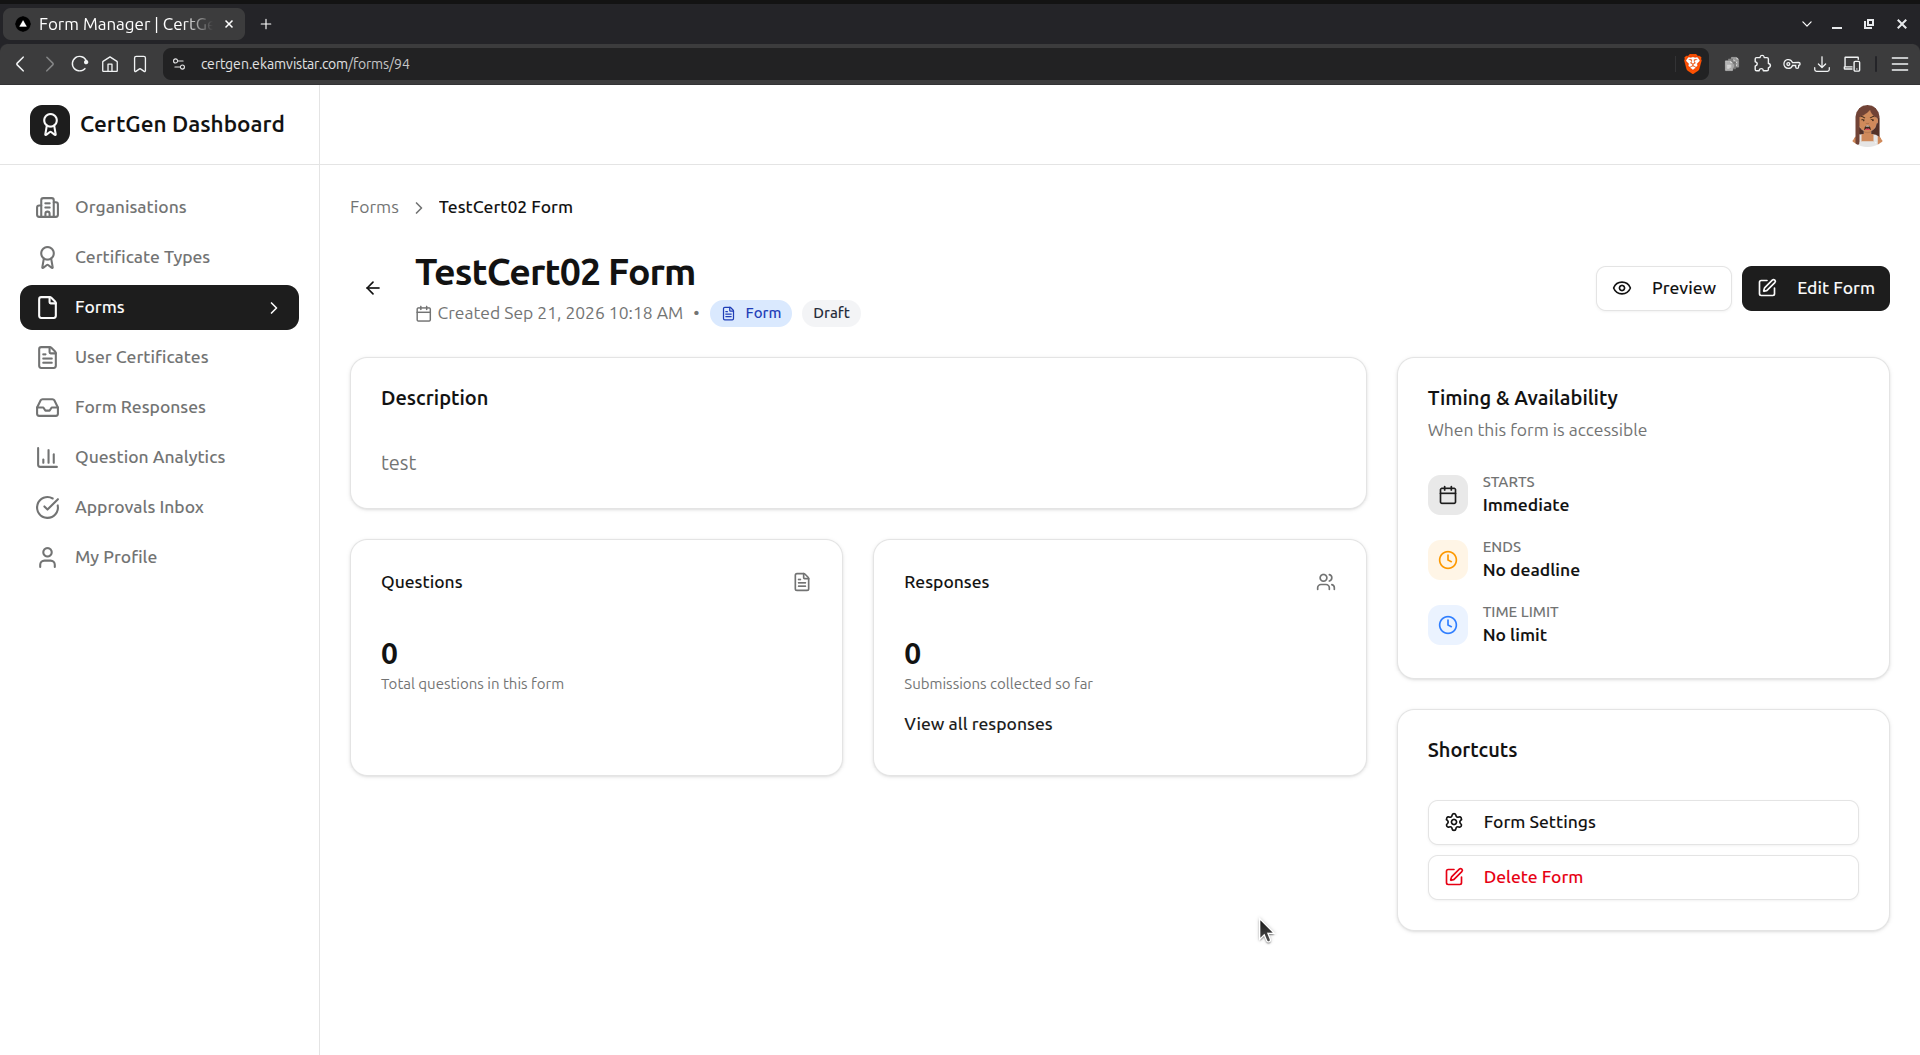
Selecting View opens a summary with question and response counts, Timing & Availability, and quick Shortcuts to Form Settings or Delete Form.
Step 7.1.1: Open Sections
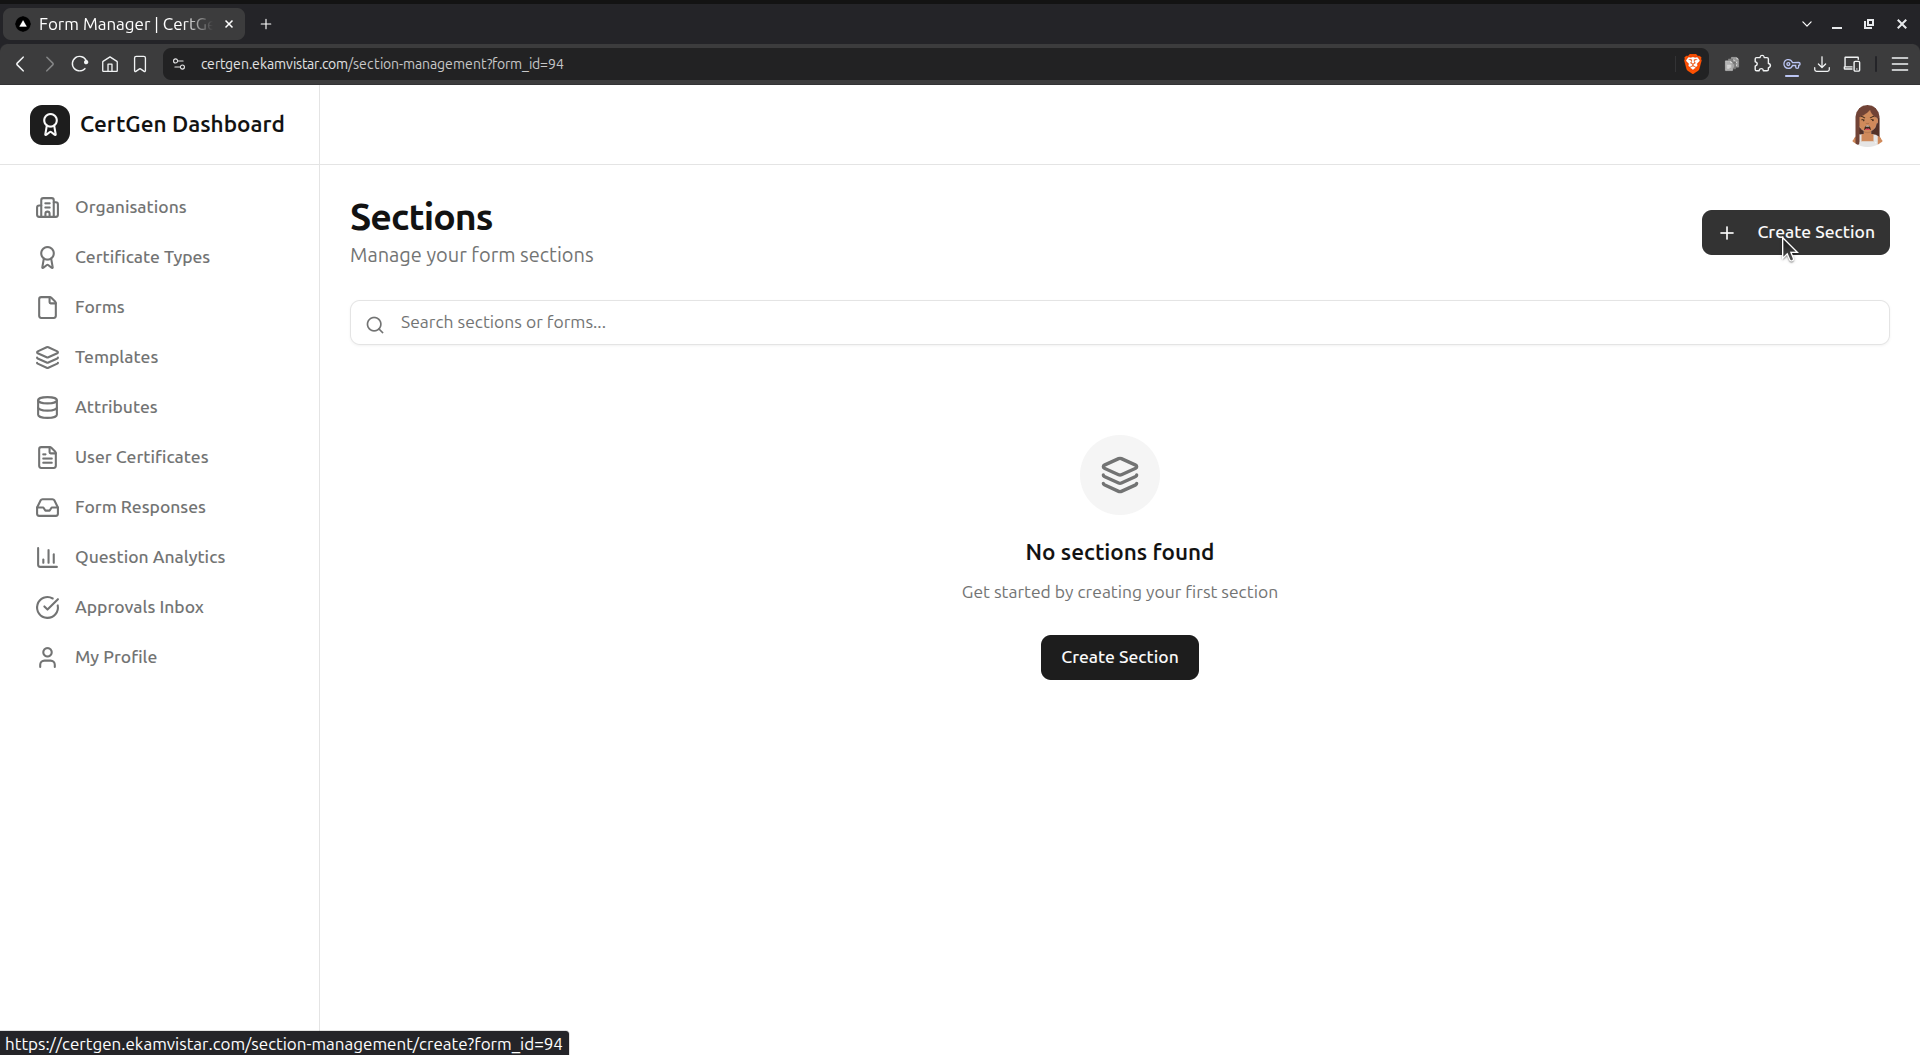
From the Actions menu, choose Manage Sections to organize this form?s questions into groups; it starts empty.
Step 7.1.2: Create a Section
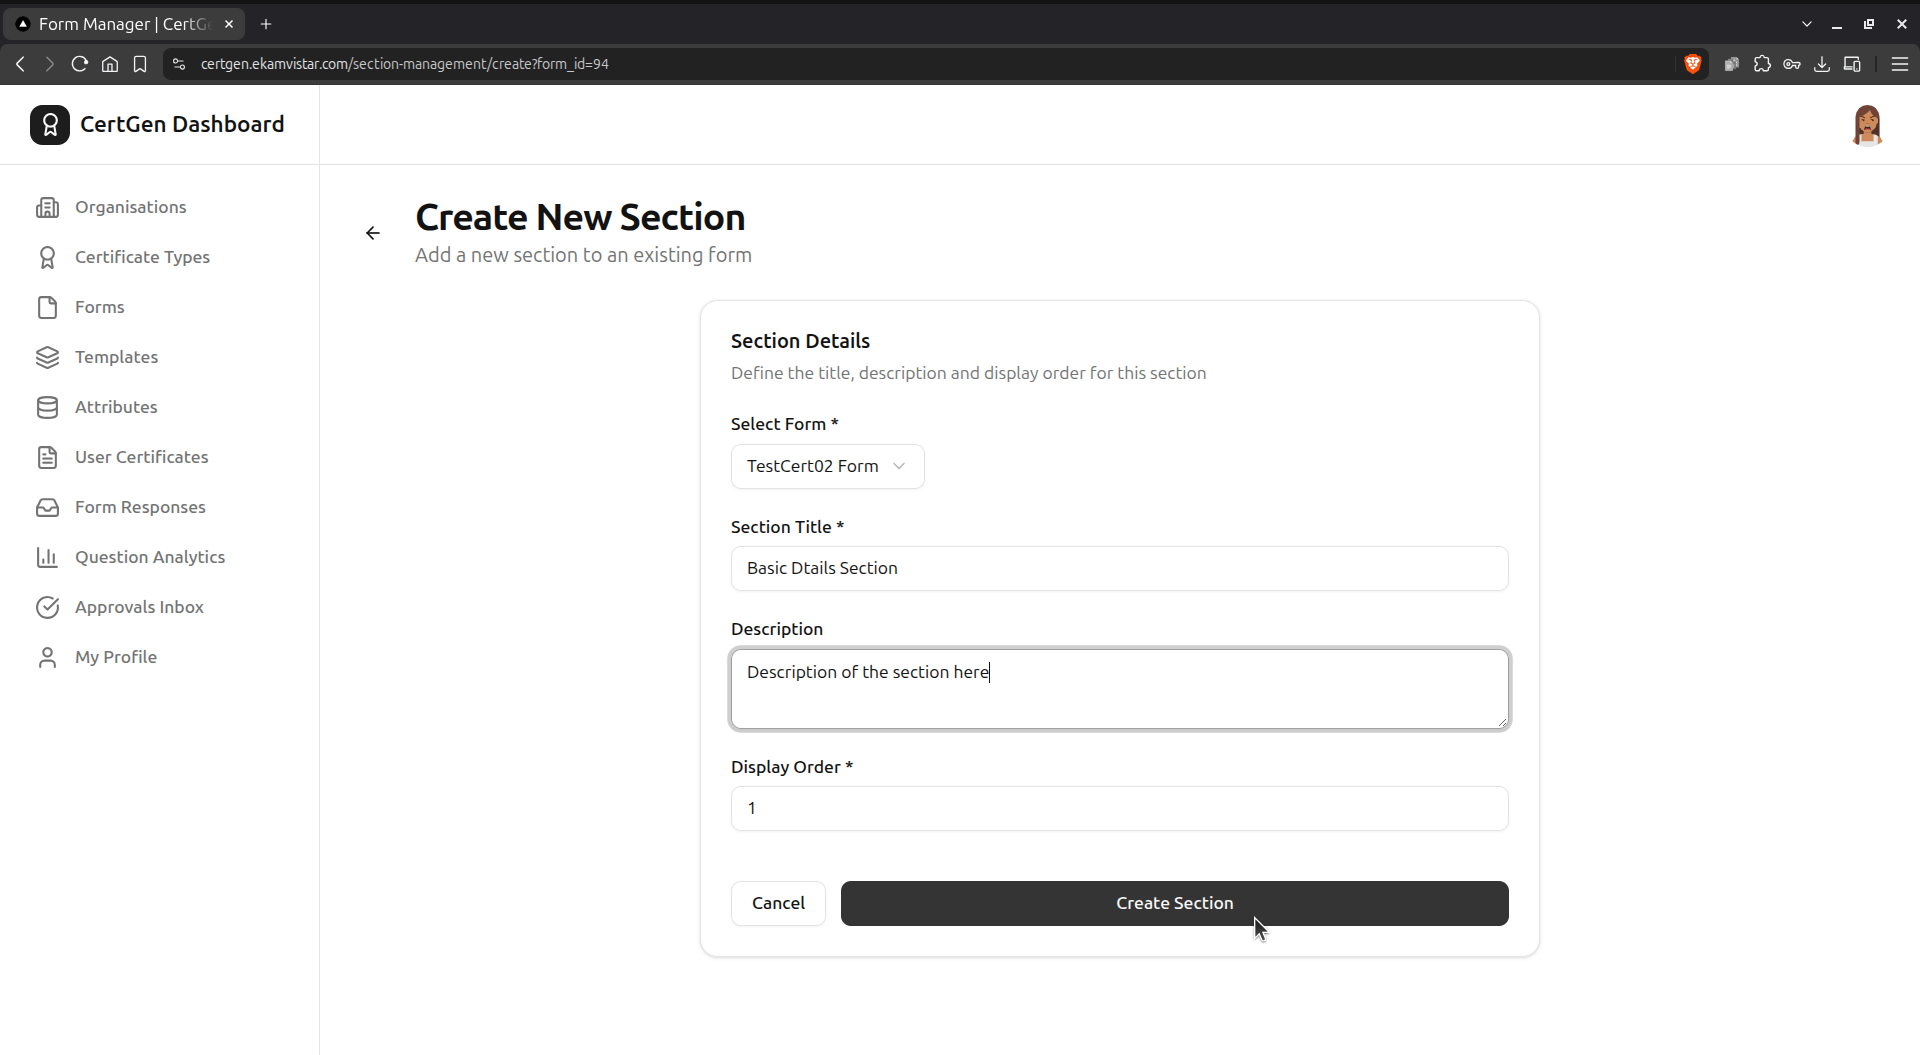
Click Create Section, select the Form, and enter a Section Title, Description and Display Order, then click Create Section.
Step 7.1.3: Confirm the Section
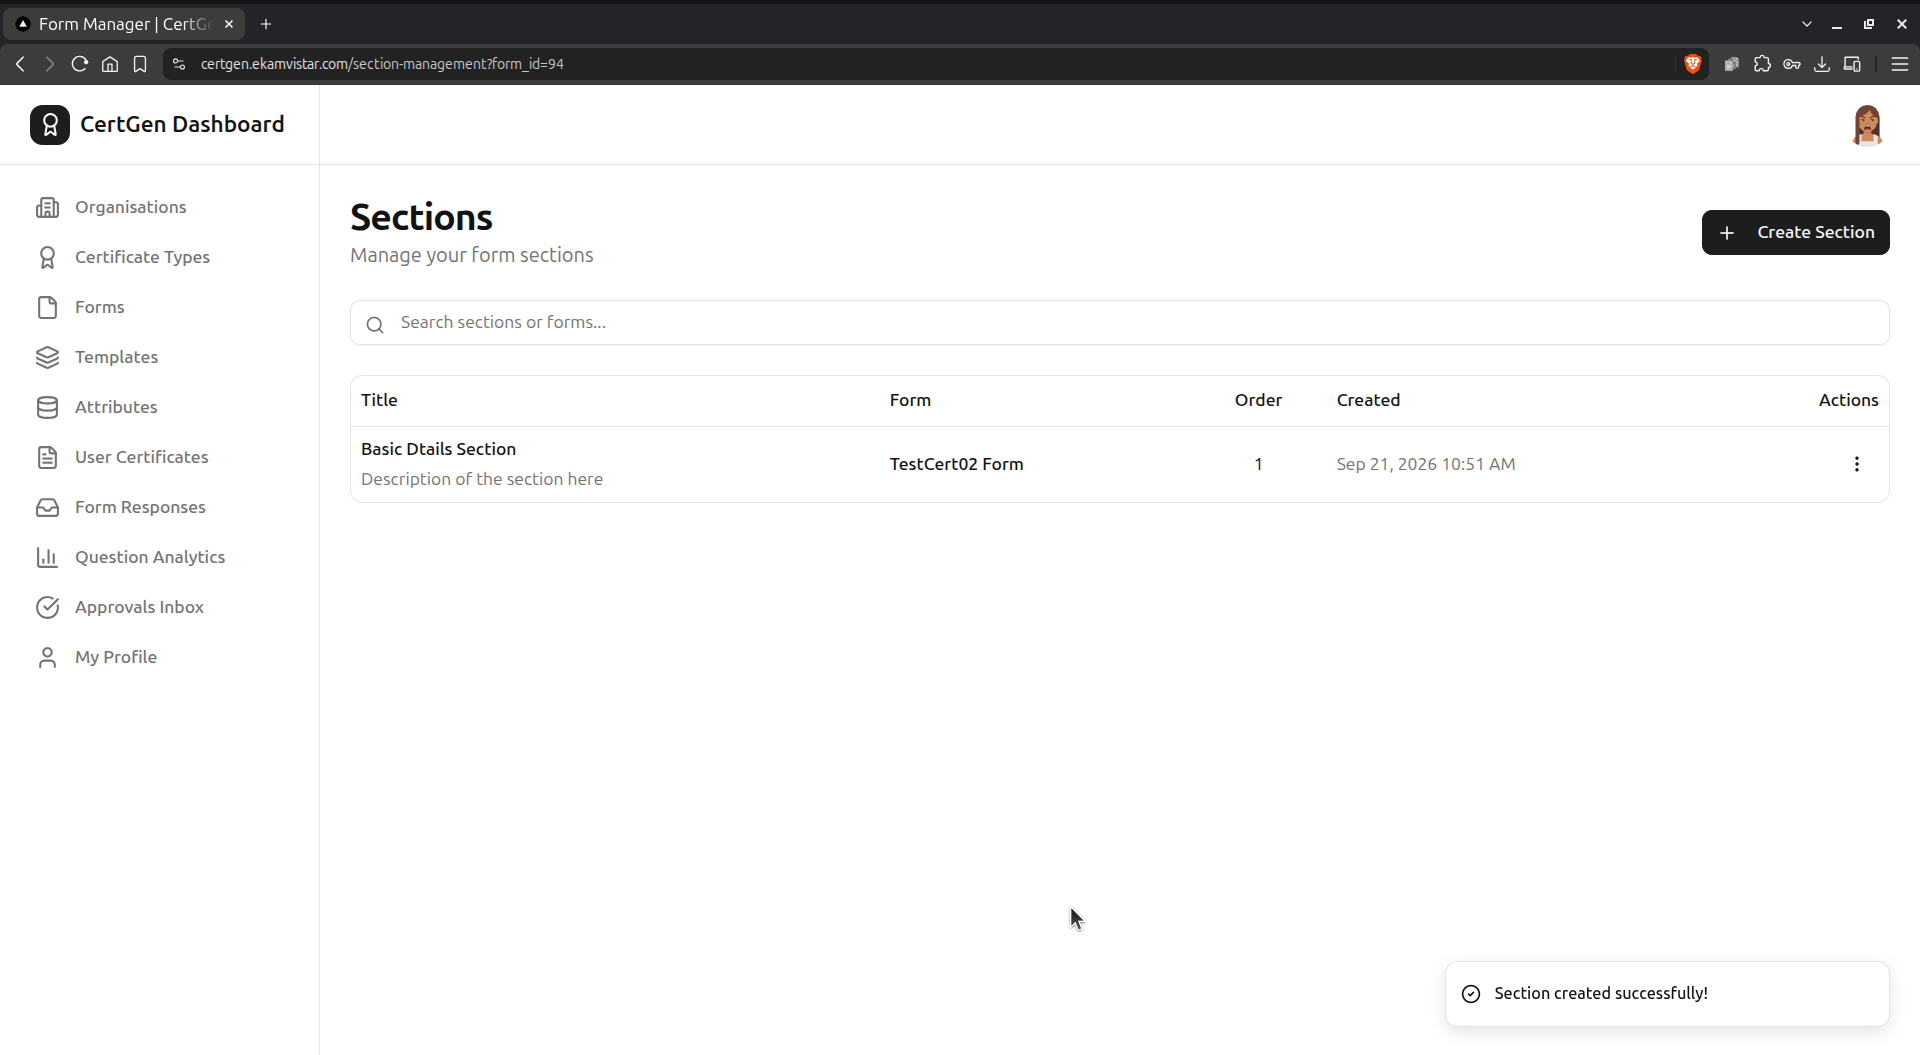
A confirmation toast appears and the new section is listed with its title, form, order and creation date.
Step 7.1.4: Open Question Pools
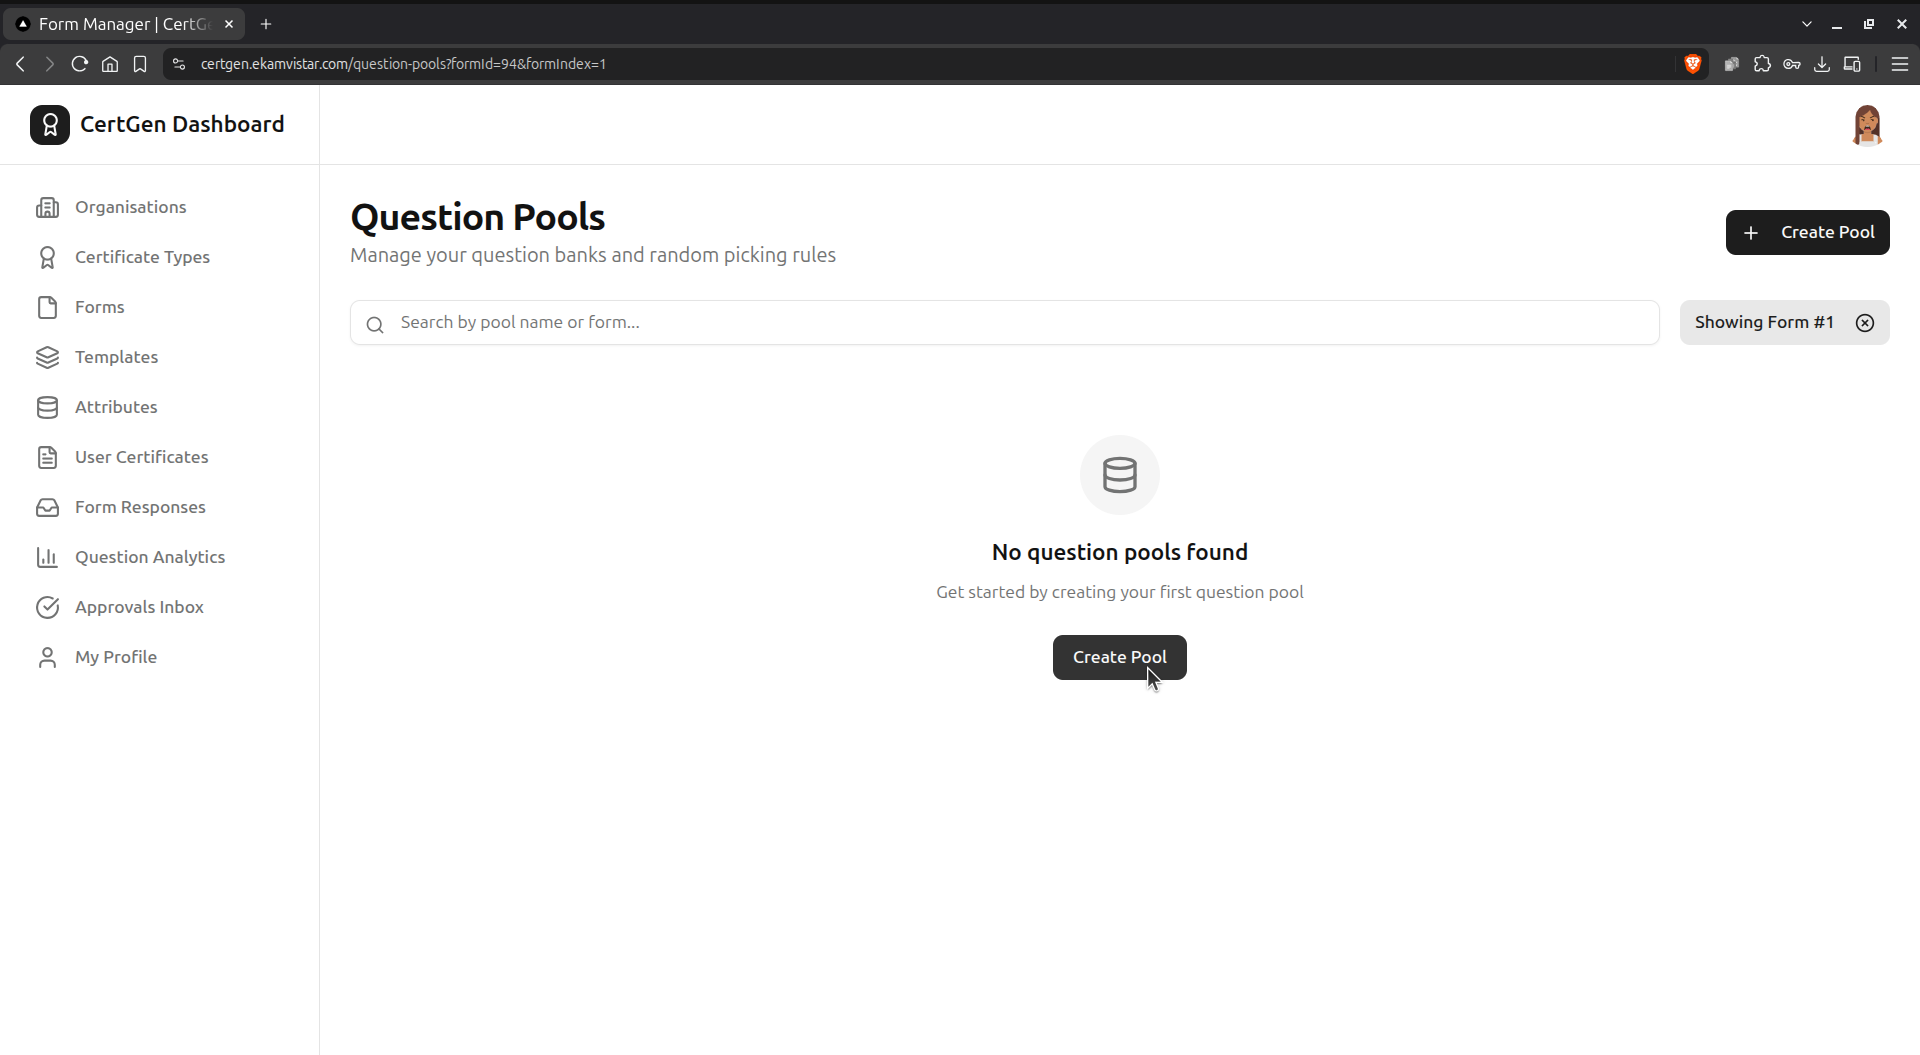
Choose Manage Question Pools from the Actions menu to set up randomized question banks; it starts empty.
Step 7.1.5: Create a Question Pool
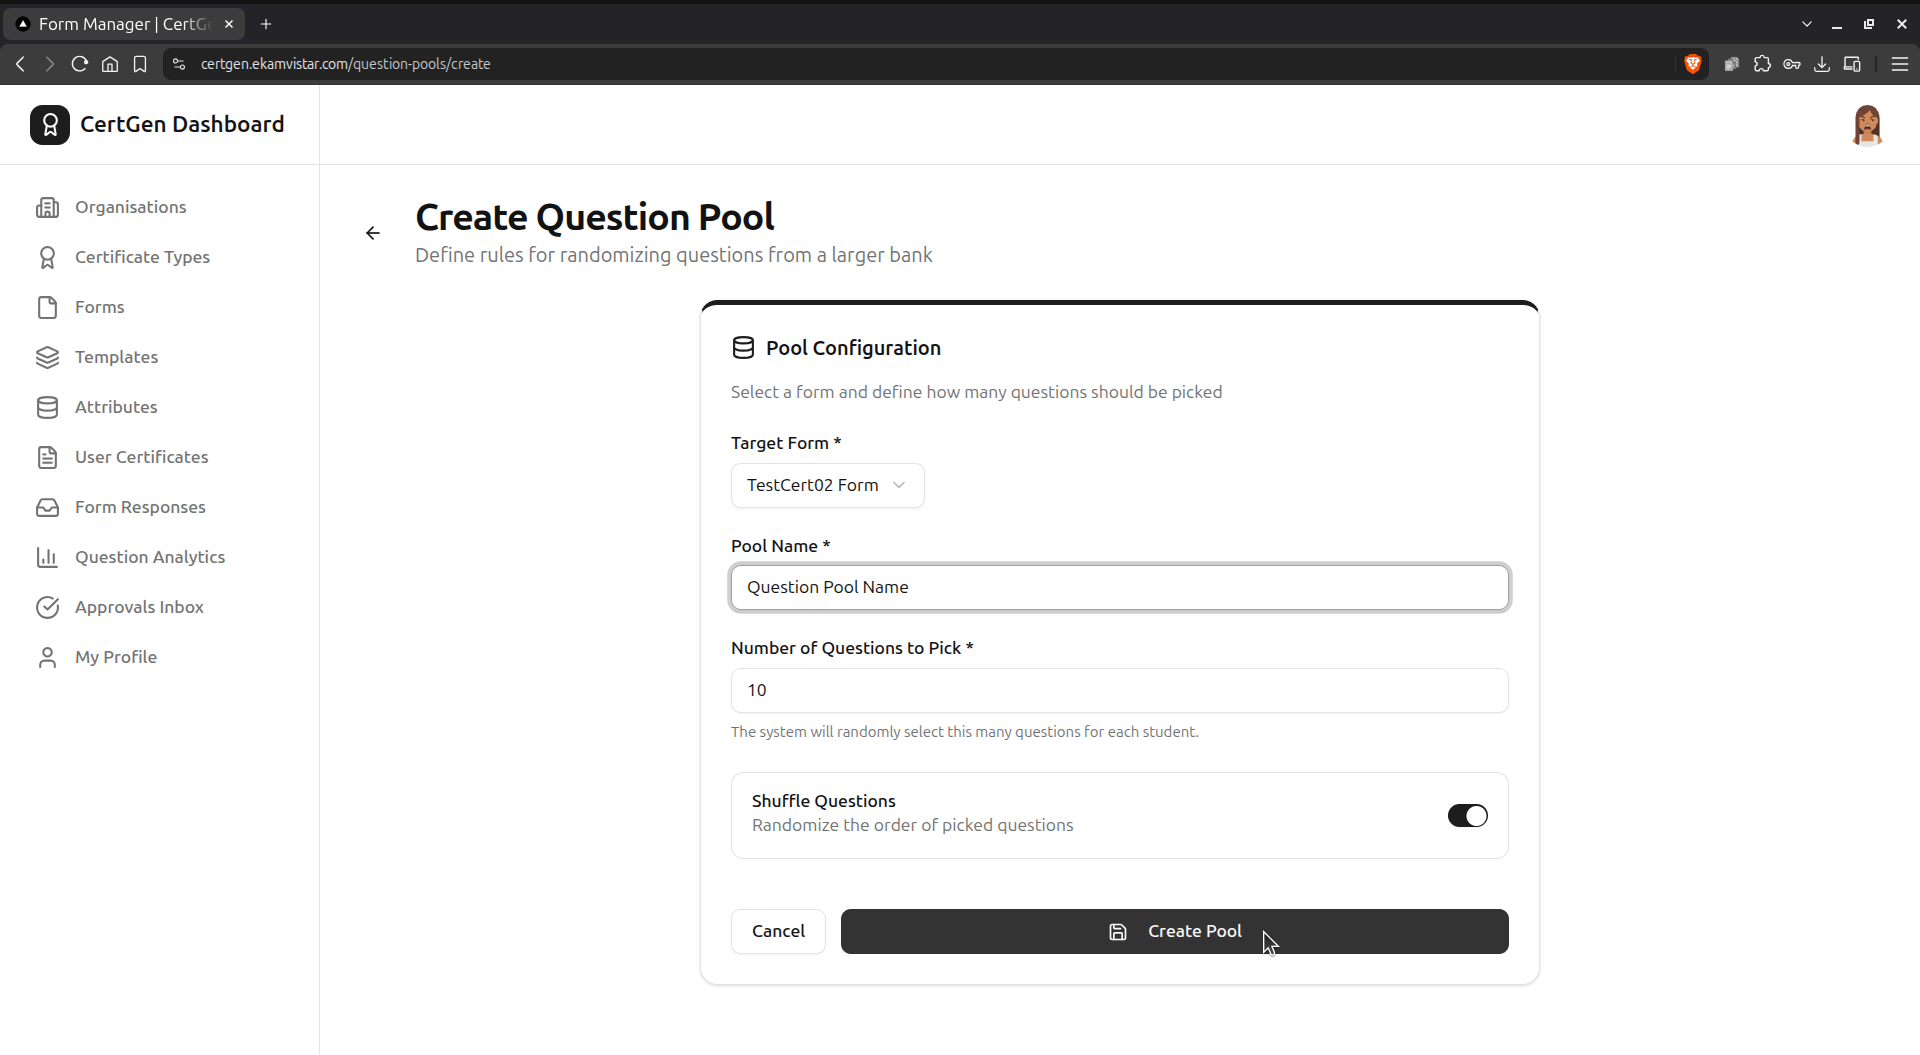
Click Create Pool, select the Target Form, name the pool, set the Number of Questions to Pick, and toggle Shuffle Questions if desired.
Step 7.2.1: Open Form Questions
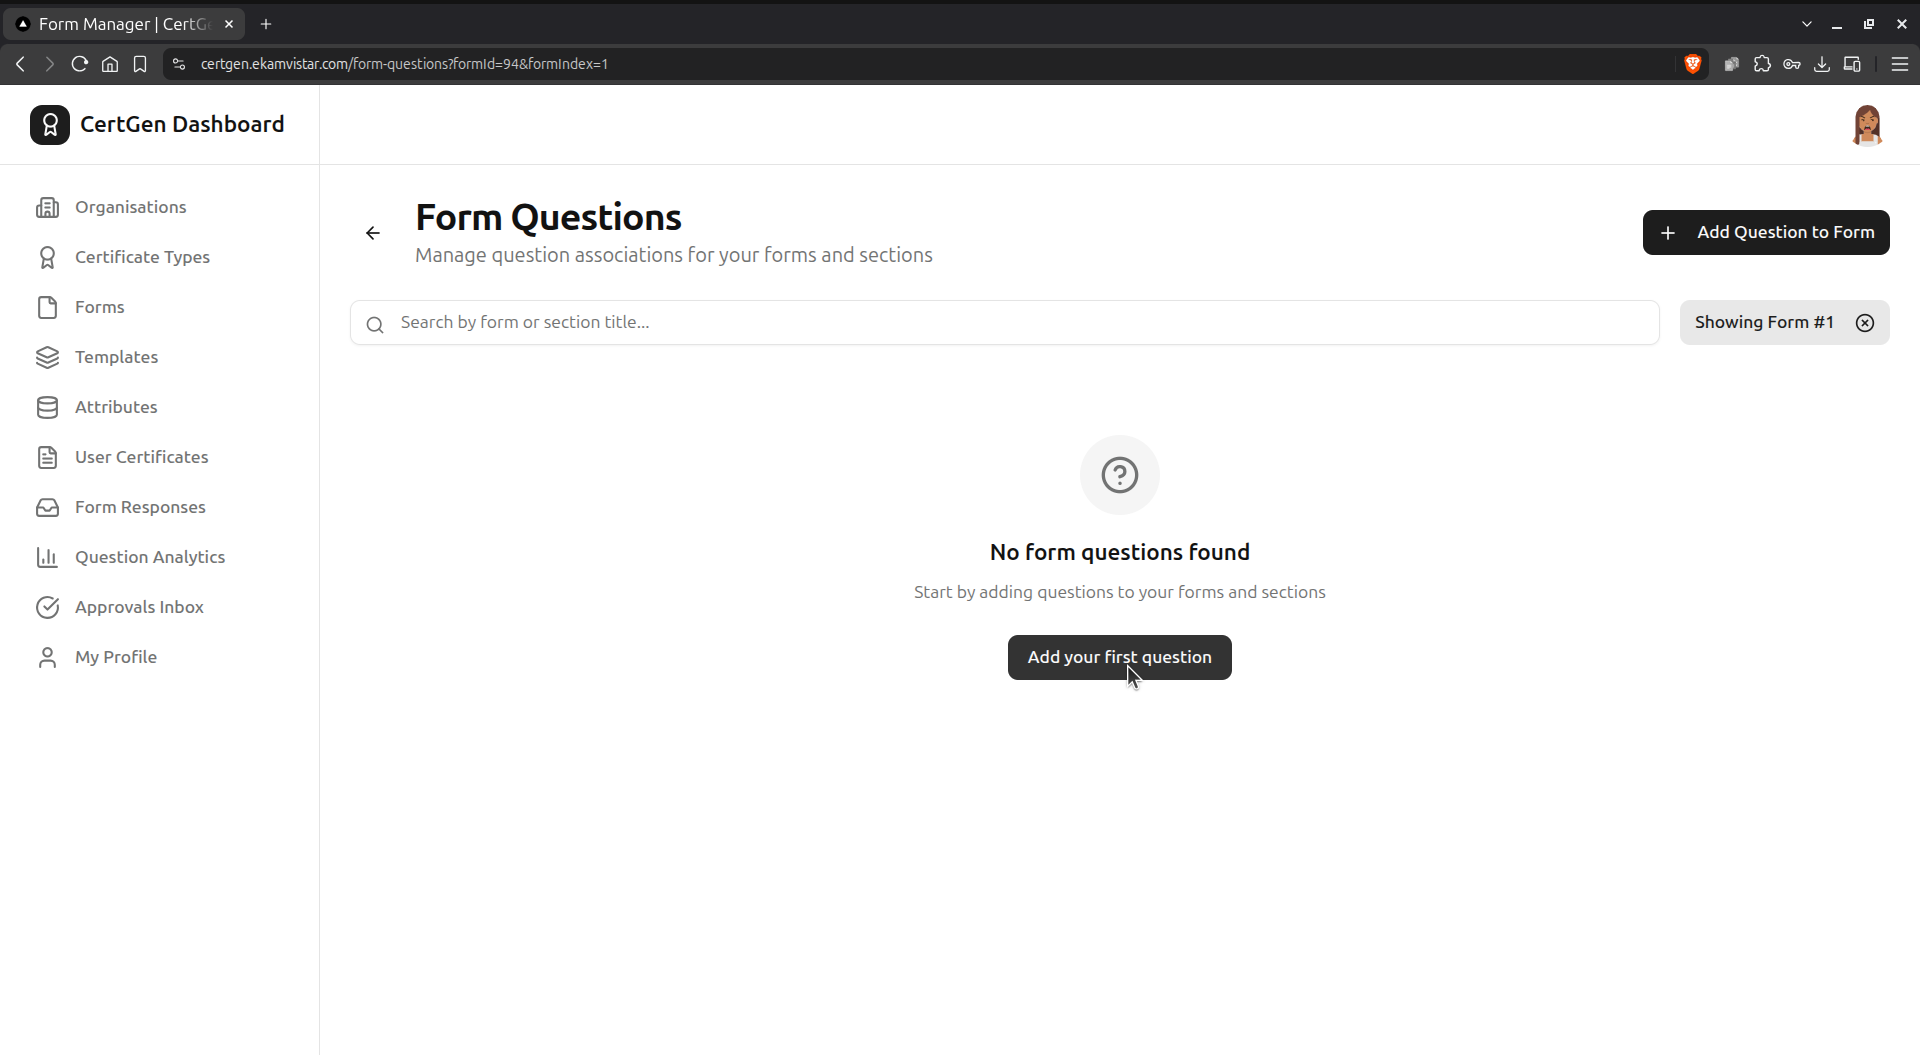
Choose Manage Questions from the Actions menu to see all questions attached to the form and its sections; it starts empty.
Step 7.2.2: Add a Form Field
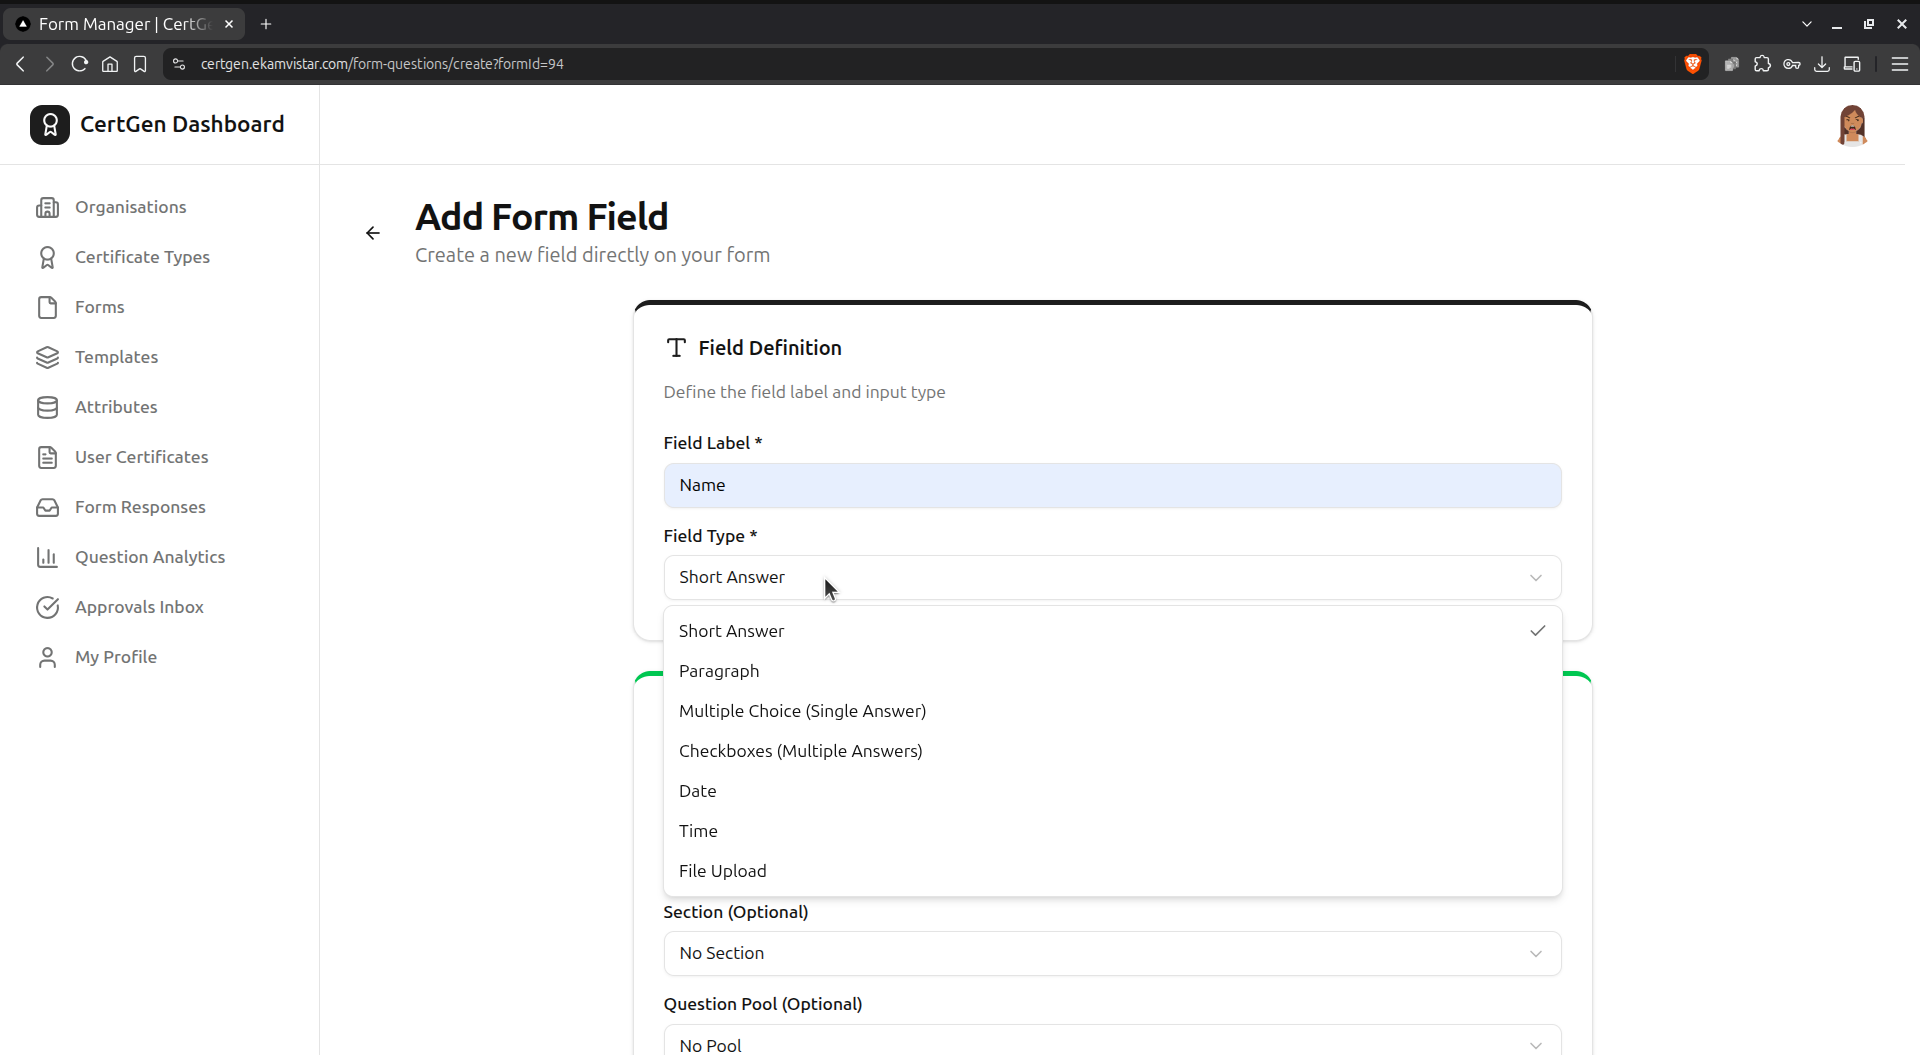
Click Add your first question (or Add Question to Form), enter a Field Label, and choose a Field Type ? Short Answer, Paragraph, Multiple Choice, Checkboxes, Date, Time, or File Upload.
Step 7.2.3: Set the Field Location
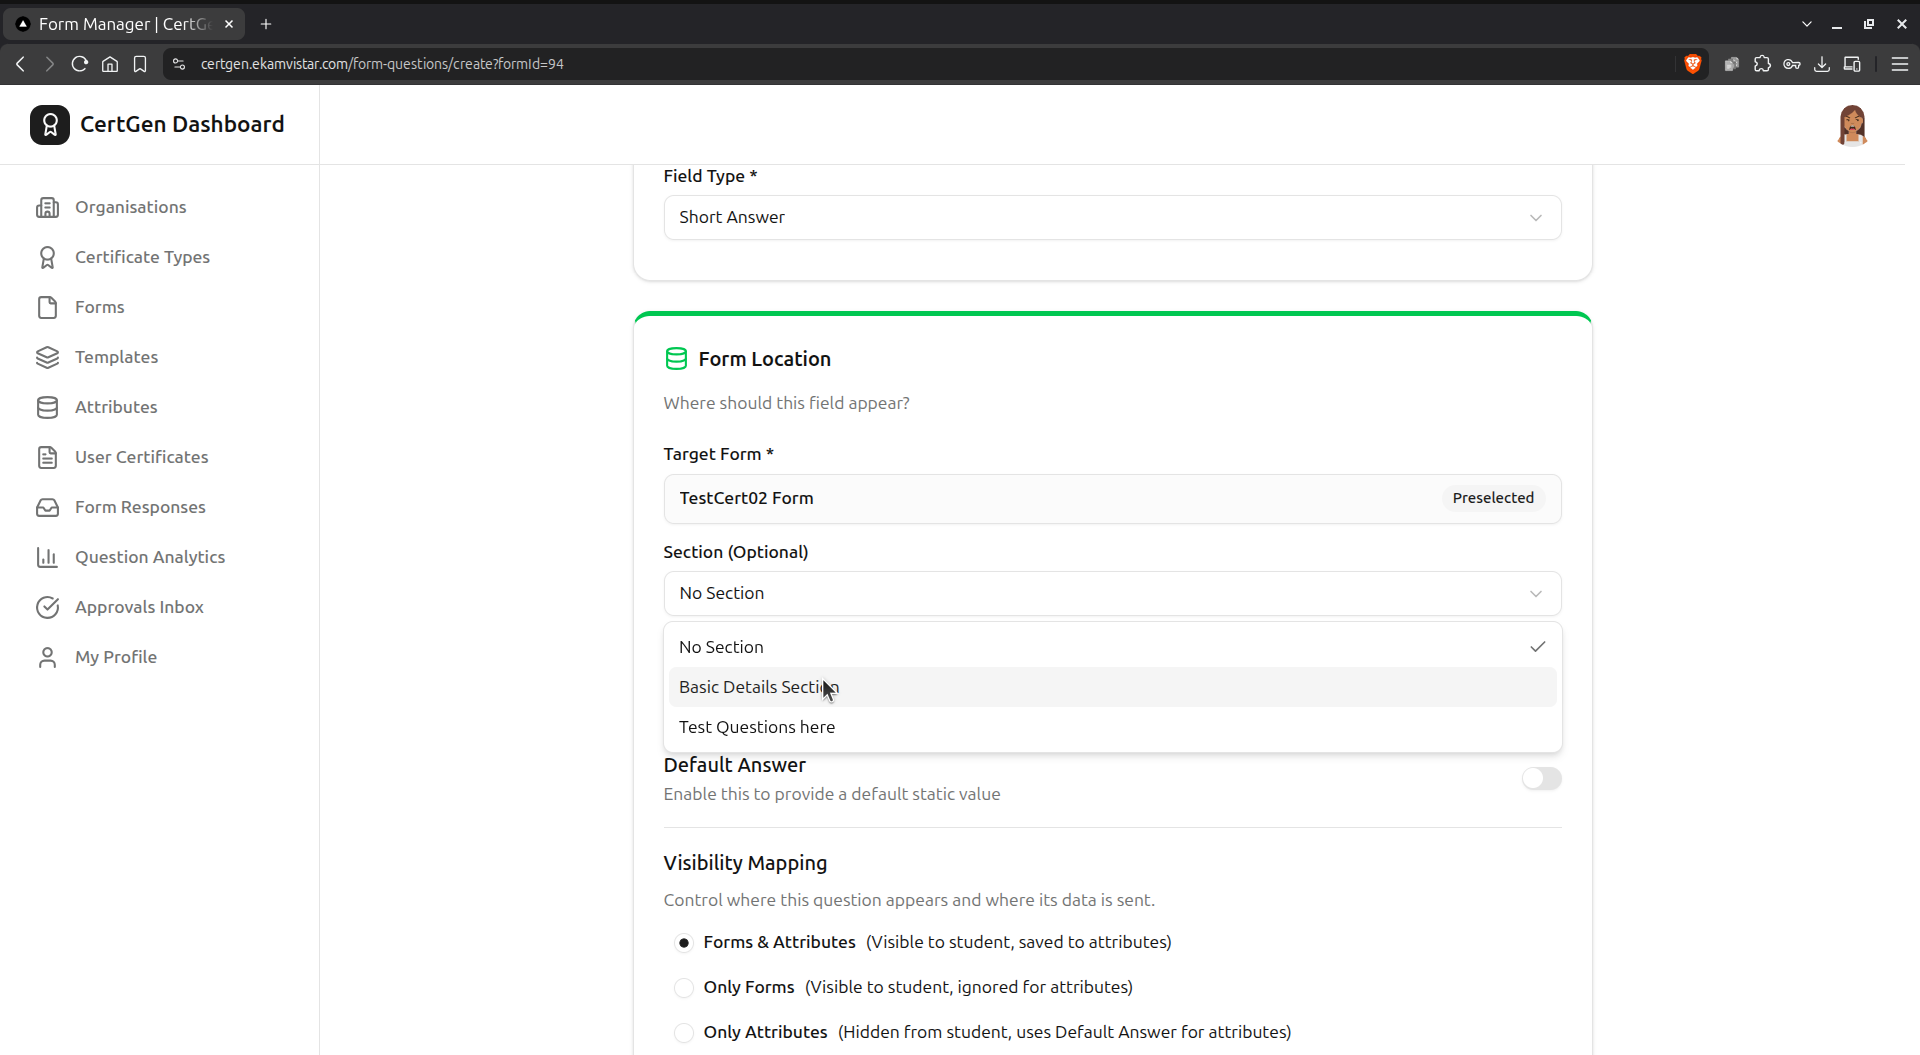
Under Form Location, confirm the Target Form, optionally assign the field to a Section, and choose a Visibility Mapping ? Forms & Attributes, Only Forms, or Only Attributes.
Step 7.2.4: Configure Multiple Choice Answers
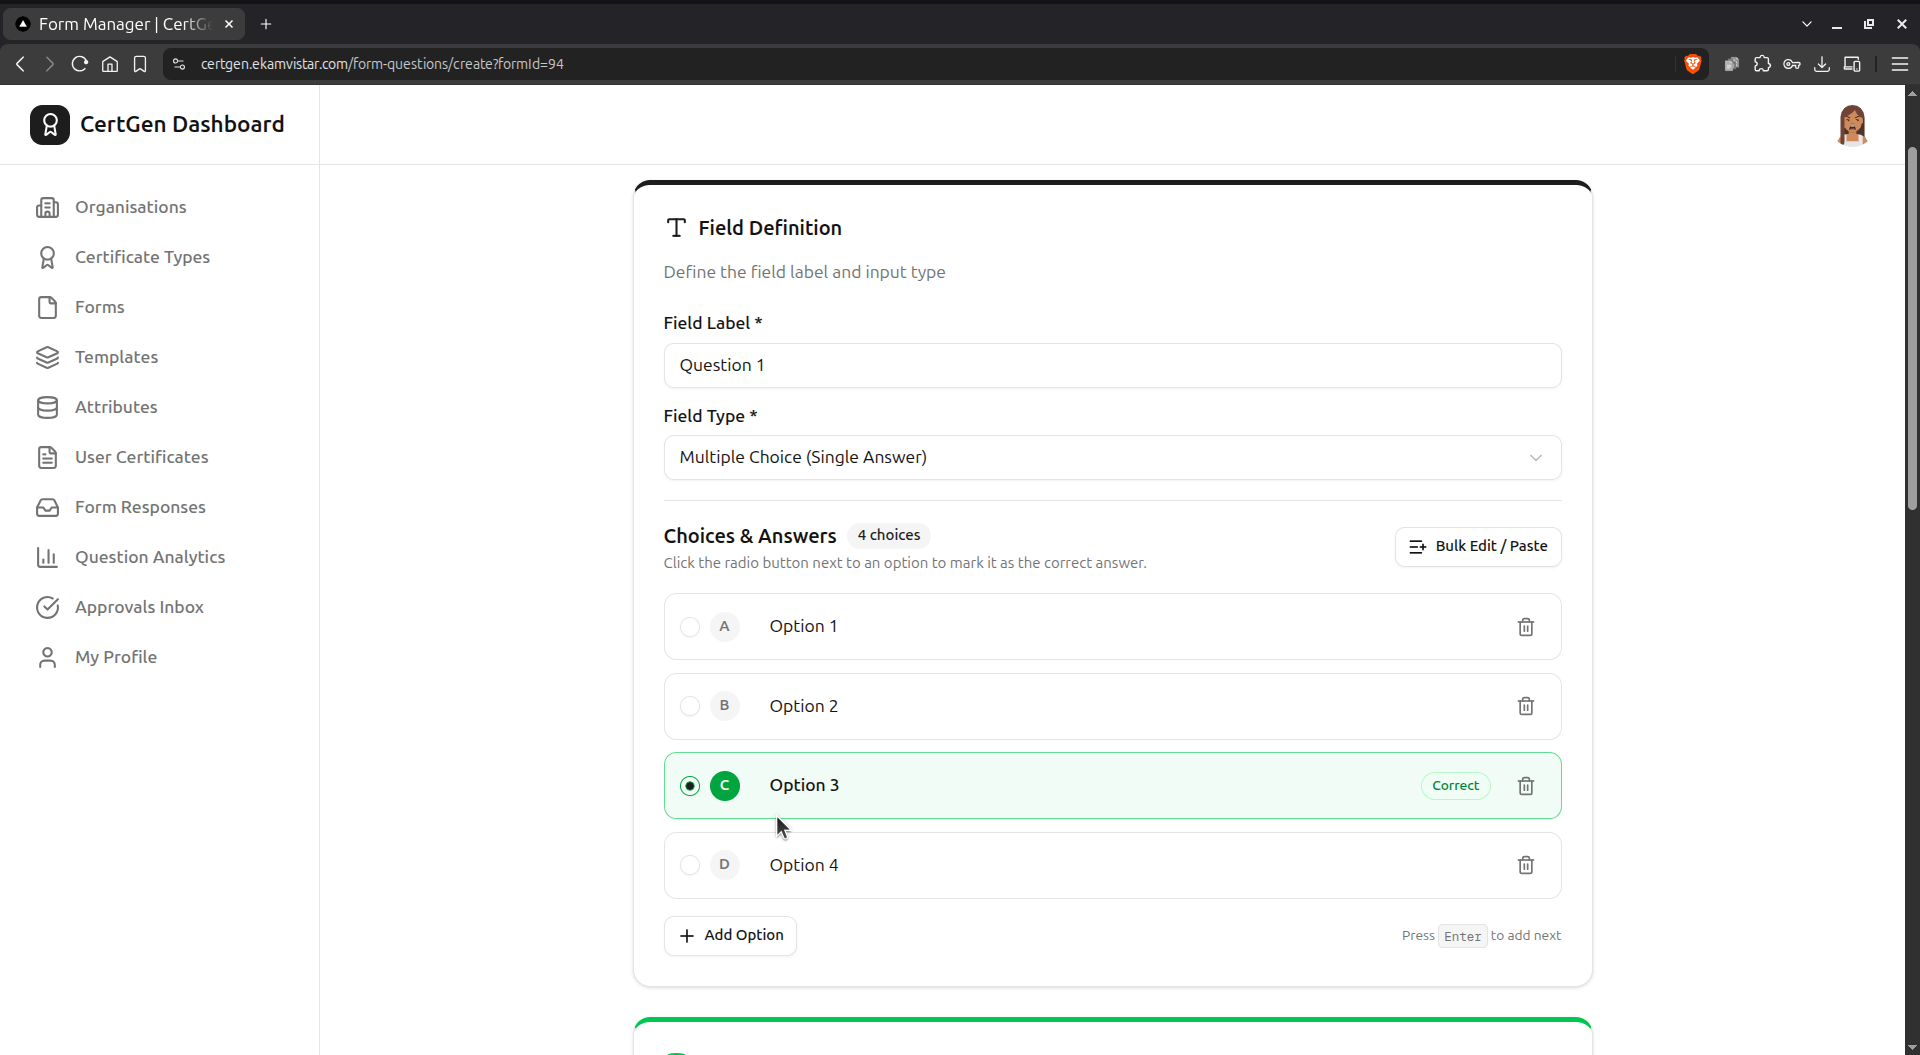
For Multiple Choice questions, add Choices & Answers and click the radio button next to the correct option to mark it as correct.
Step 7.3.1: Open Edit Settings
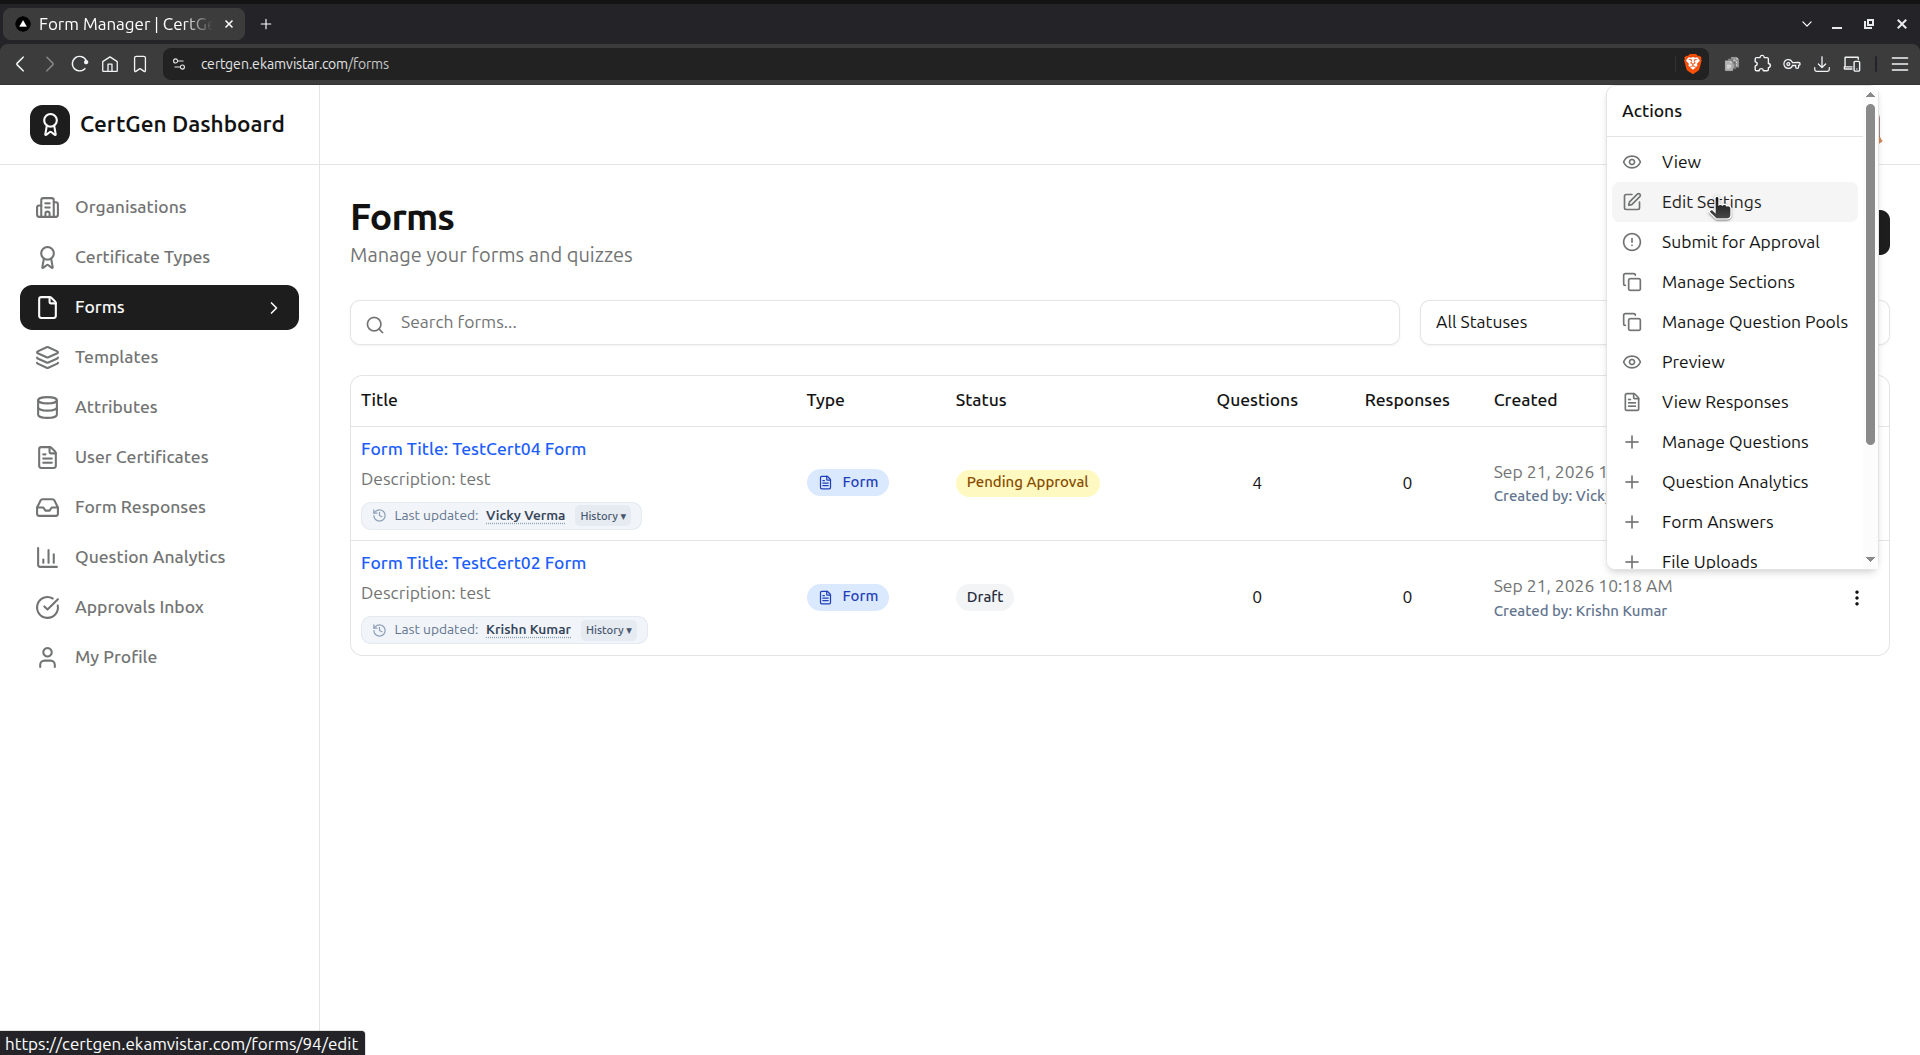
From the Actions menu, choose Edit Settings to configure access, timing, navigation and security for the form.
Step 7.3.2: Set Access Control
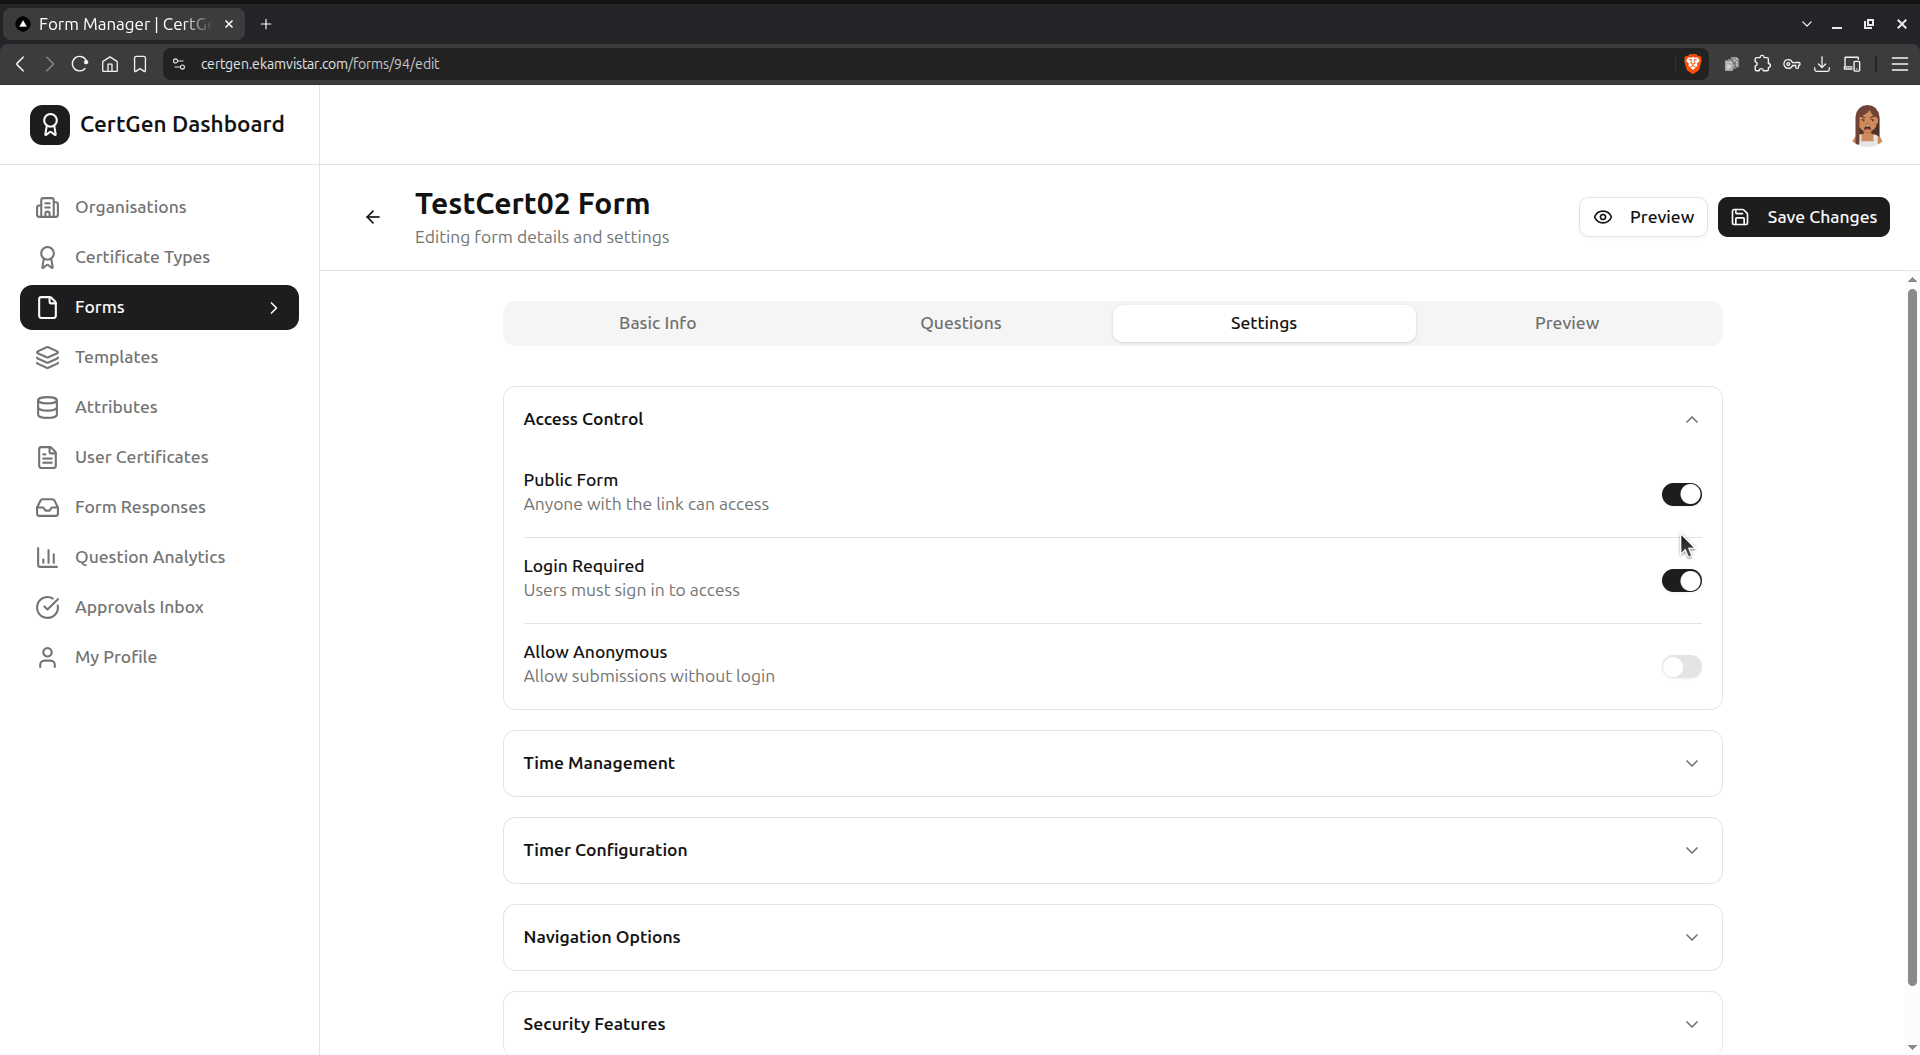
Under the Settings tab, toggle Public Form, Login Required, and Allow Anonymous to control who can access the form.
Step 7.3.3: Configure Time Management
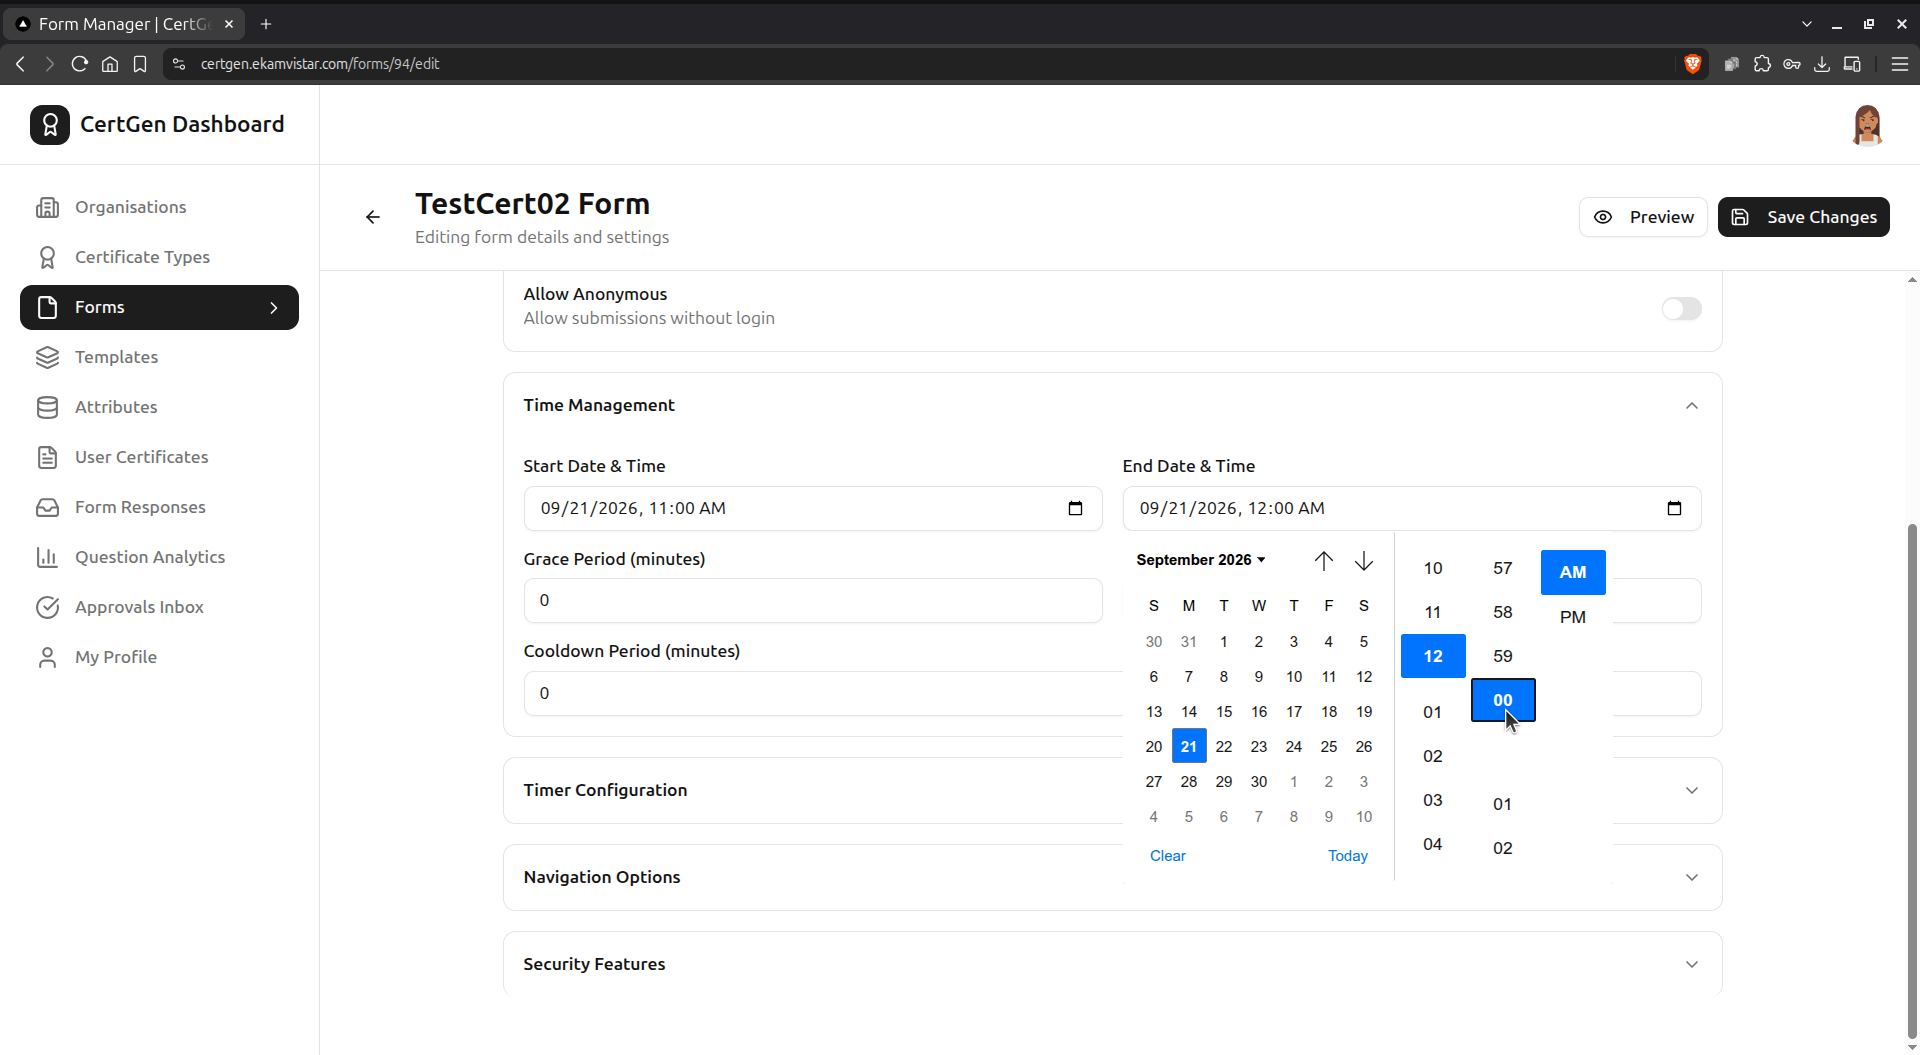
Set the Start Date & Time, End Date & Time, Grace Period and Cooldown Period for when the form is accessible.
Step 7.3.4: Configure the Timer
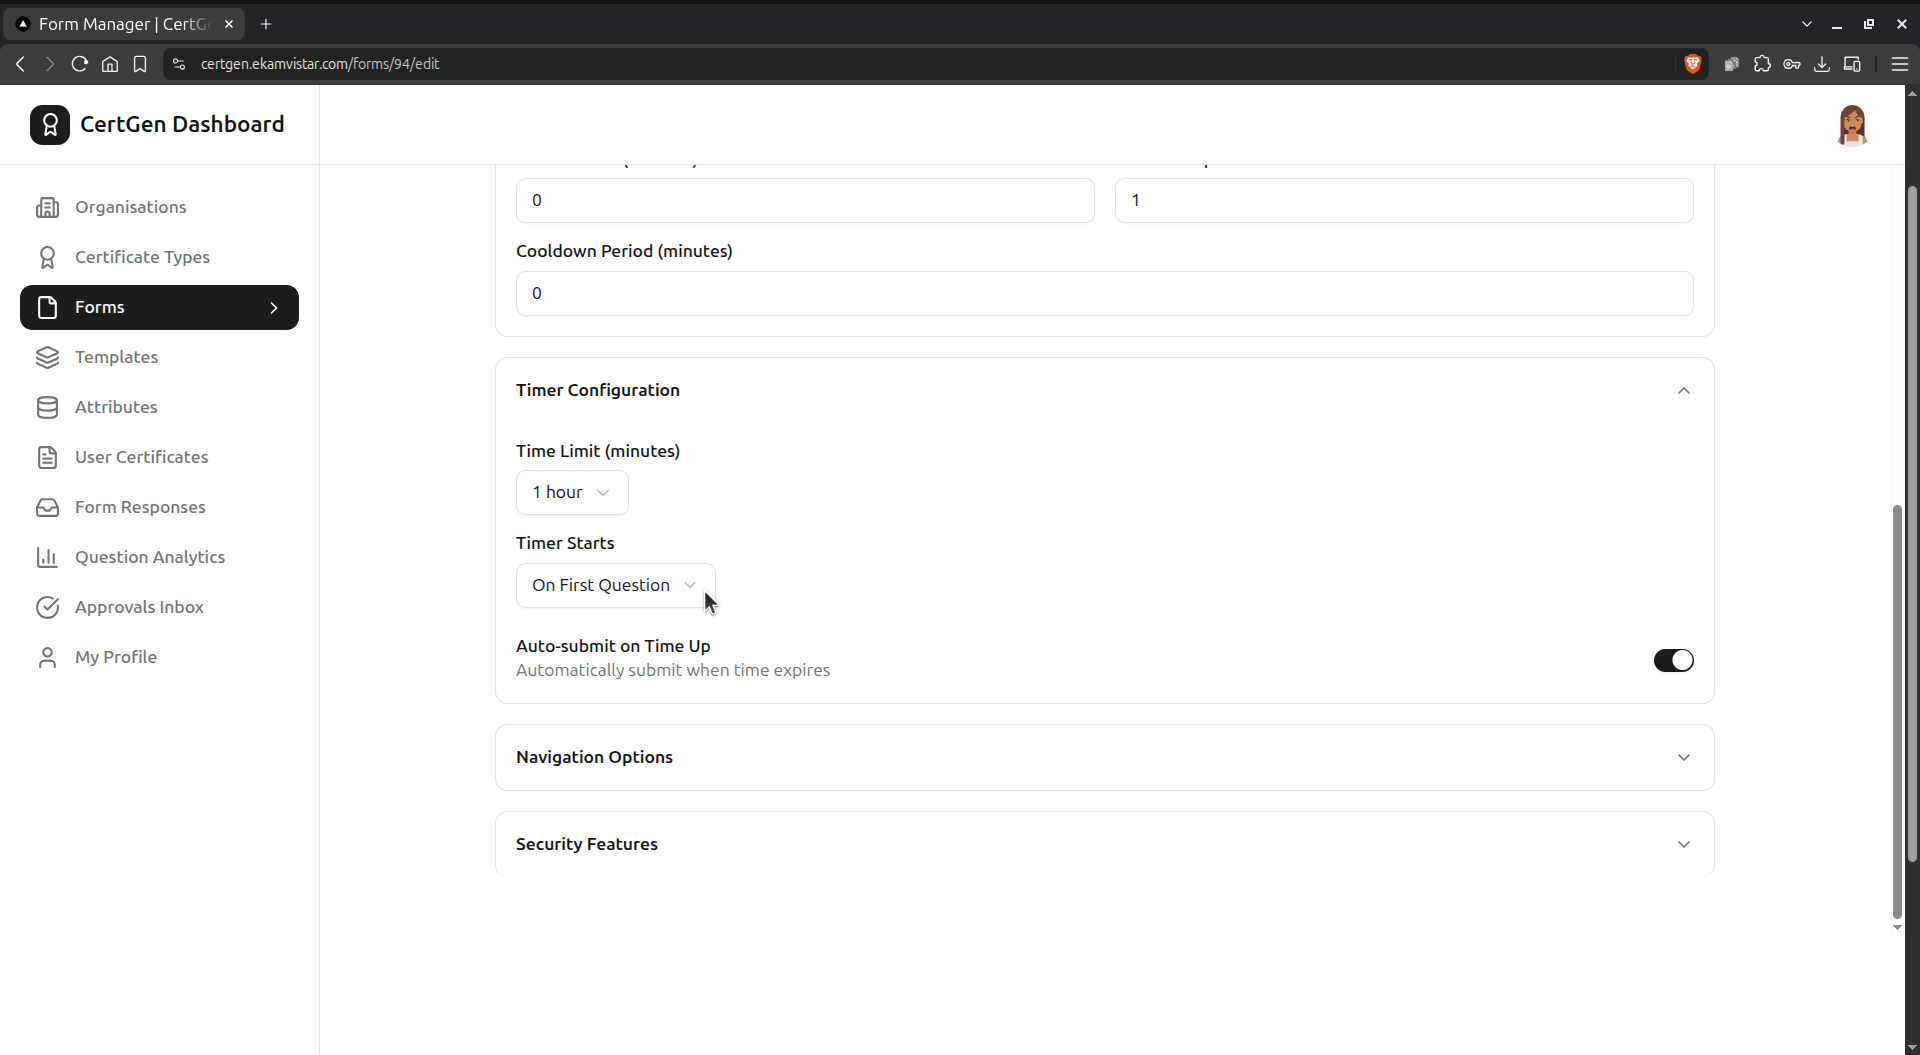
Under Timer Configuration, set a Time Limit, choose when the Timer Starts, and enable Auto-submit on Time Up.
Step 7.3.5: Set Navigation Options
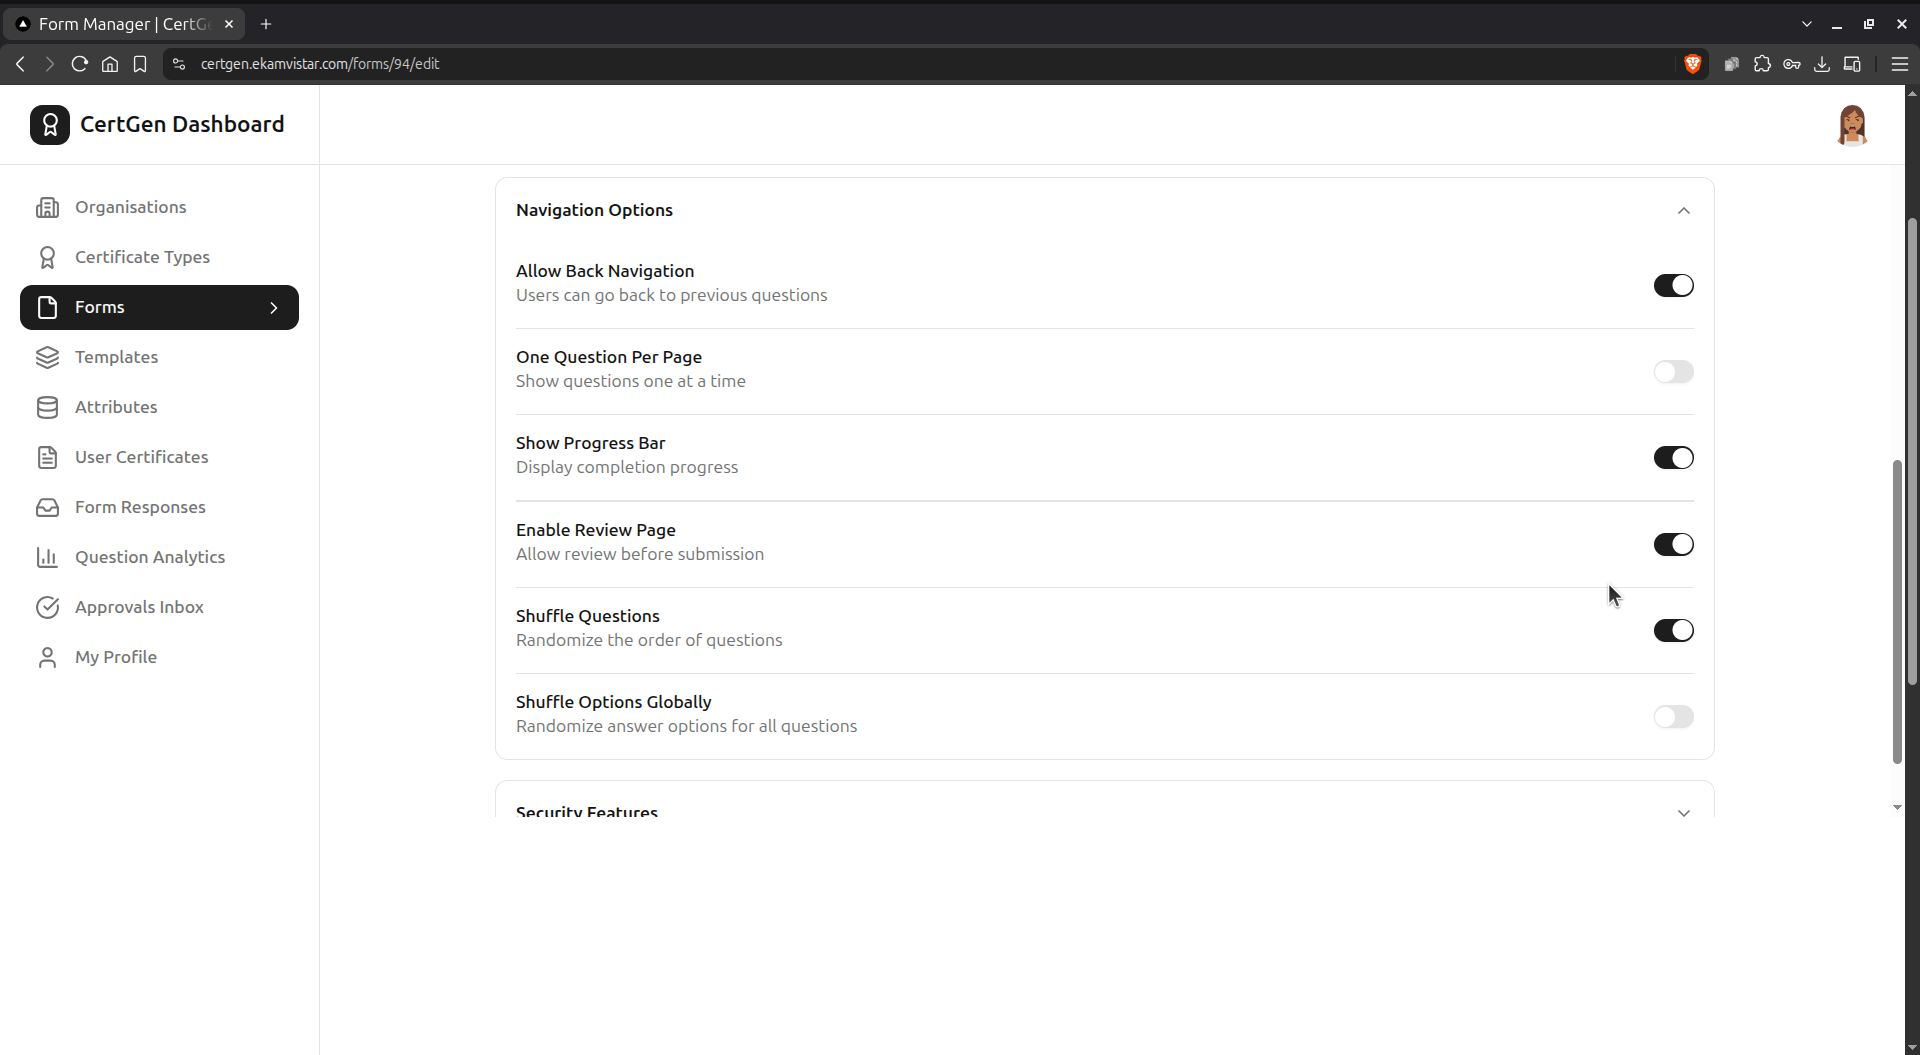
Toggle Allow Back Navigation, One Question Per Page, Show Progress Bar, Enable Review Page, and question/answer shuffling.
Step 7.3.6: Enable Security Features
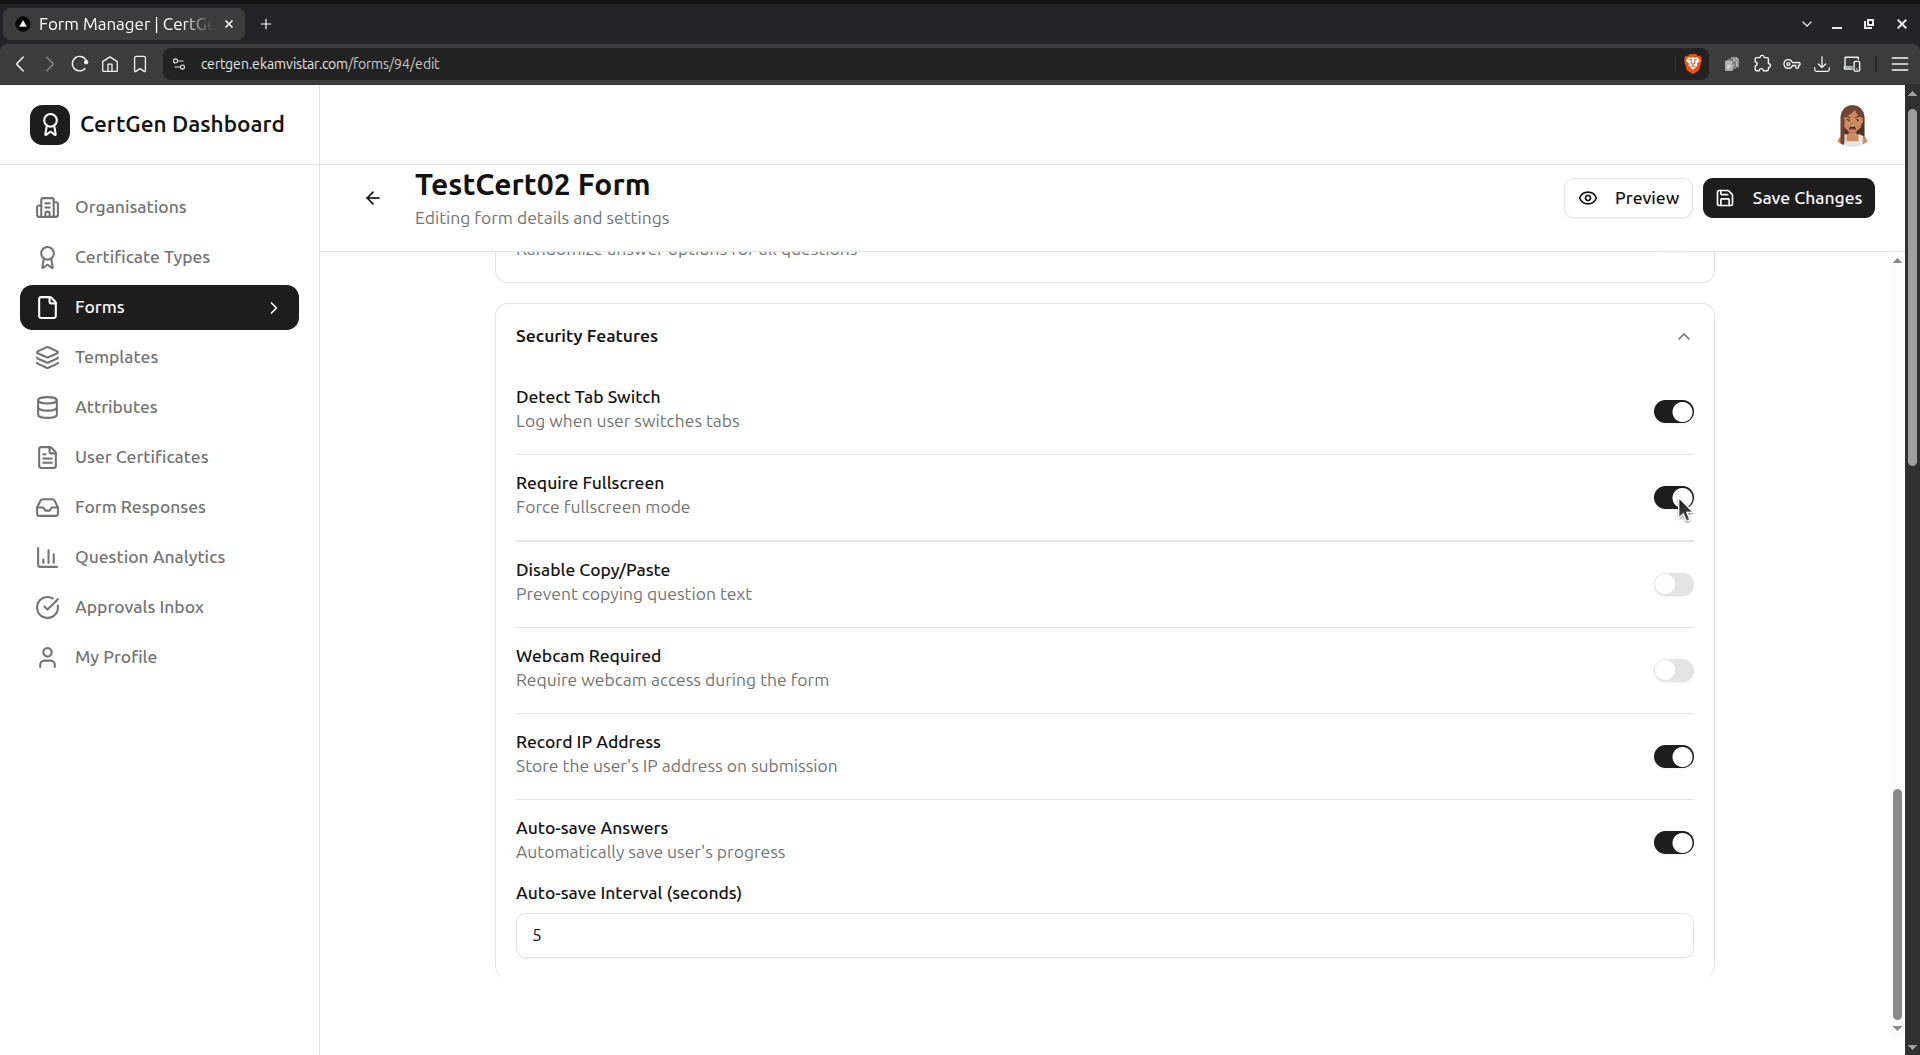
Turn on protections like Detect Tab Switch, Require Fullscreen, Disable Copy/Paste, Webcam Required, Record IP Address, and Auto-save Answers.
Step 7.4.1: Preview the Form
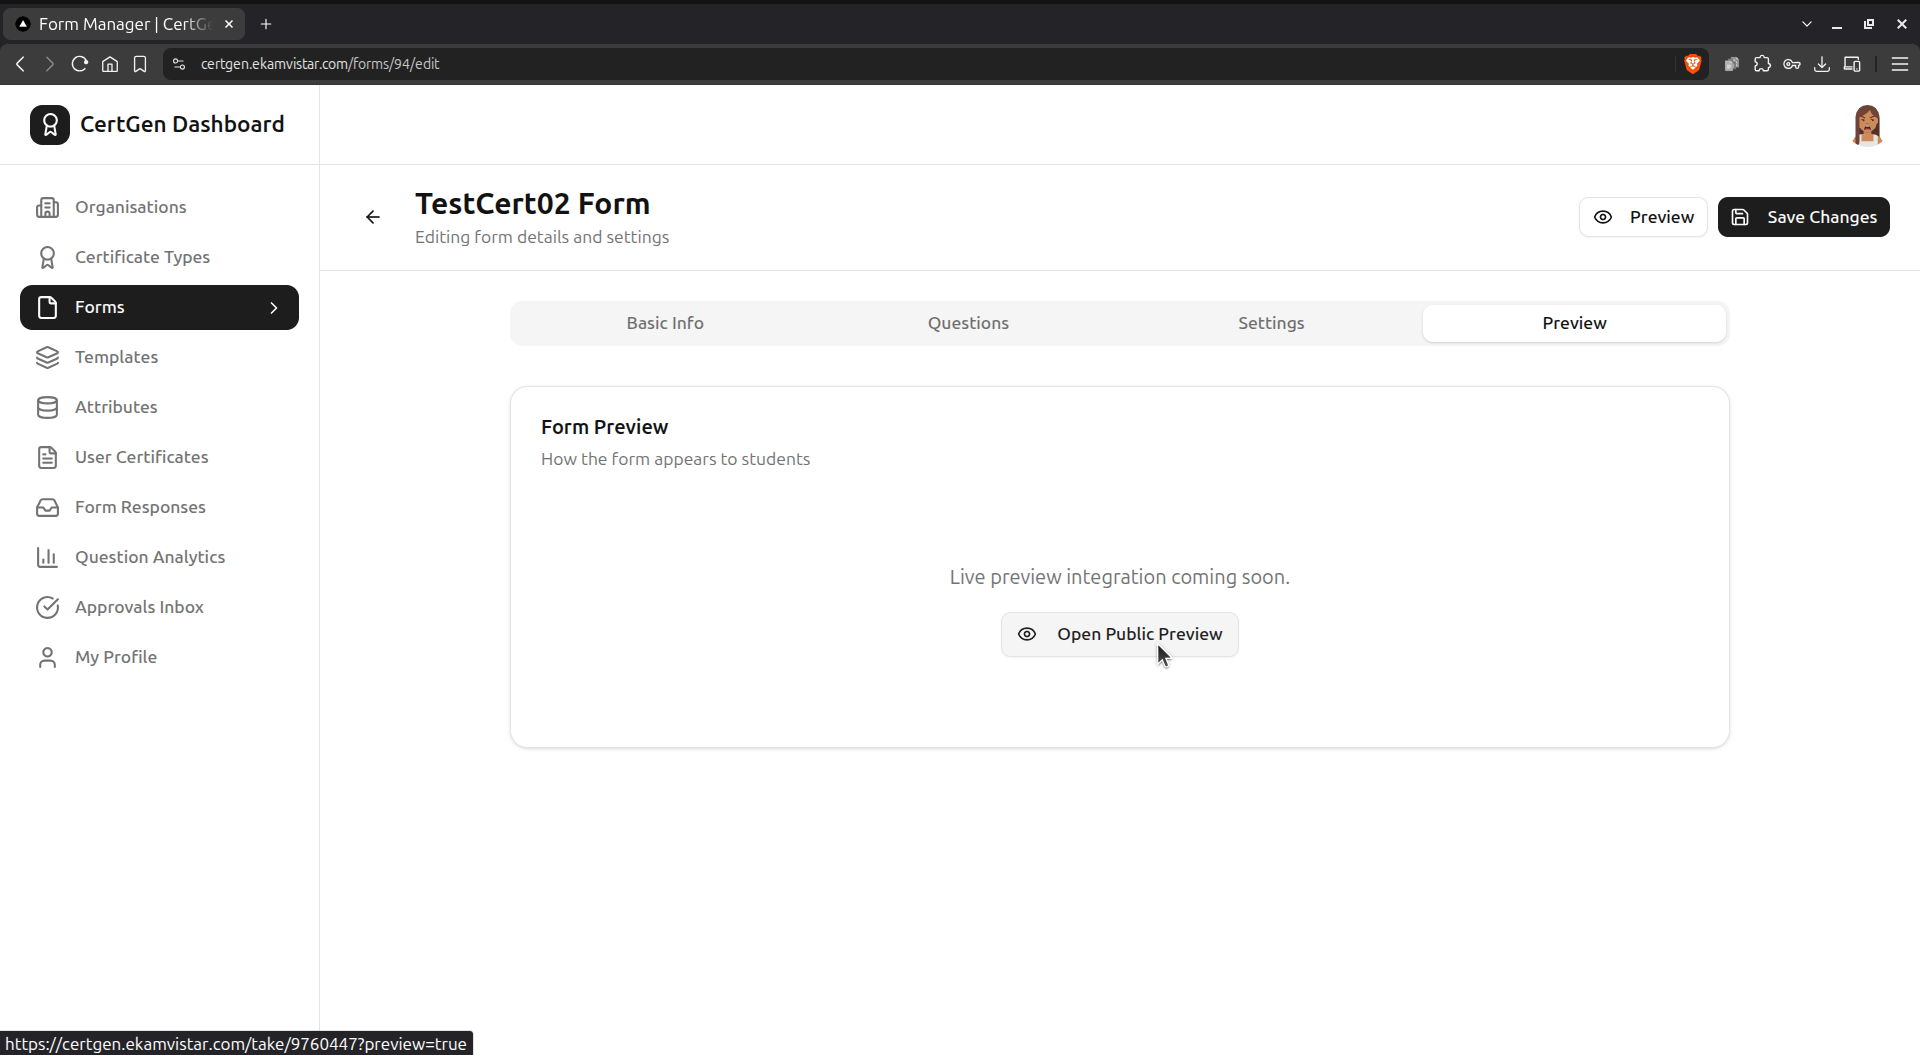
Switch to the Preview tab and click Open Public Preview to see exactly how the form will appear to students.
Step 7.4.2: Walk Through the Live Preview
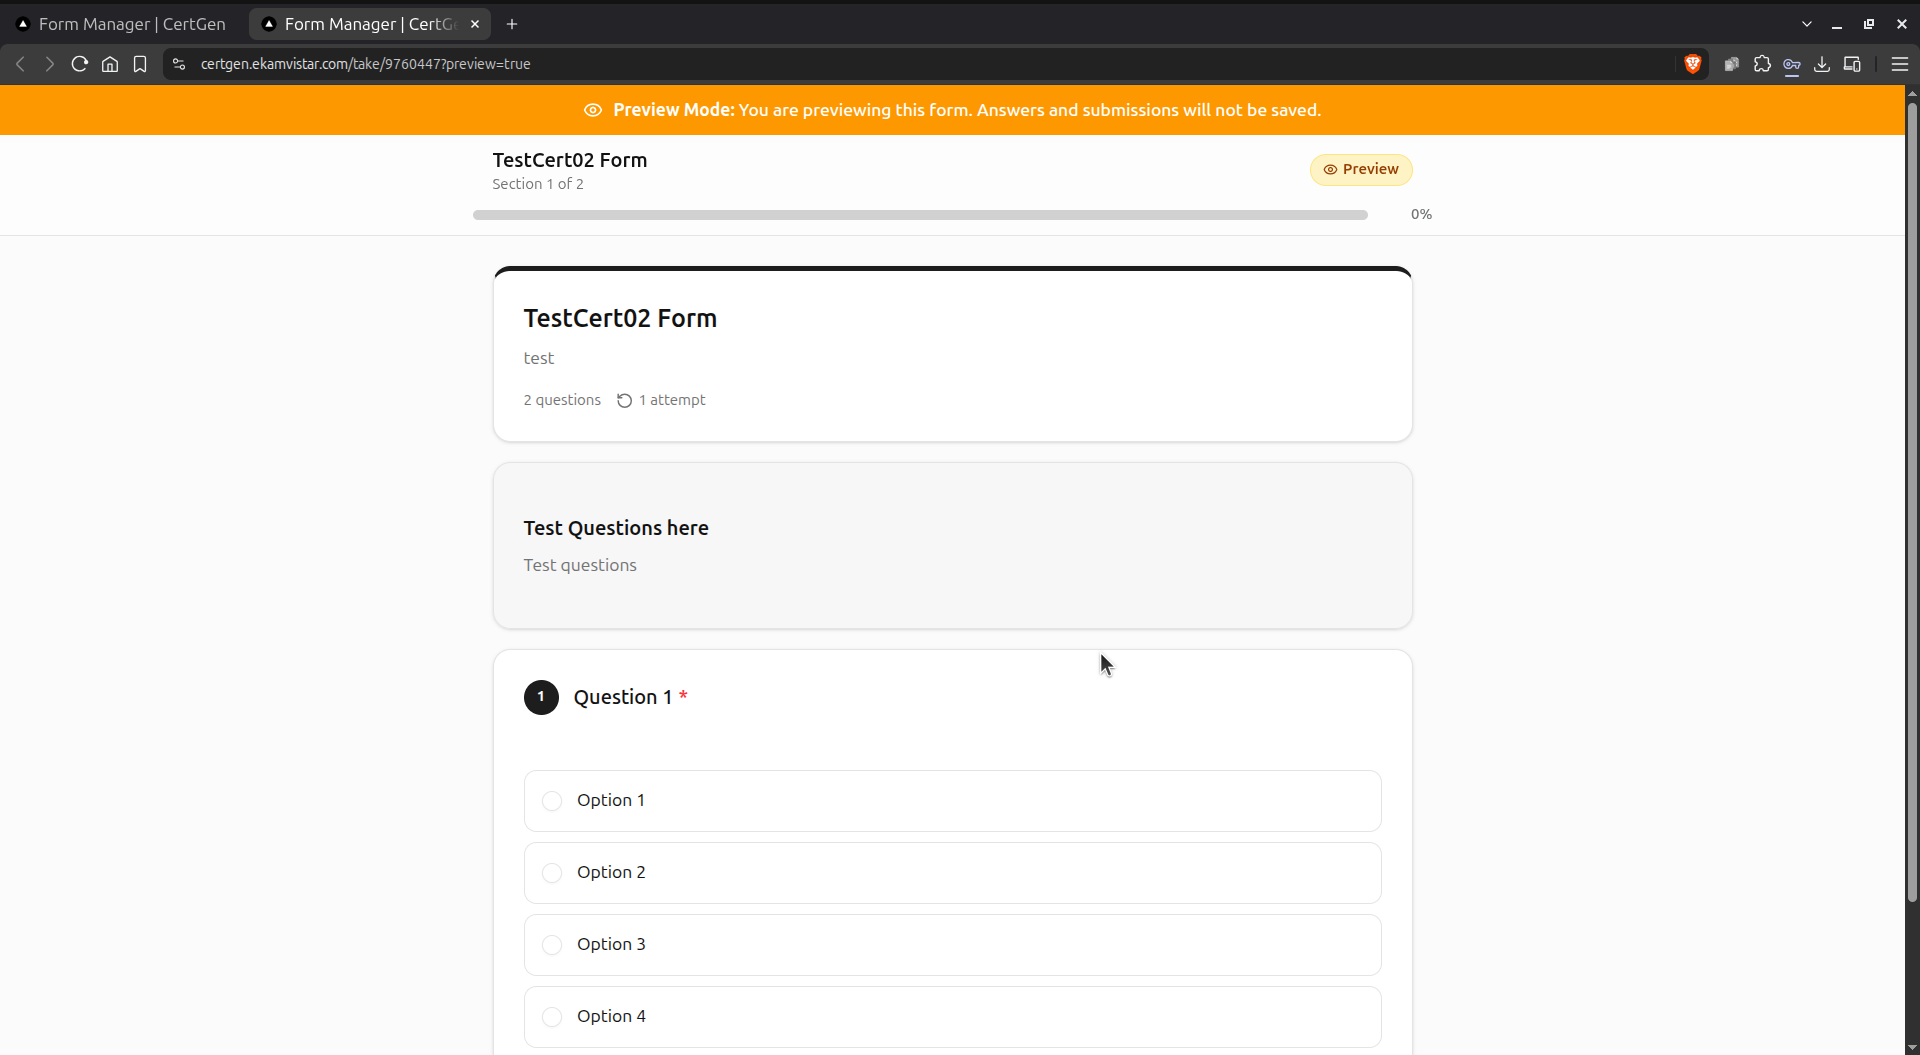
The public preview opens in a new tab with a Preview Mode banner, showing sections, progress and each question as students will see them.
Step 7.4.3: Confirm Submission in Preview
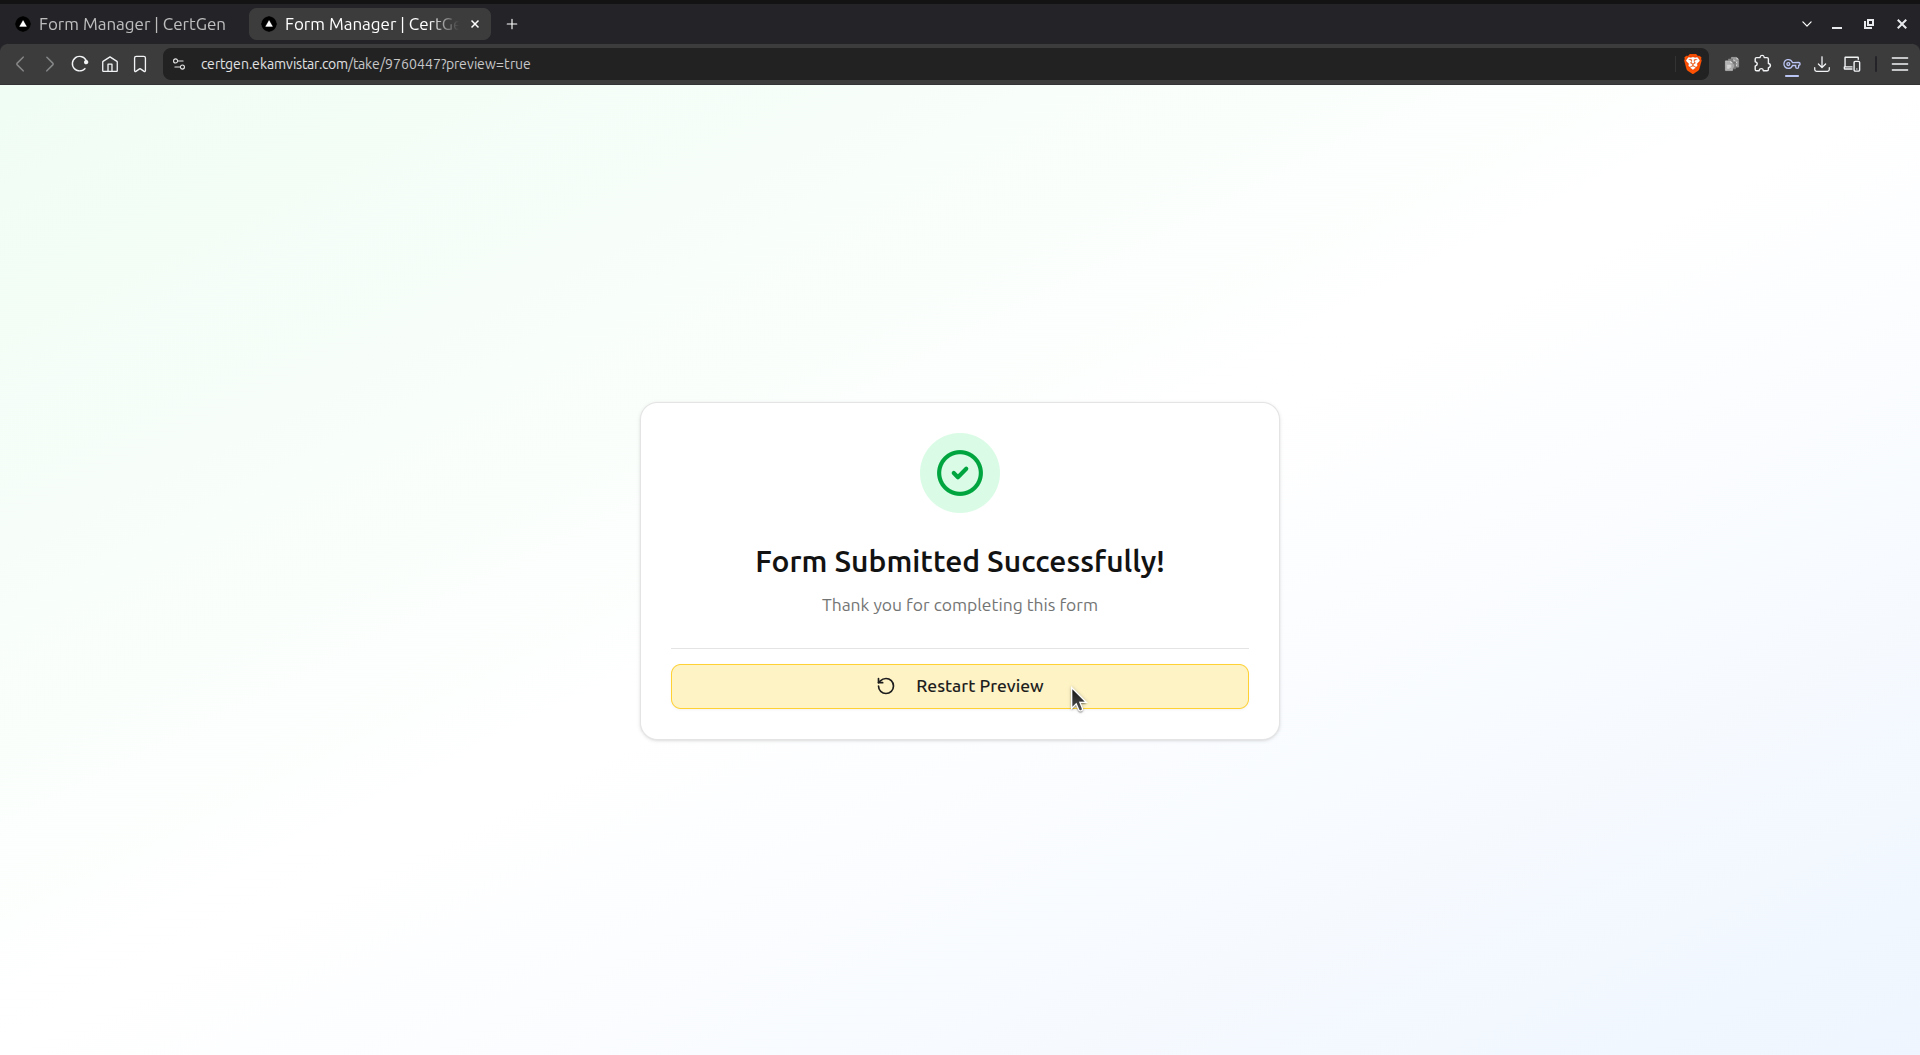
Completing the preview shows a Form Submitted Successfully confirmation, with an option to Restart Preview.
Step 7.4.4: Submit the Form for Approval
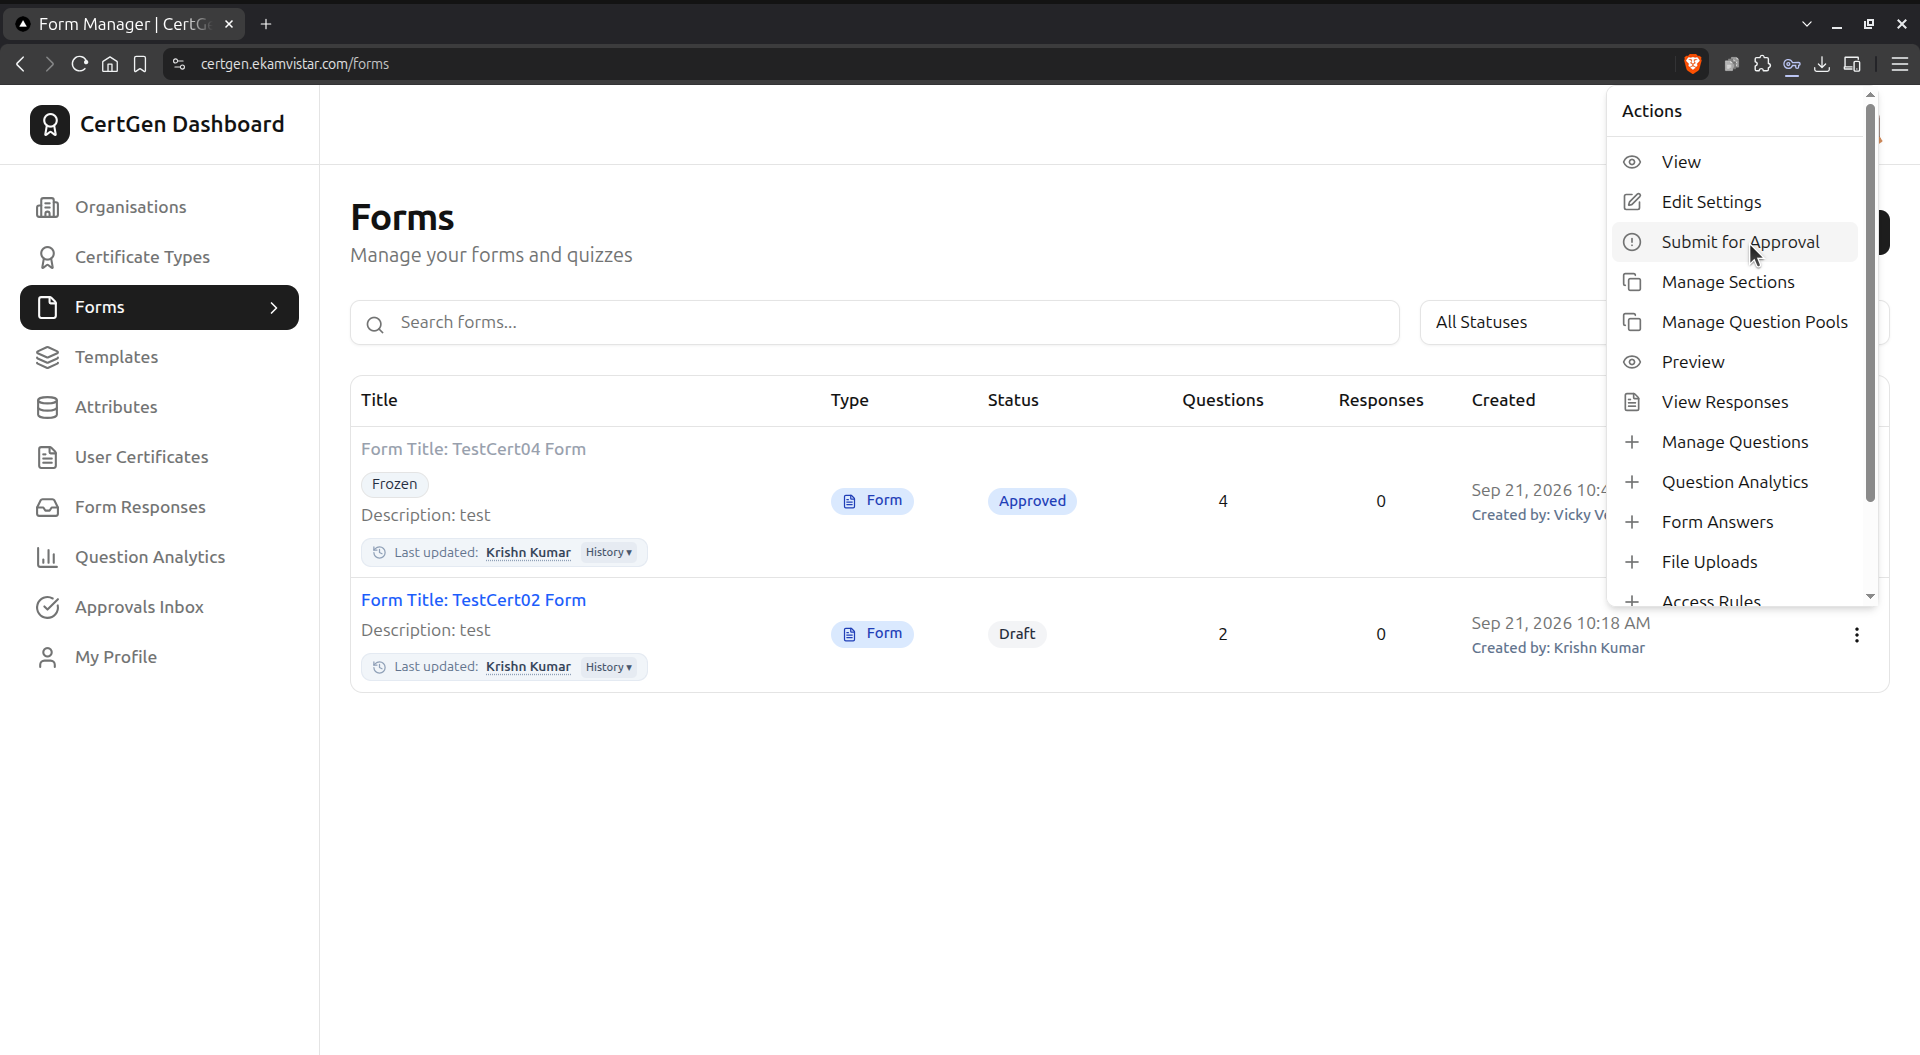
Back in the Forms list, open the Actions menu and choose Submit for Approval to send the form for review.
Step 7.4.5: Select Approvers
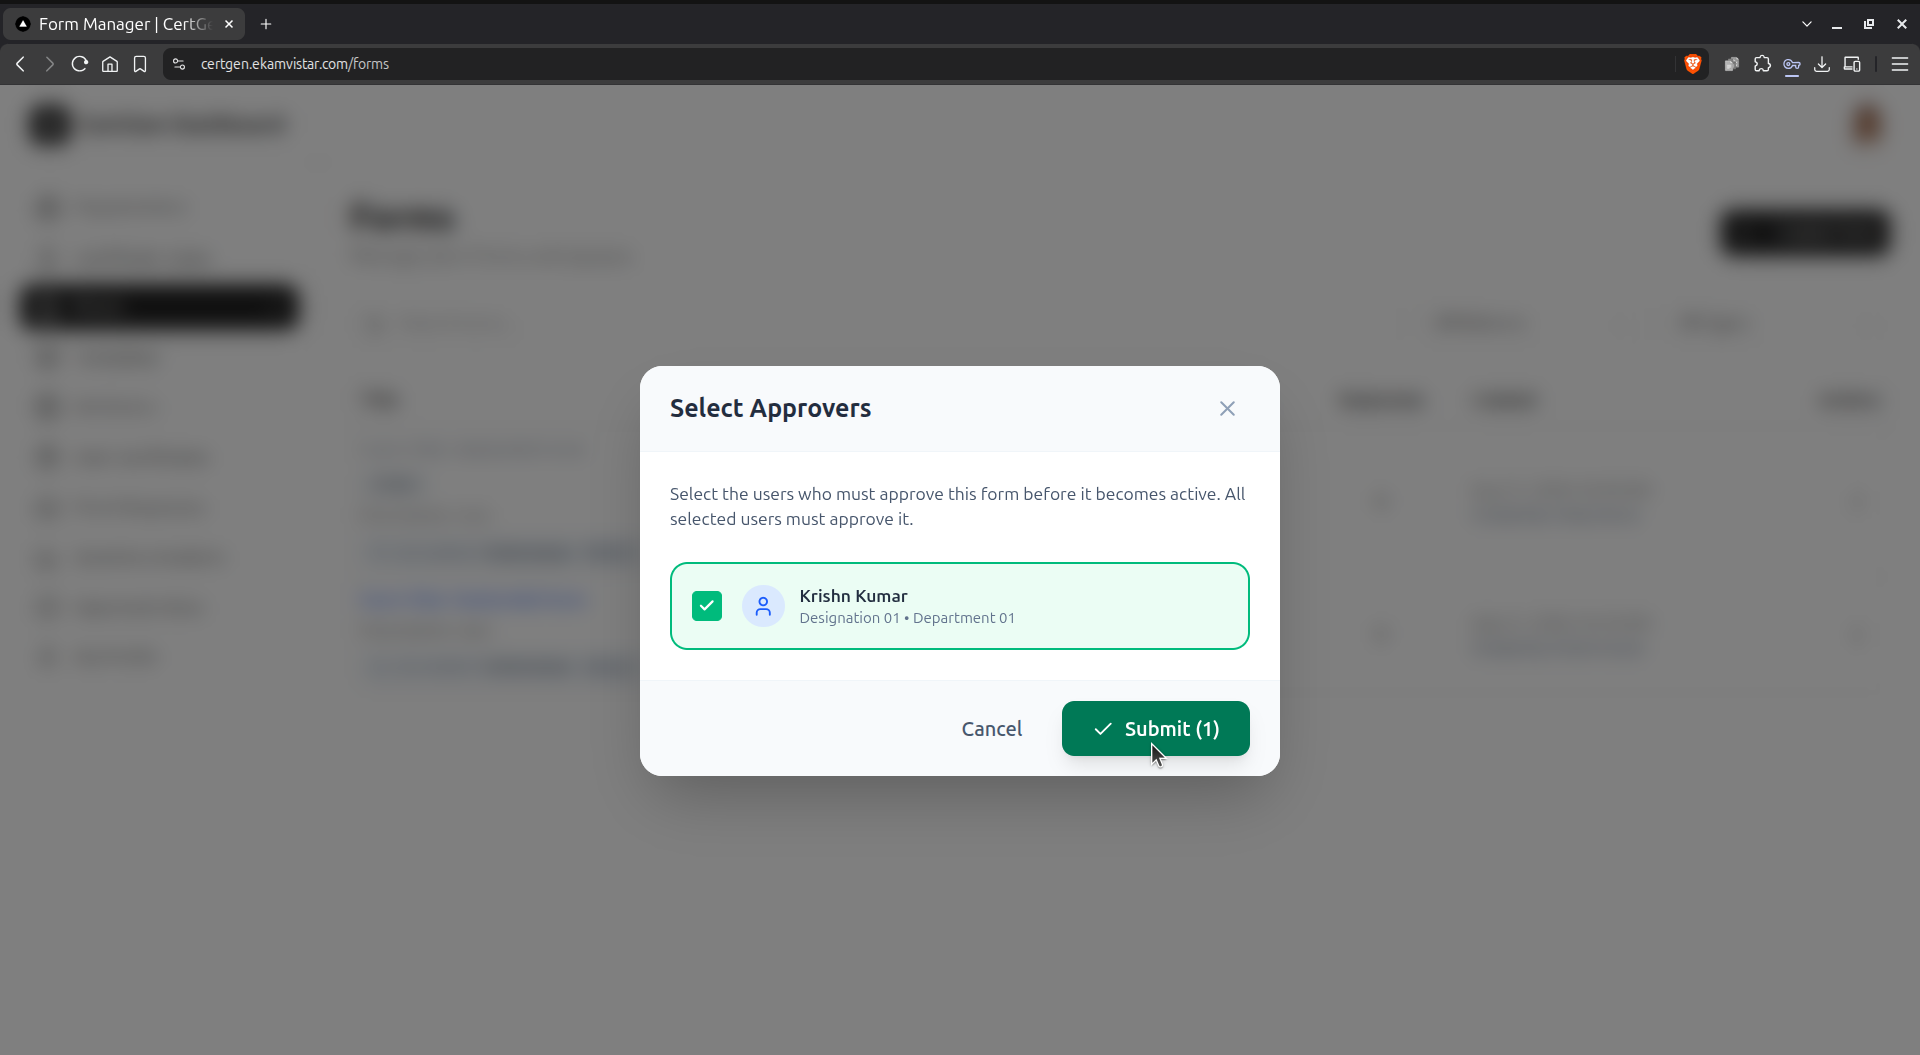
In the Select Approvers dialog, choose the reviewer(s) who must approve the form, then click Submit.
Step 7.4.6: Confirm Approved Status
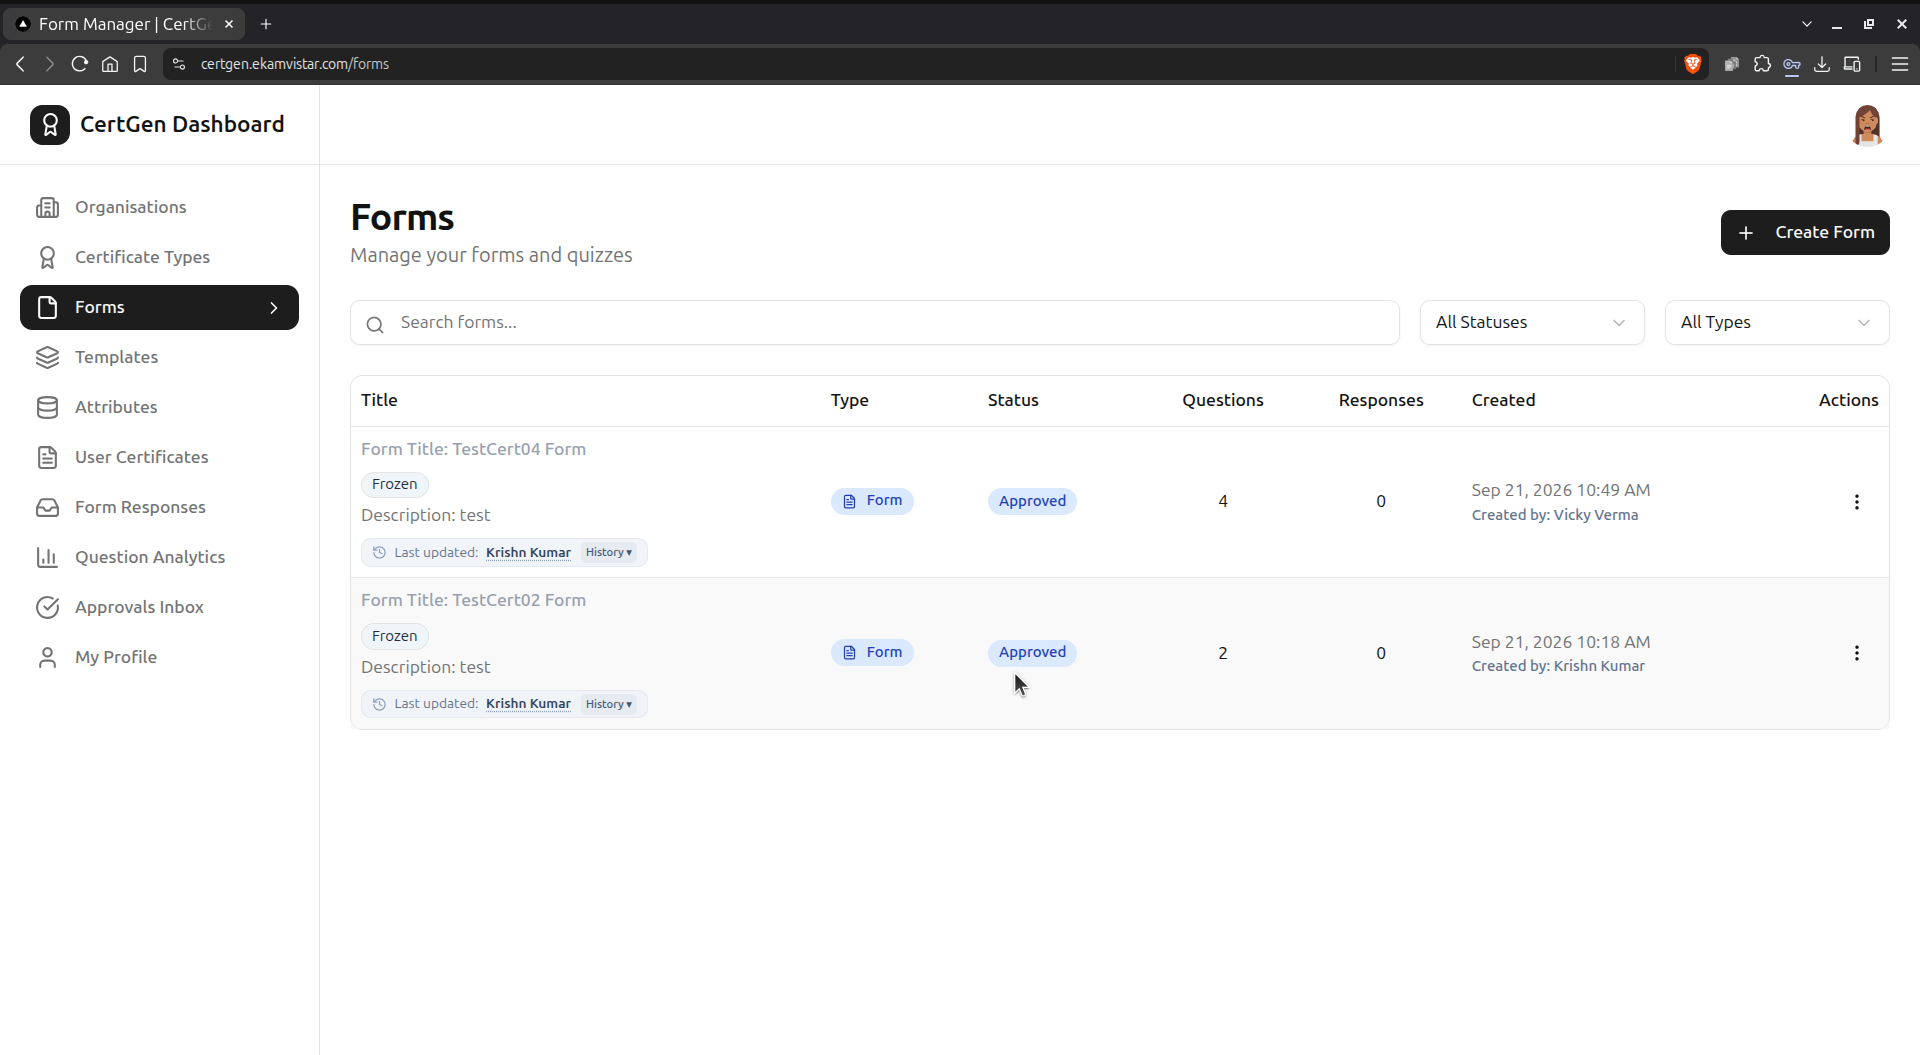
Once approved, the form shows Approved and Frozen badges in the list, meaning it?s locked from further edits.
Step 7.4.7: Publish a Frozen Form
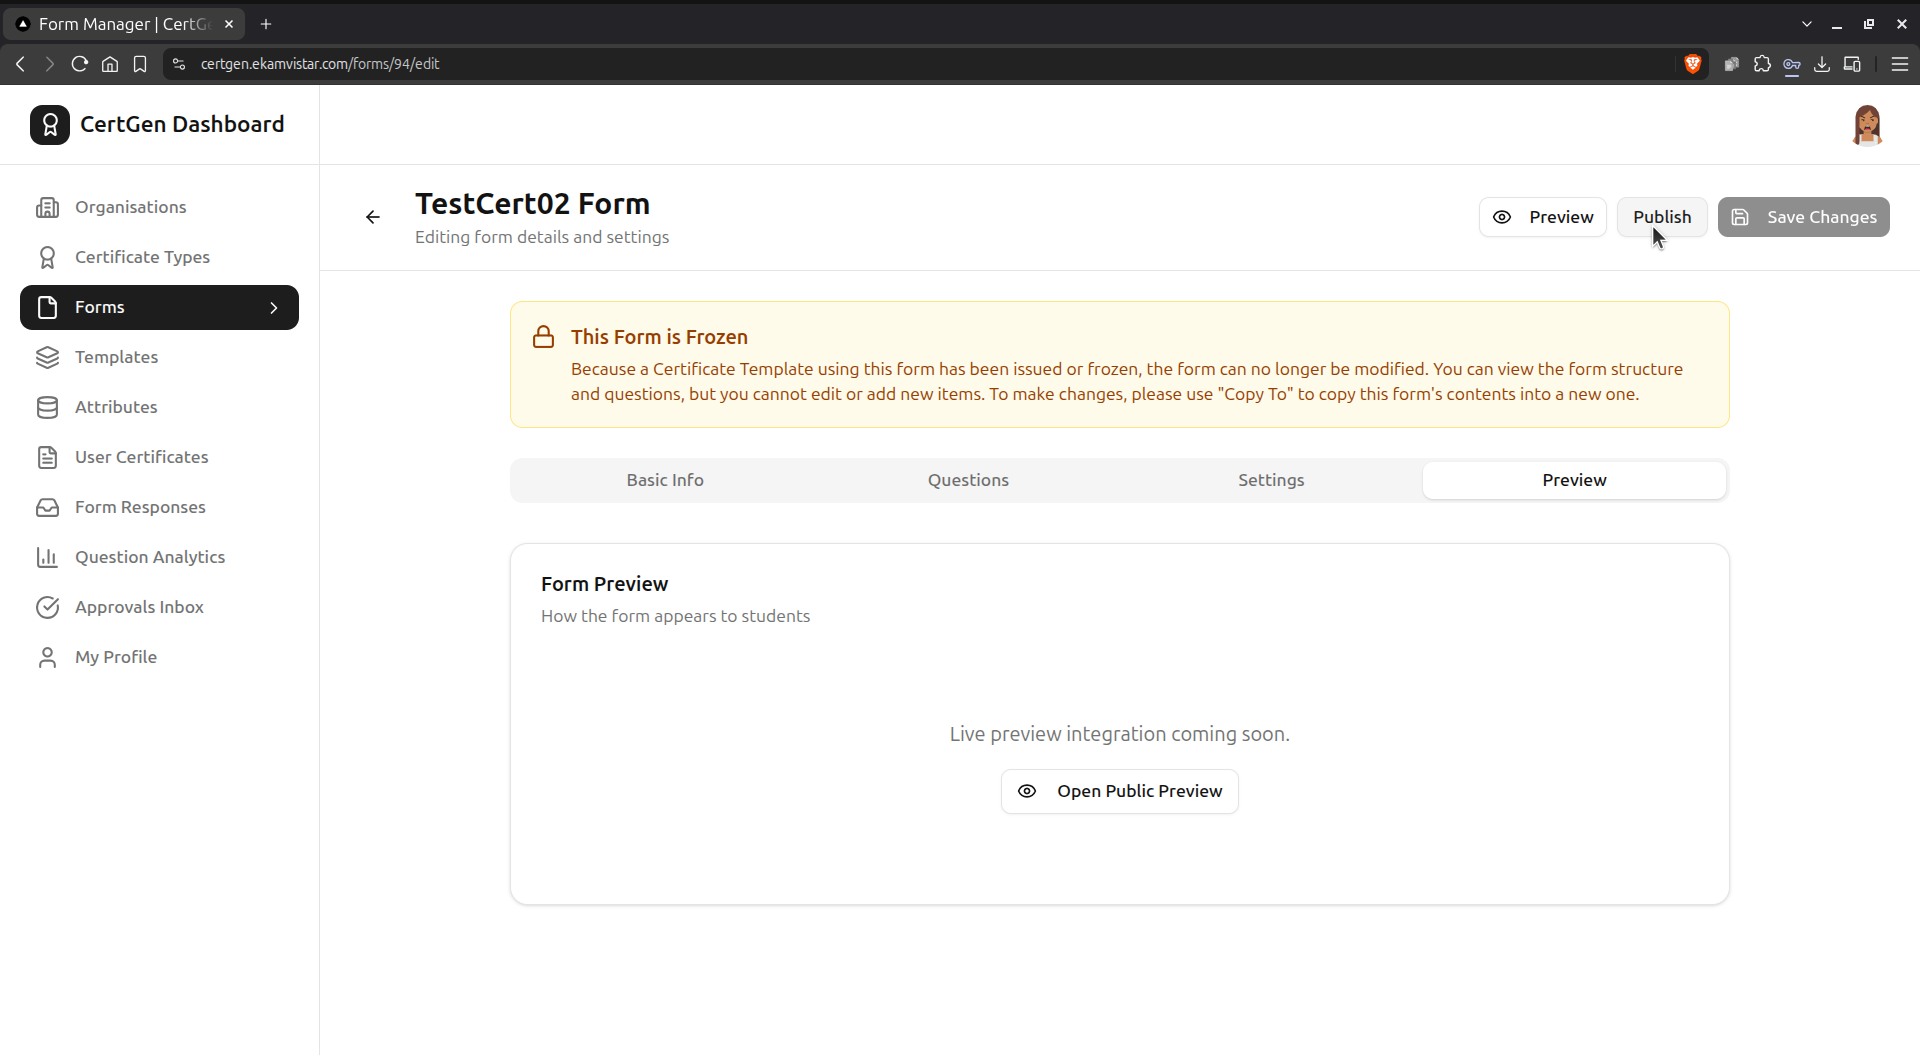
A frozen form displays a notice that it can no longer be modified (use ?Copy To? for changes) and now shows a Publish button to make it live.
Step 8.1.0: Open Certificate Templates
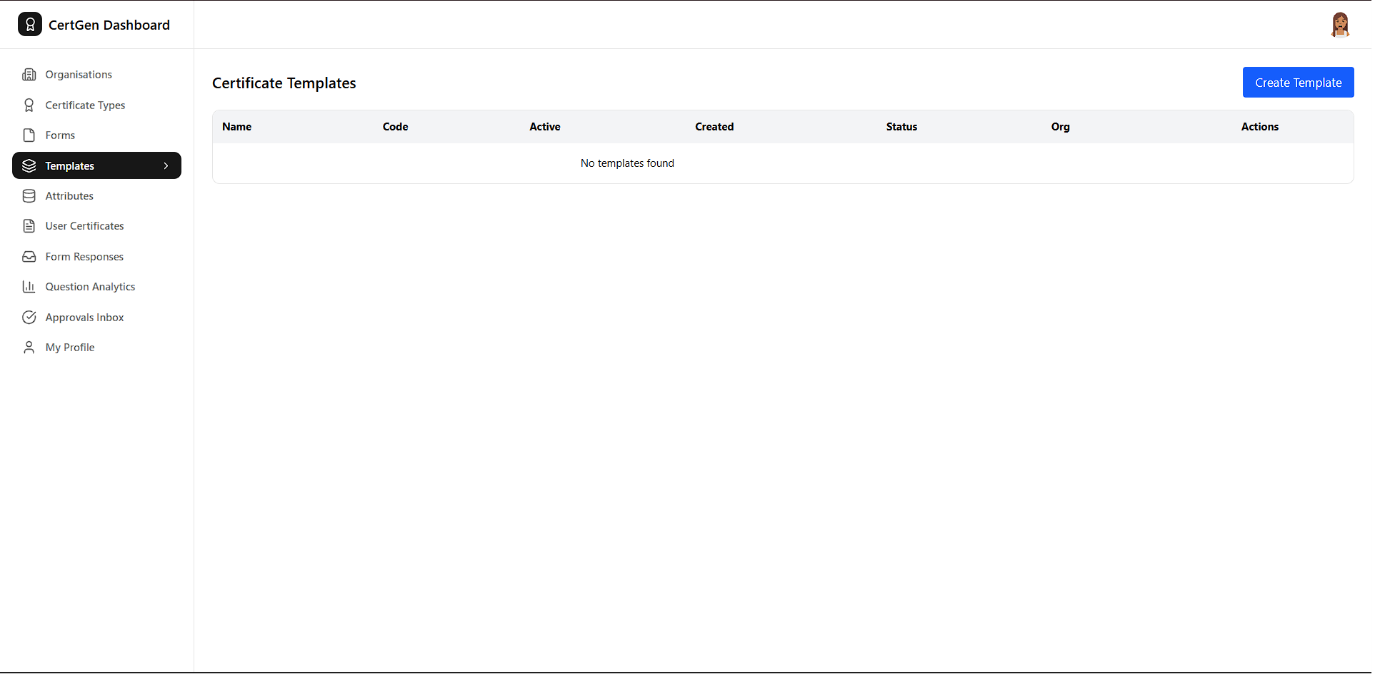
Go to Templates to view or create certificate templates; it starts empty until one is created.
Step 8.2.0: Create a Certificate Template
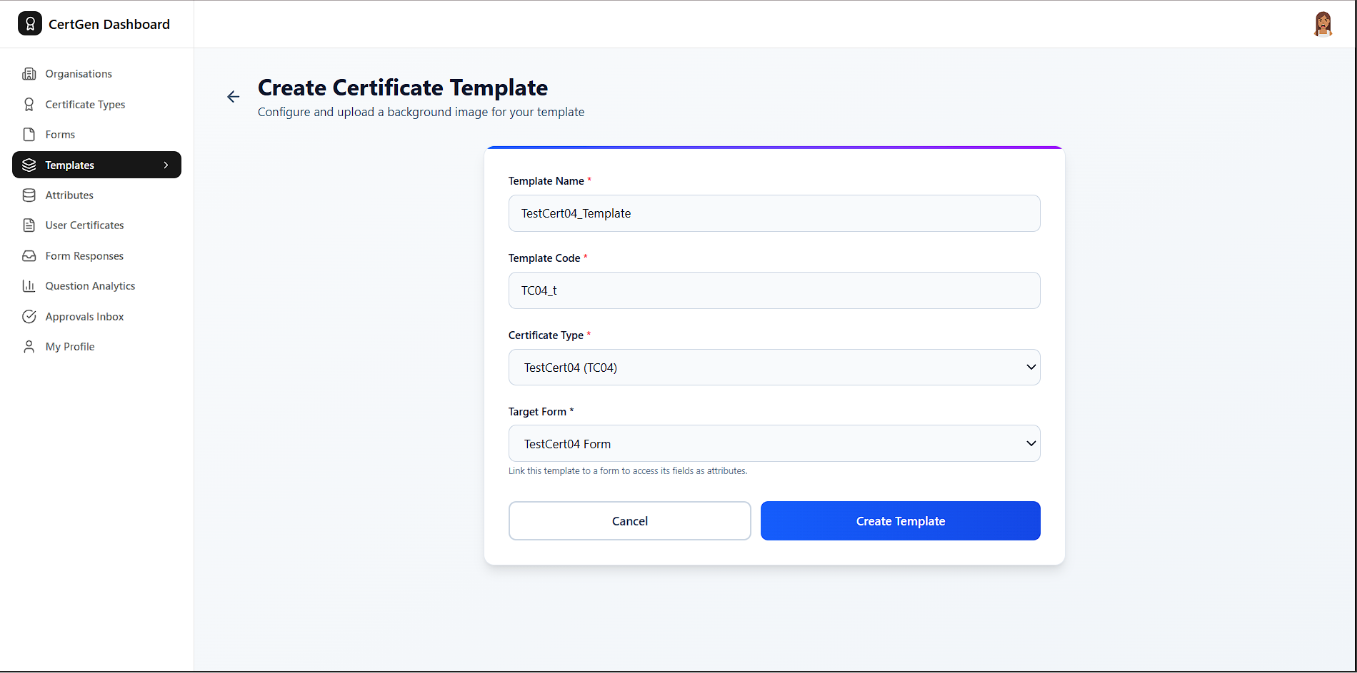
Click Create Template, enter a Template Name and Code, then select the Certificate Type and a Target Form to link its fields as attributes.
Step 8.3.0: Open Attributes for a Template
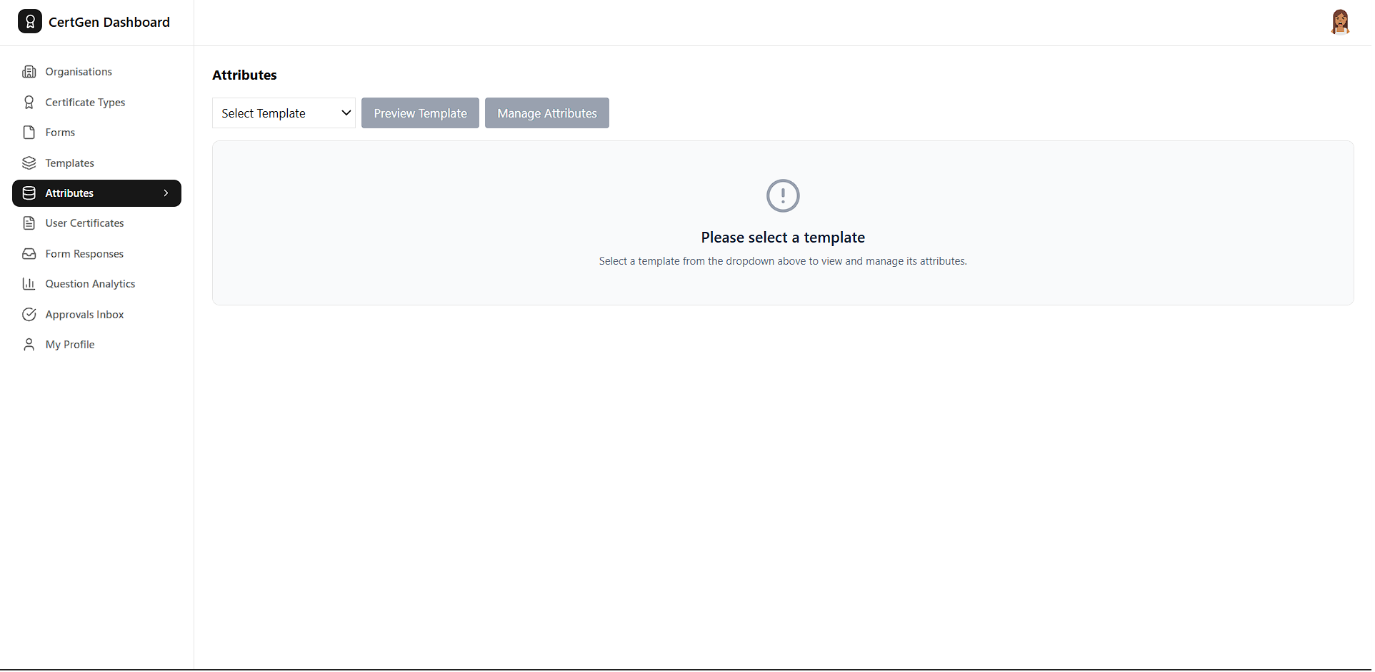
Go to Attributes and select a template from the dropdown to view or manage its fields.
Step 8.4.0: Manage a Template?s Attributes
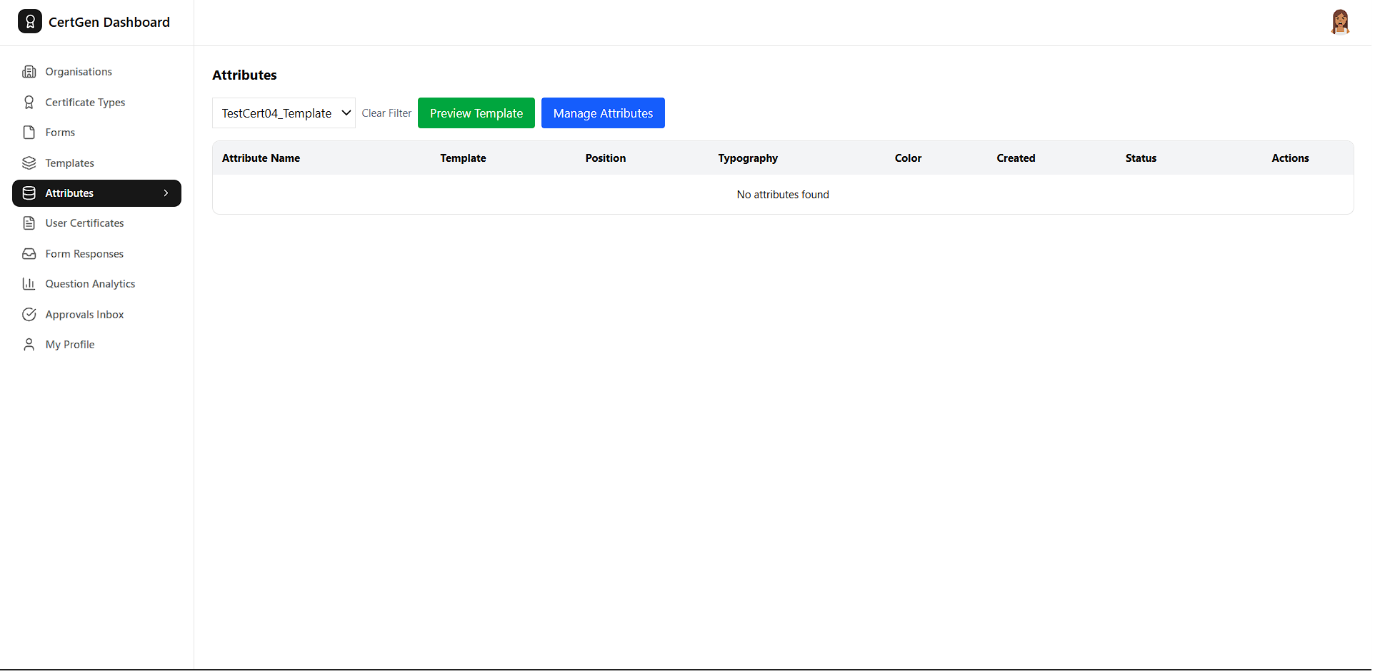
With a template selected, click Manage Attributes to open the field designer (the list starts with ?No attributes found?).
Step 9.0.1: Open the Design Certificate Fields Canvas
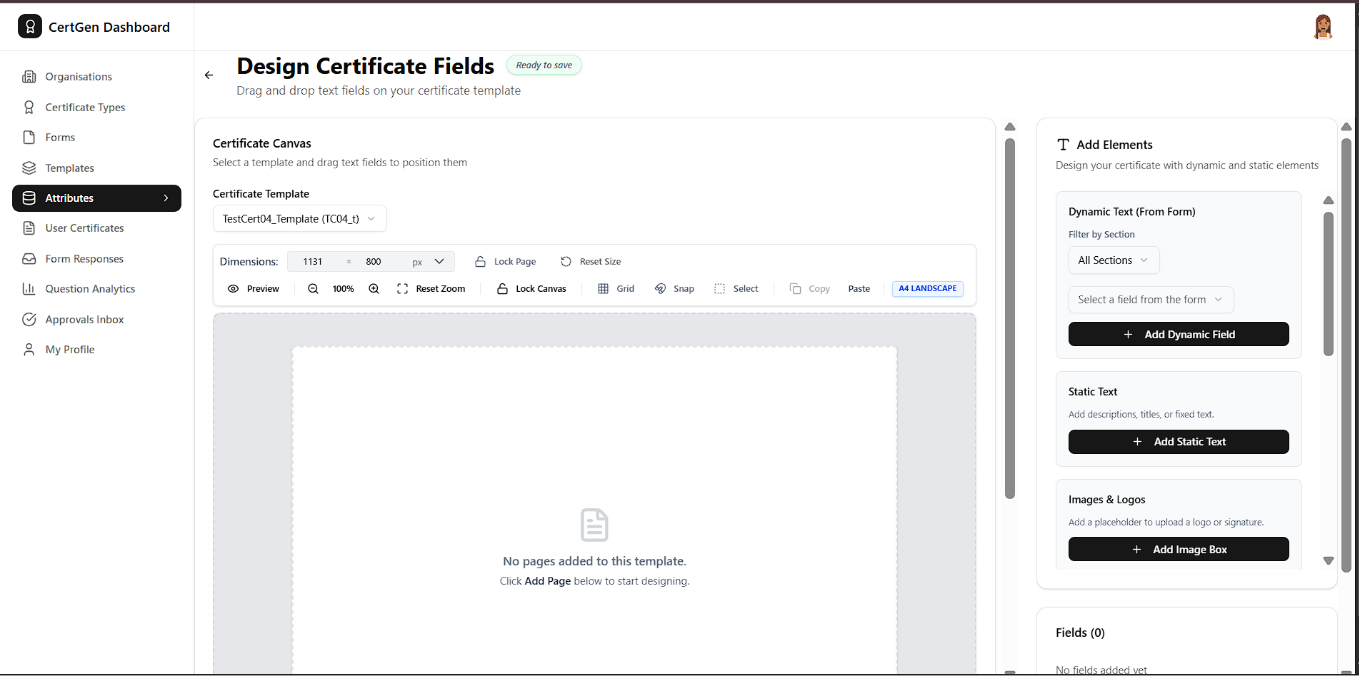
The Design Certificate Fields screen lets you drag and drop text, static text, and image elements onto the certificate canvas.
Step 9.0.2: Start with an Empty Page
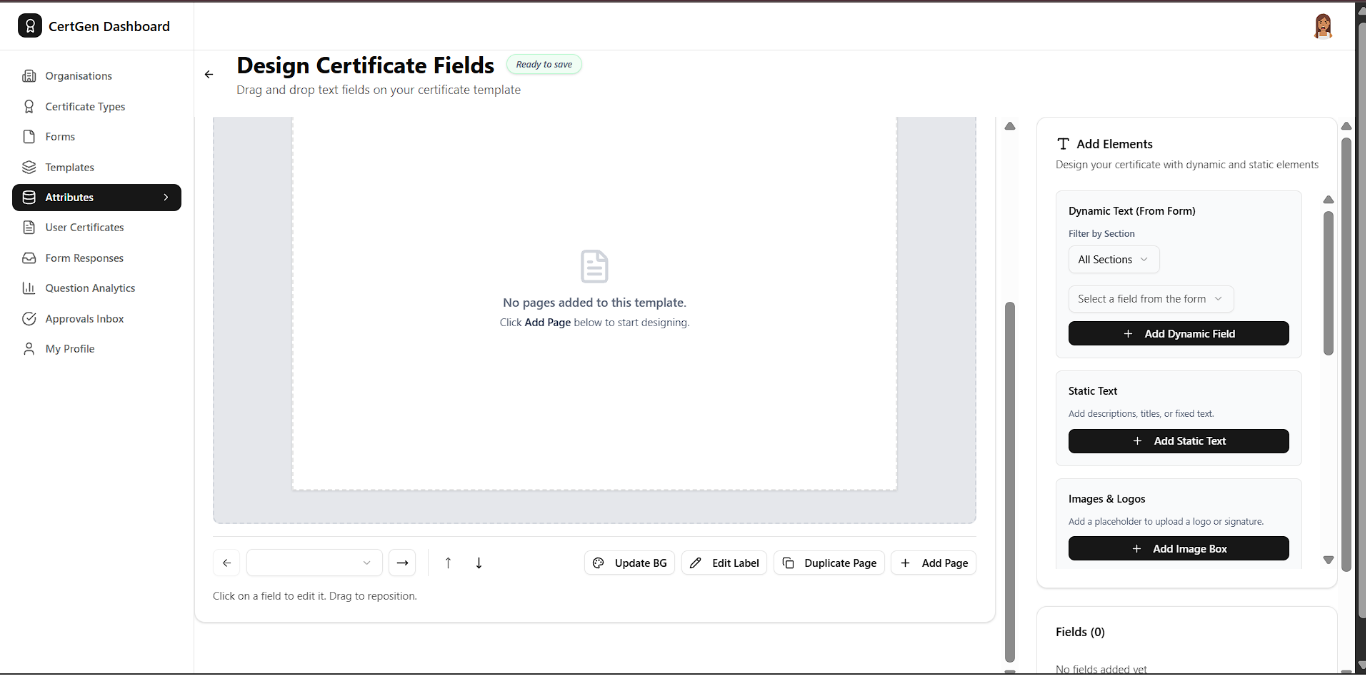
Before adding fields, click Add Page below the canvas to create the first page of the template.
Step 9.0.3: Configure a New Page
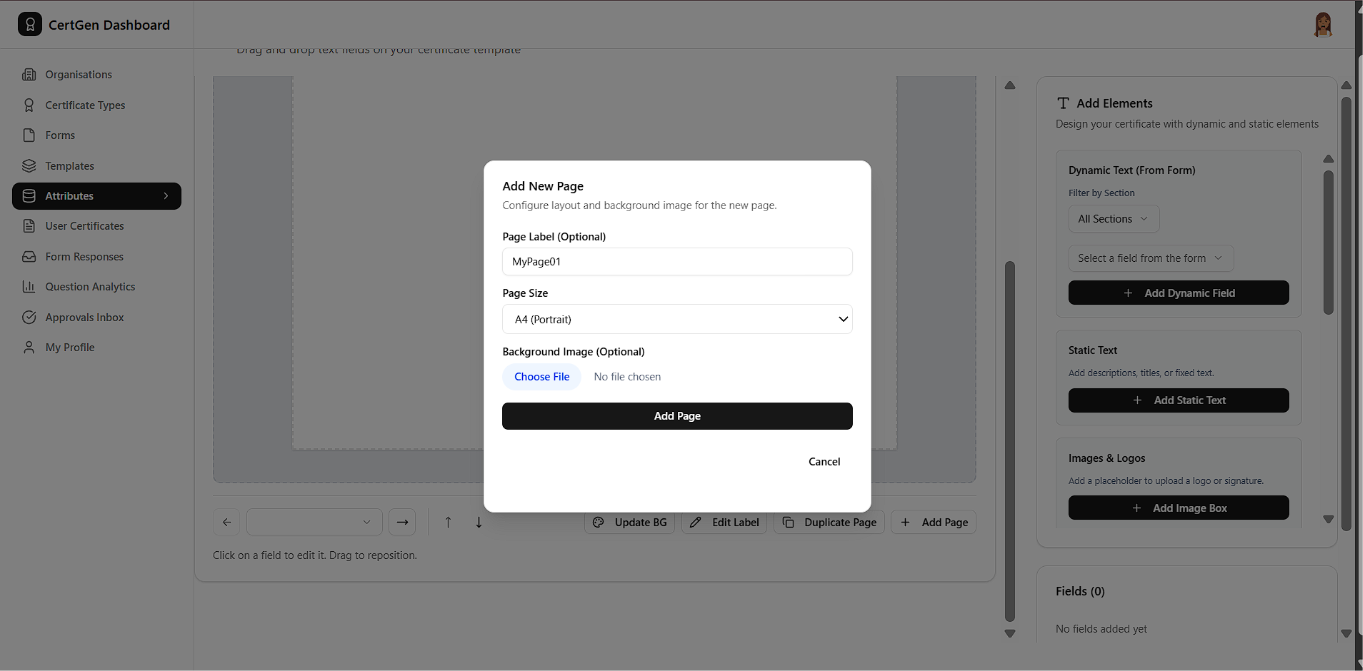
In the Add New Page dialog, set a Page Label, choose a Page Size, and optionally upload a Background Image.
Step 9.0.4: Blank Page Ready for Fields
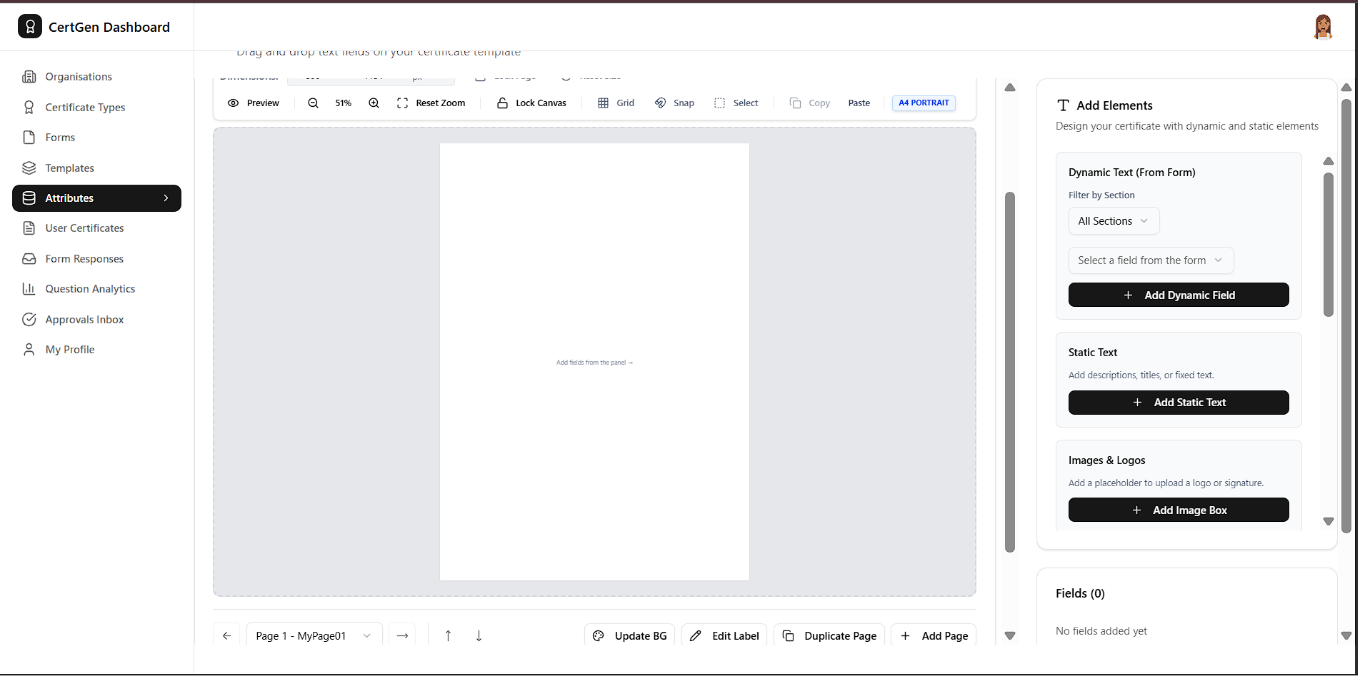
The new A4 Portrait page appears empty, prompting you to add fields from the right-hand panel.
Step 9.0.5: Upload a Certificate Background
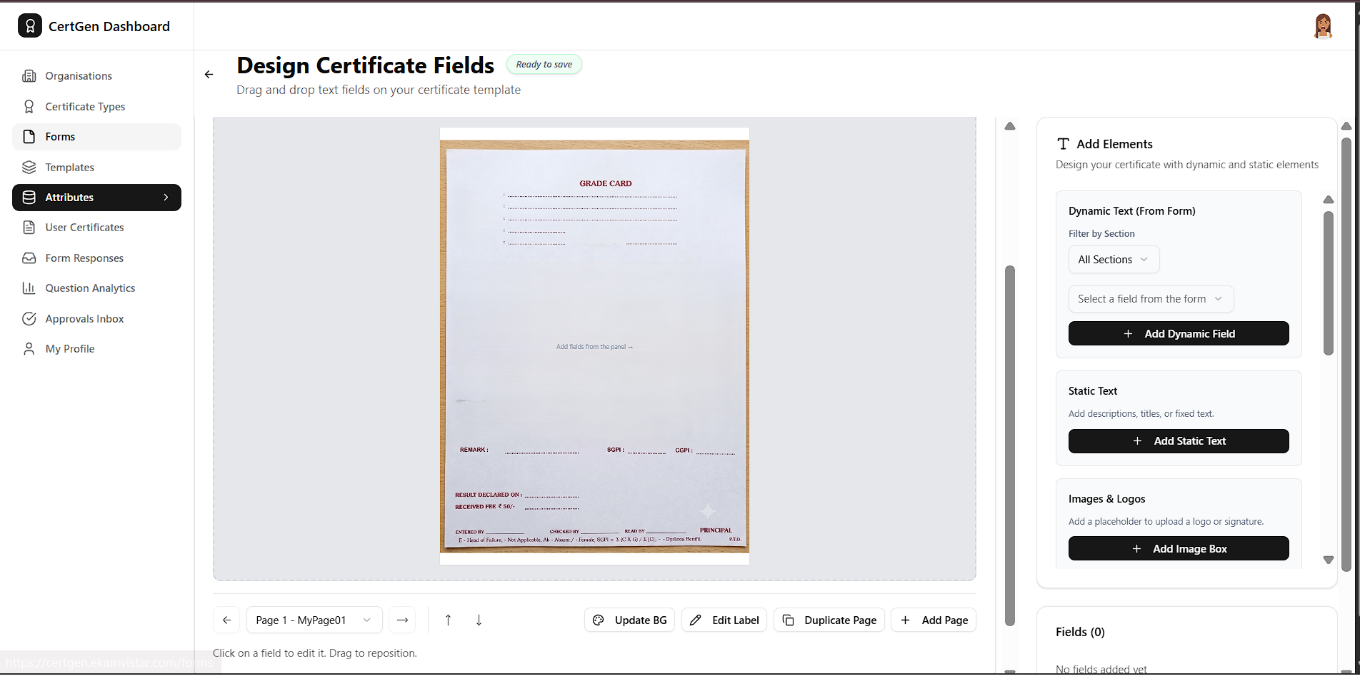
Uploading a background image (e.g., a grade card layout) displays it behind the canvas so fields can be positioned over it.
Step 9.0.6: Adjust the Background
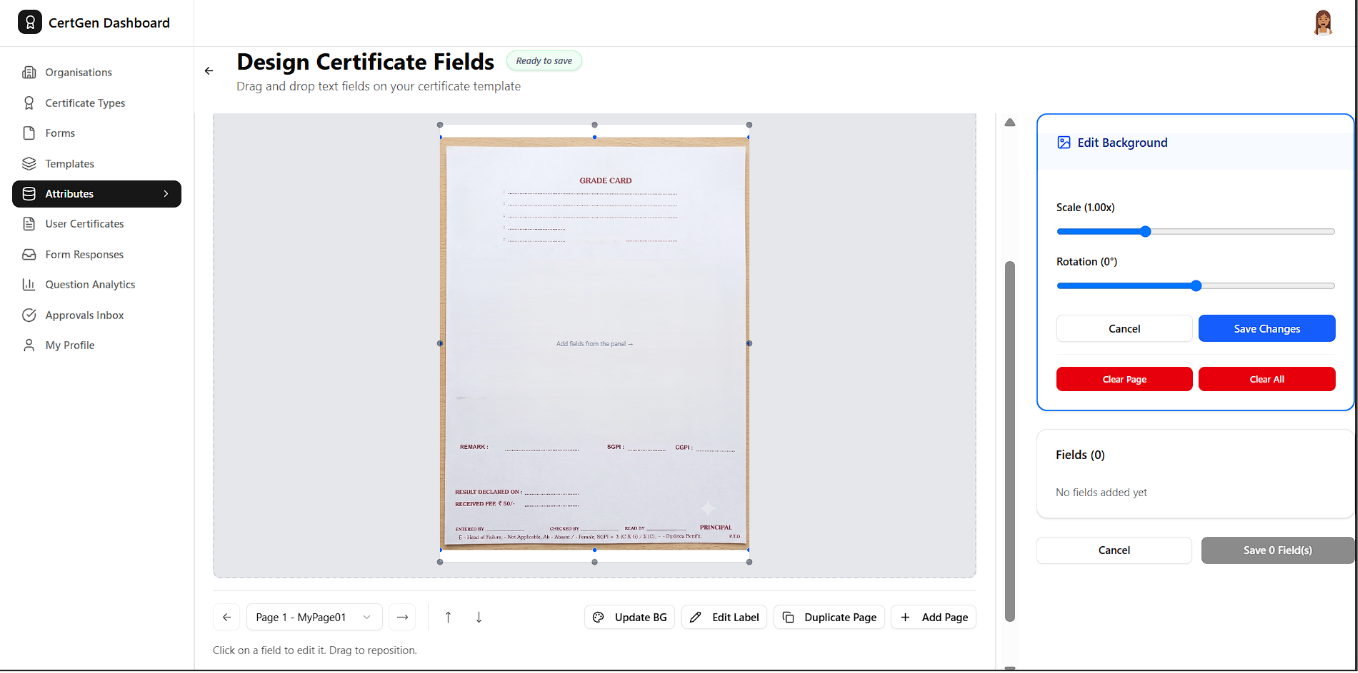
Use the Edit Background panel to Scale or Rotate the image, or Clear Page/Clear All to start over.
Step 9.0.7: Add a Dynamic Text Field
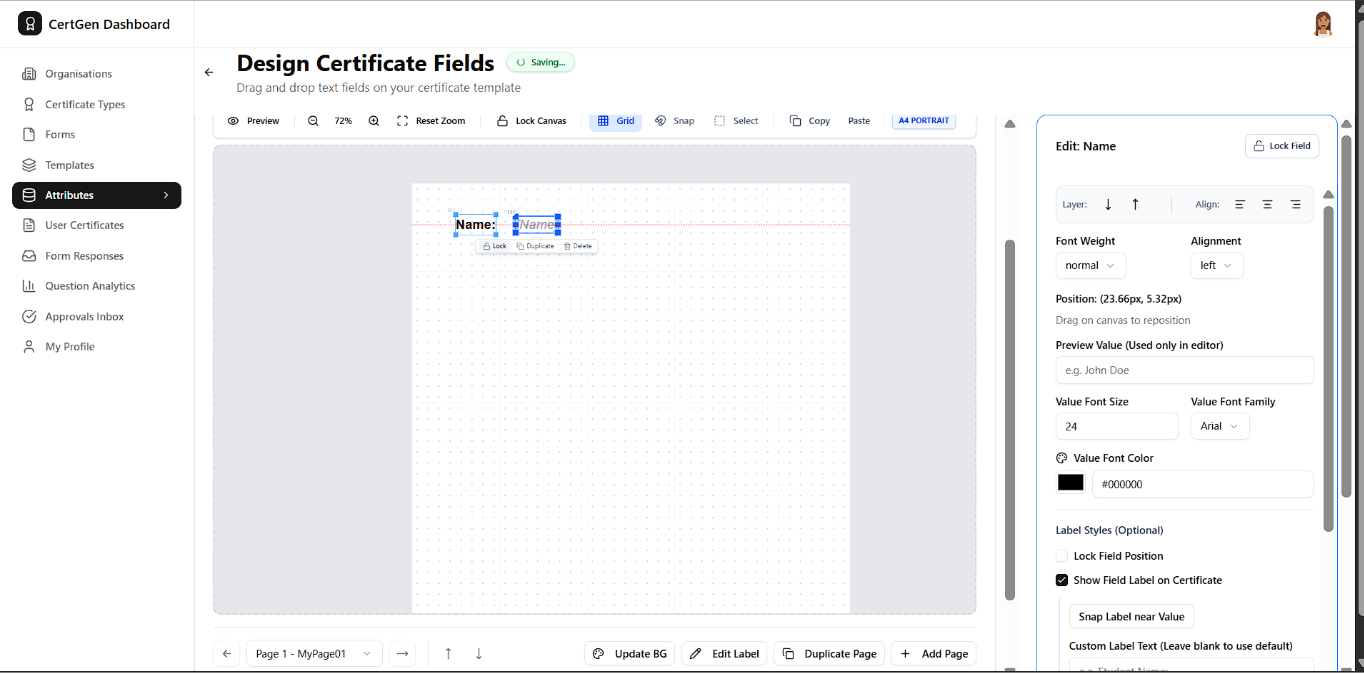
Click Add Dynamic Field to place a form-linked field like Name; the Edit panel lets you set font, alignment, size, colour and label options.
Step 9.0.8: Add Static Text
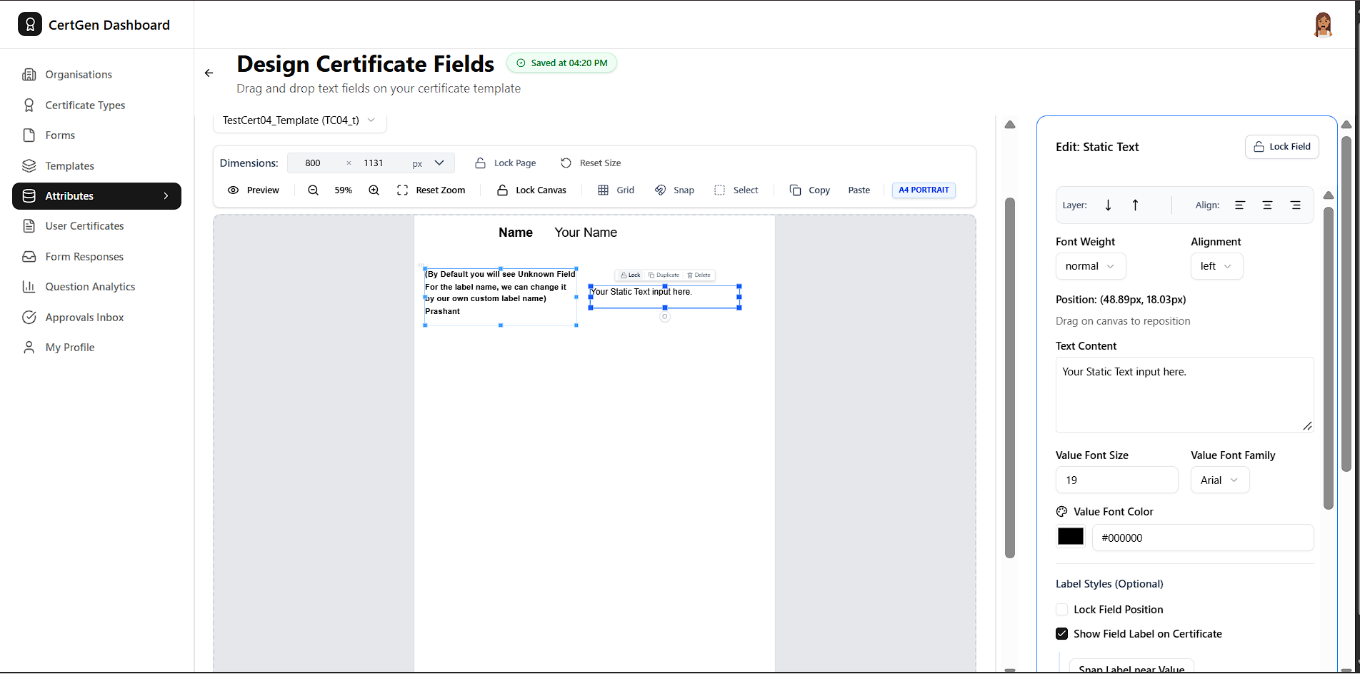
Click Add Static Text to place fixed text (titles or descriptions) and edit its content directly in the Text Content box.
Step 9.0.9: Add an Image Placeholder
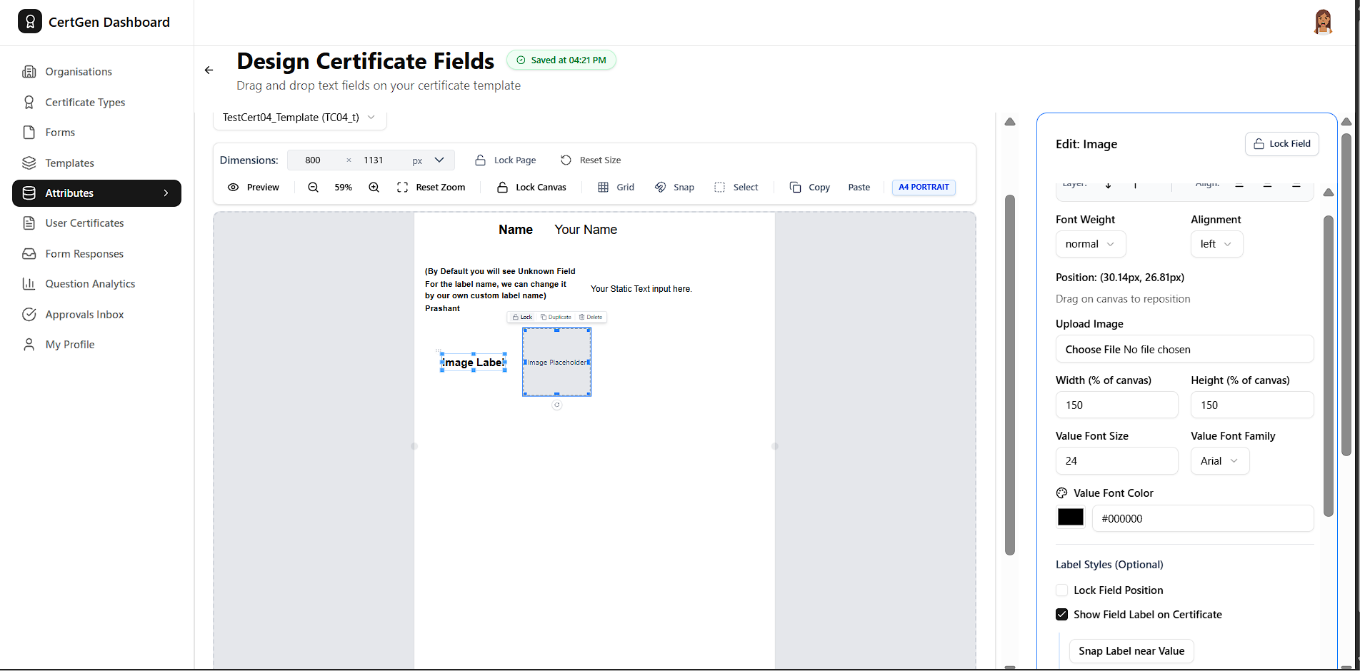
Click Add Image Box to reserve space for a logo or signature, then set its width and height as a percentage of the canvas.
Step 9.0.10: Add a QR Code Field
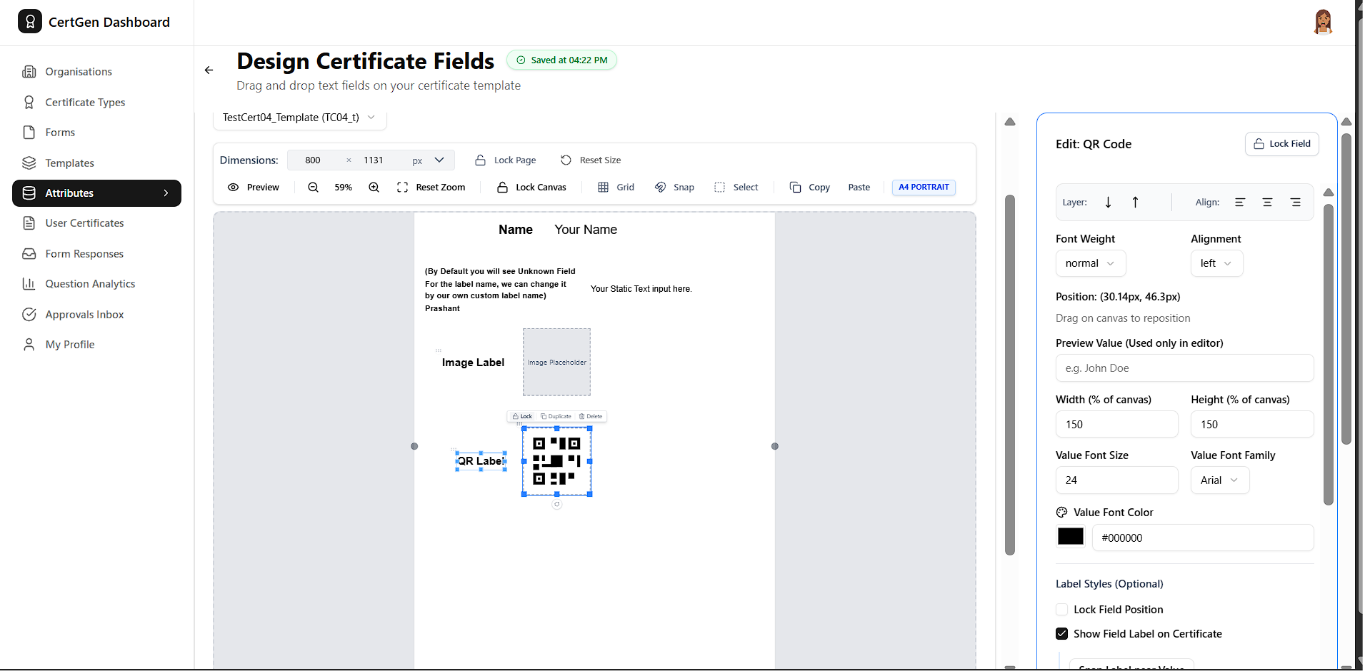
Add a QR Code field to place a verification code on the certificate, adjusting its size and font as needed.
Step 9.0.11: Insert a Table
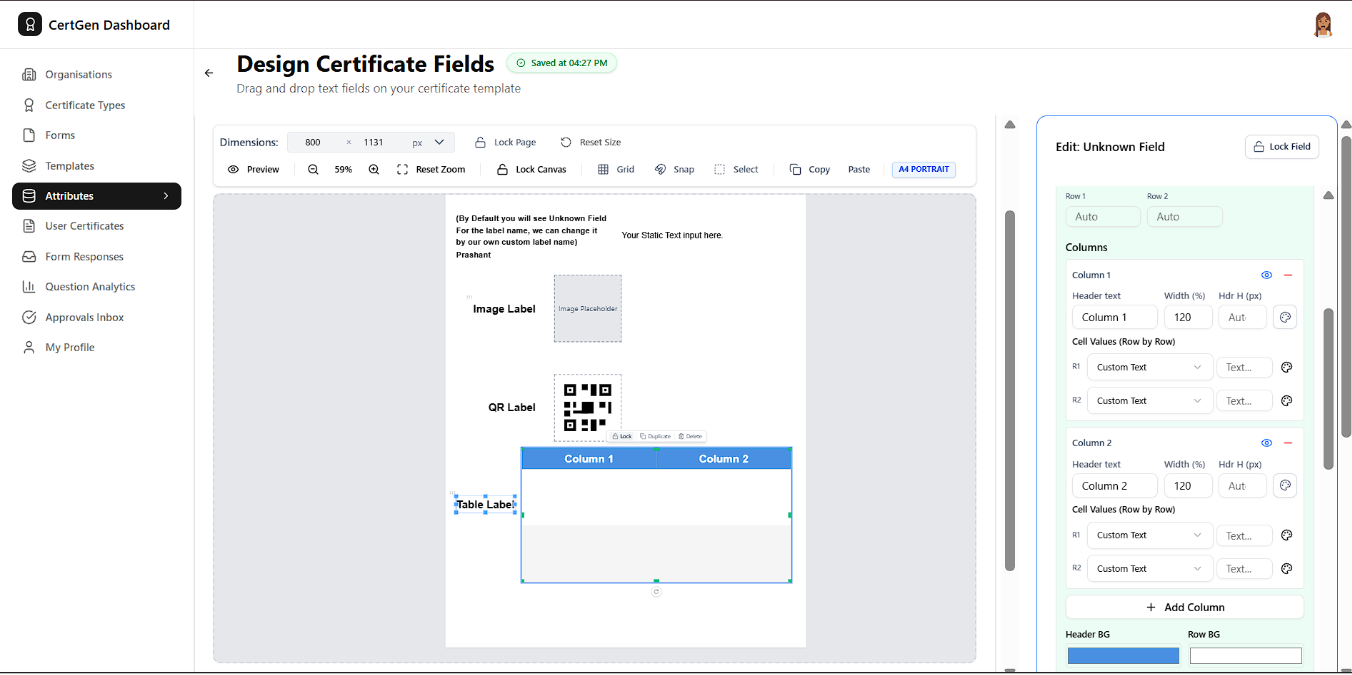
Add a table field and configure each column?s header text, width and per-row cell values.
Step 9.0.12: Add a Shape and Lock the Page
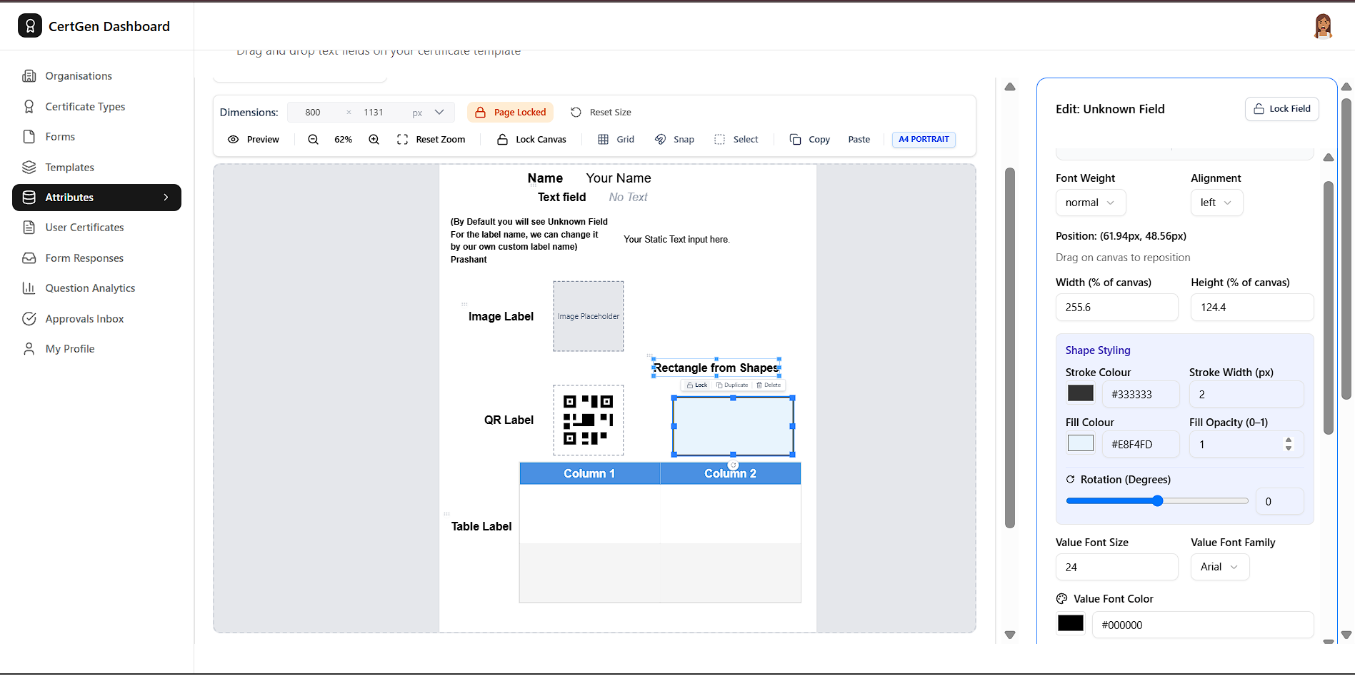
Add shapes like rectangles and adjust Stroke Colour, Fill Colour and Rotation; use Page Locked to prevent accidental edits while designing.
Step 9.0.13: Style the Table
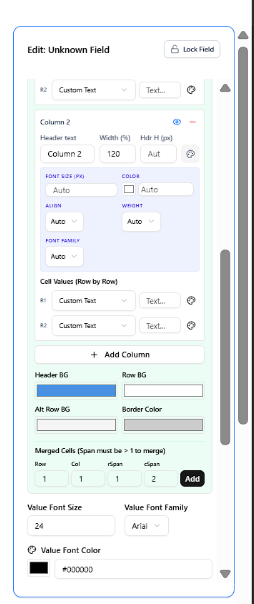
Scroll within the table?s edit panel to set Header/Row background colours, border colour, and merge cells if needed.
Step 9.0.14: Save All Fields
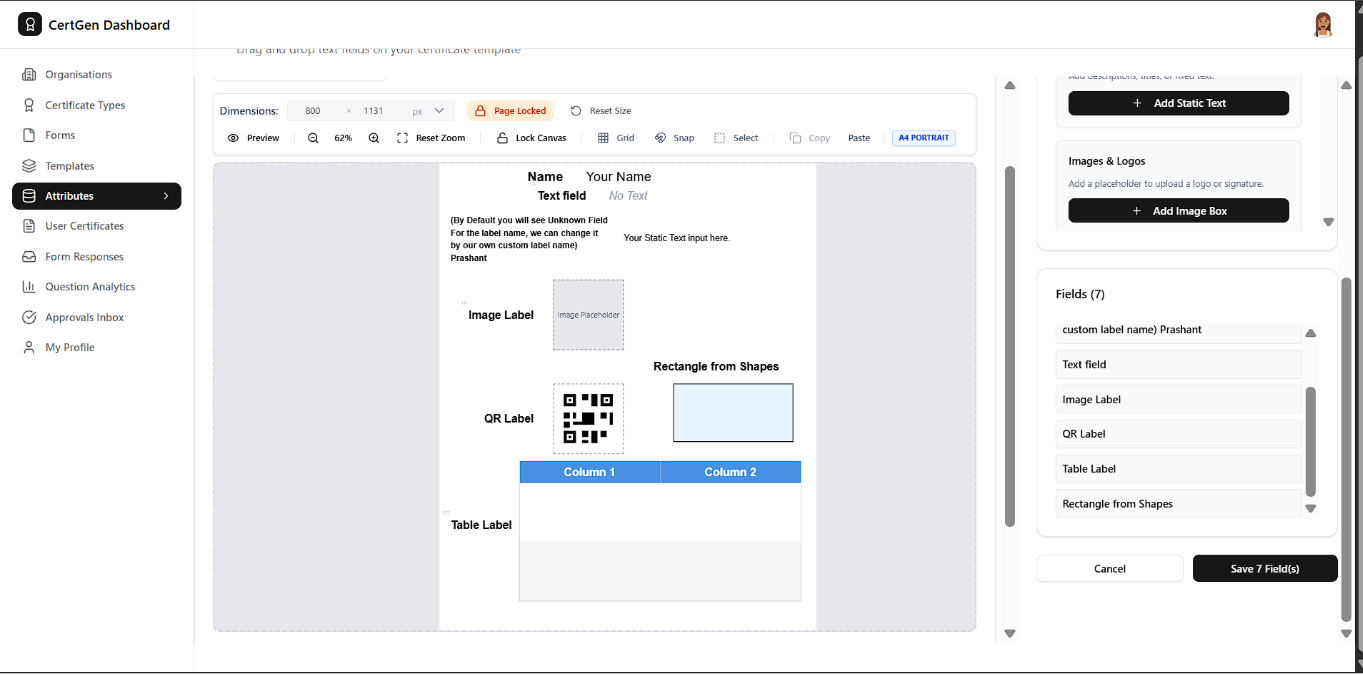
The Fields panel lists every element added to the page; click Save Field(s) to save all changes at once.
Step 9.0.15: Preview Inline
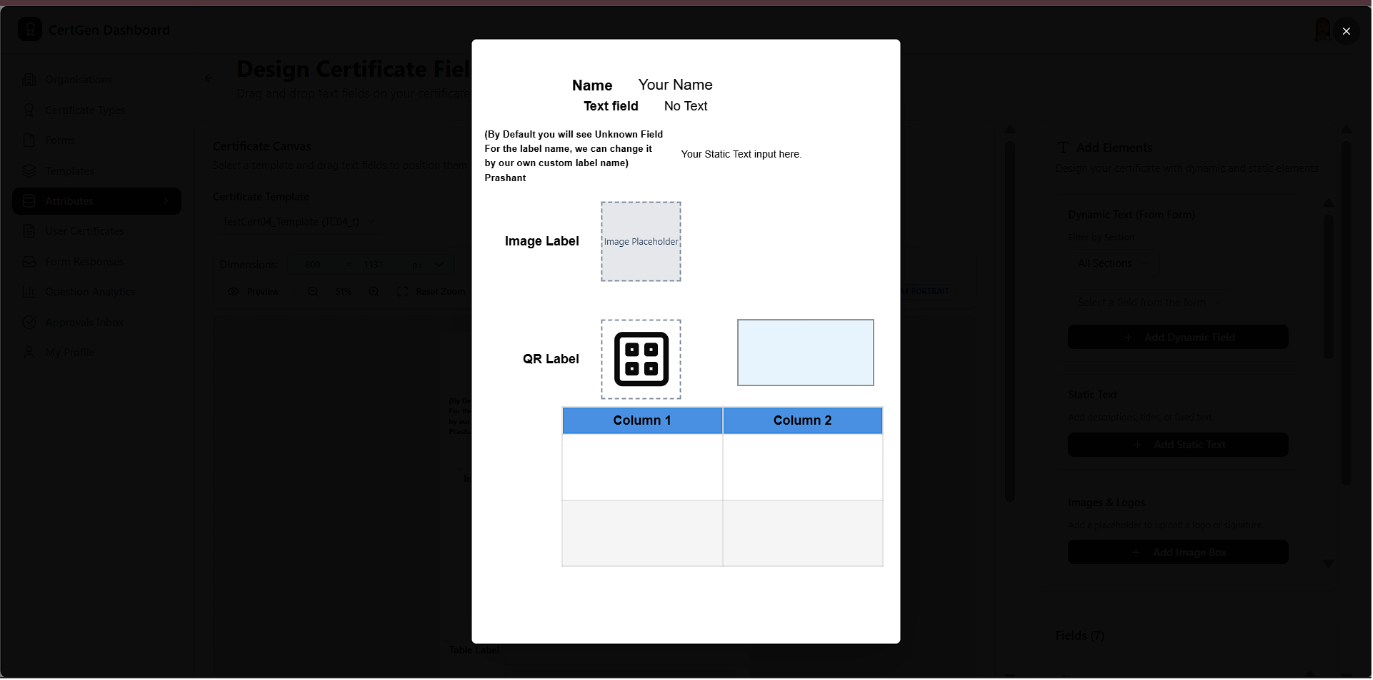
Click Preview to see a quick modal preview of how the certificate will look with all fields in place.
Step 9.0.16: Review the Full Template Preview
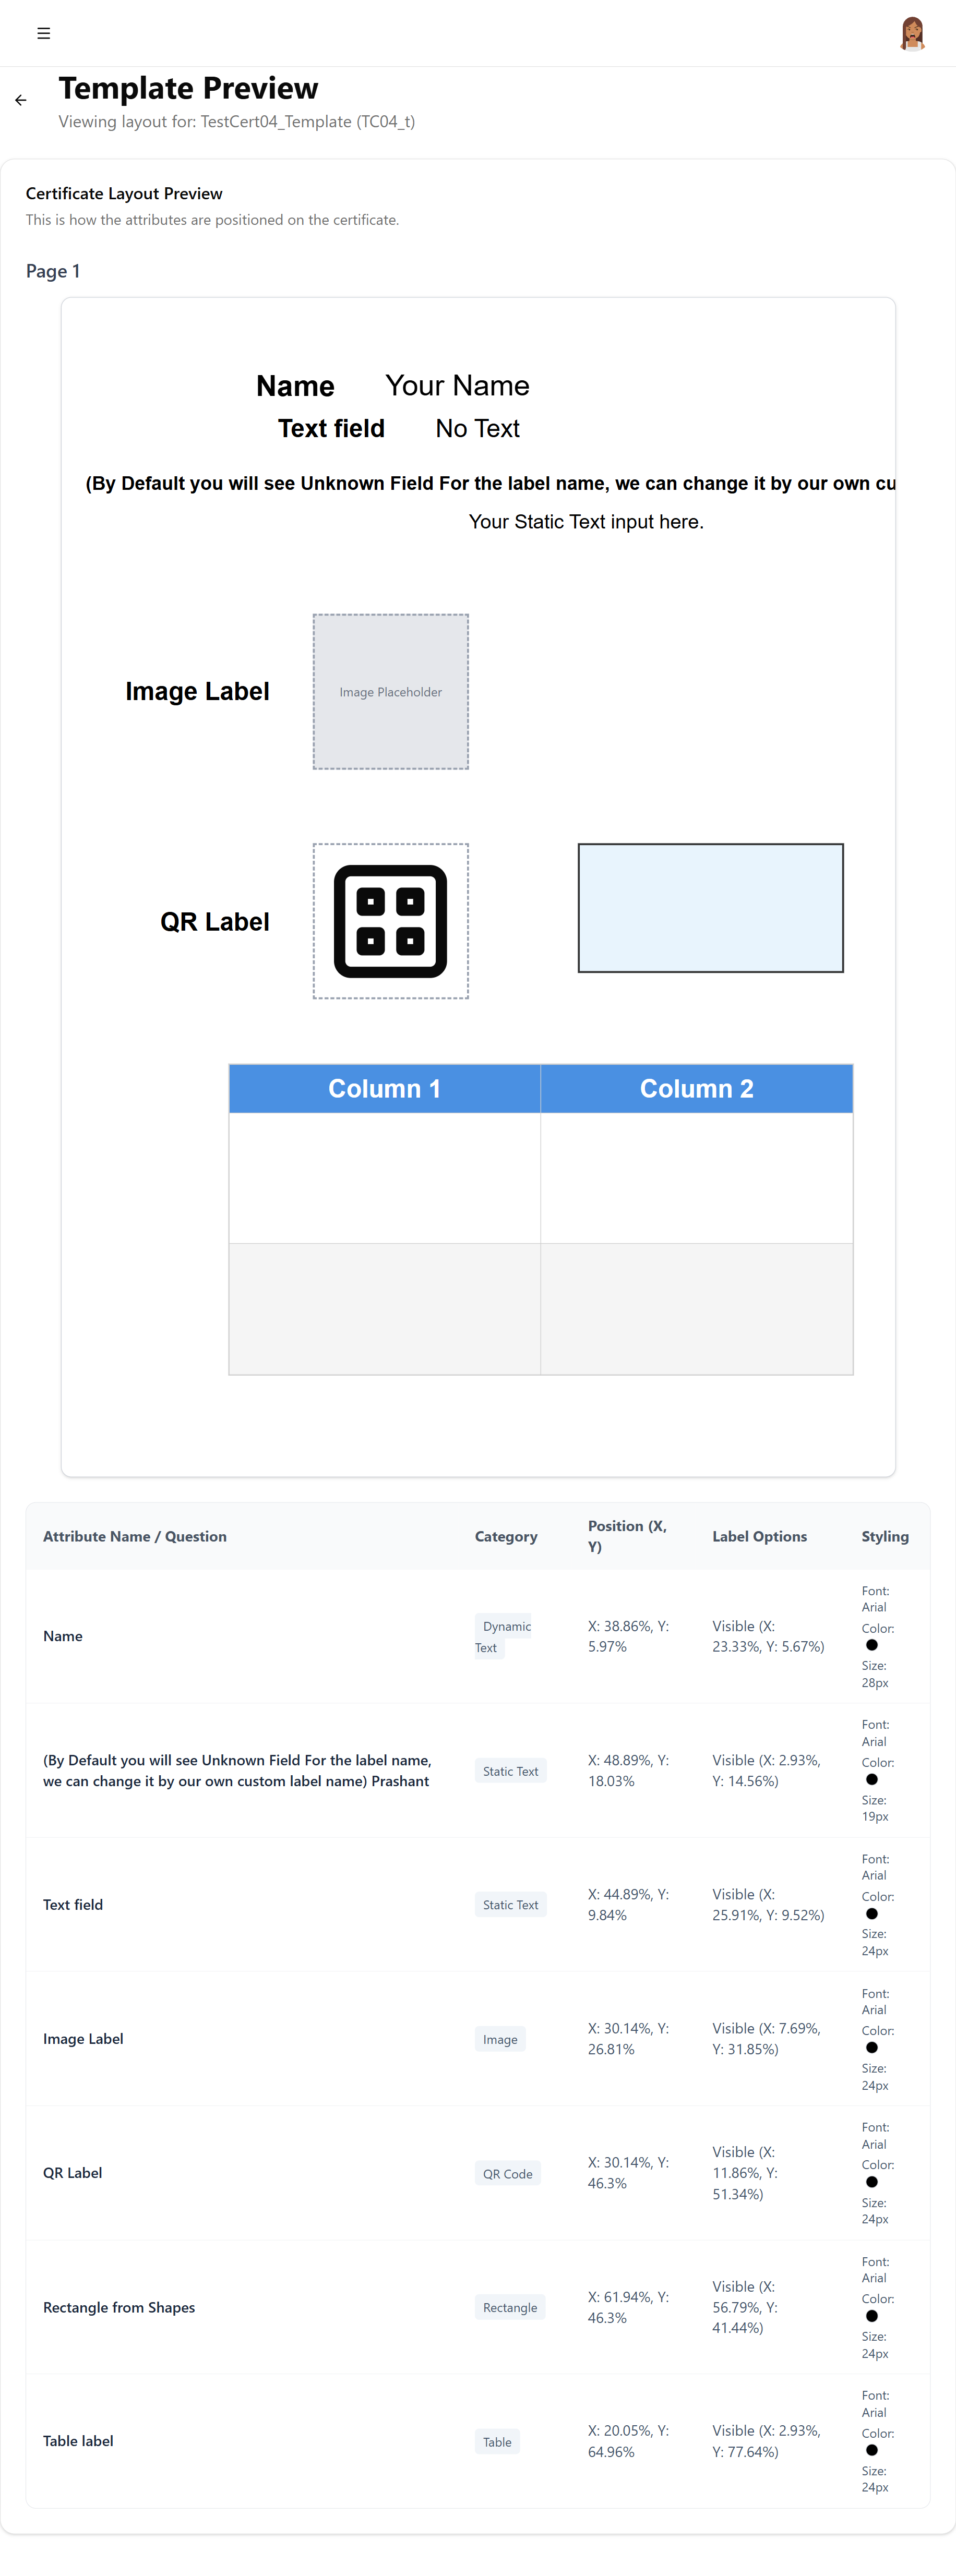
Open Template Preview for a complete, page-by-page layout plus a details table listing every attribute?s position, category and styling.
Step 9.1.1: Submit Attributes for Approval
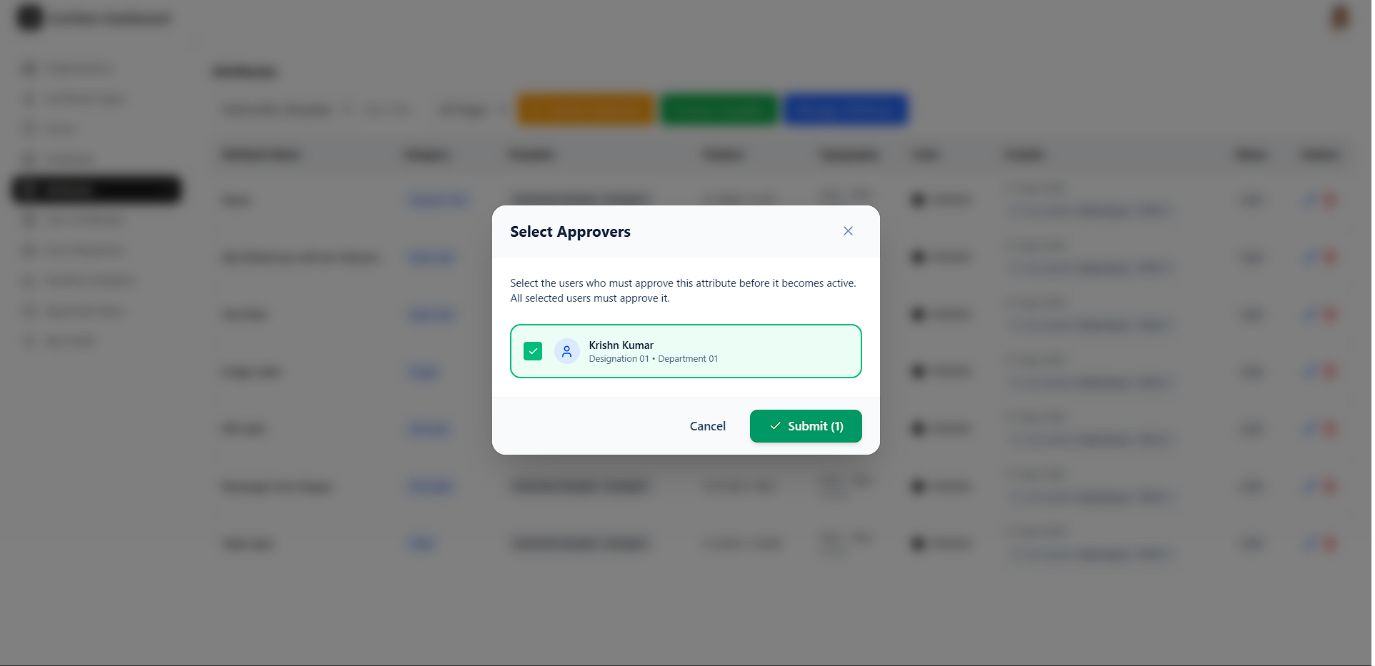
From the Attributes list, submit changes for approval by selecting approvers in the Select Approvers dialog and clicking Submit.
Step 9.1.2: Attributes Approved
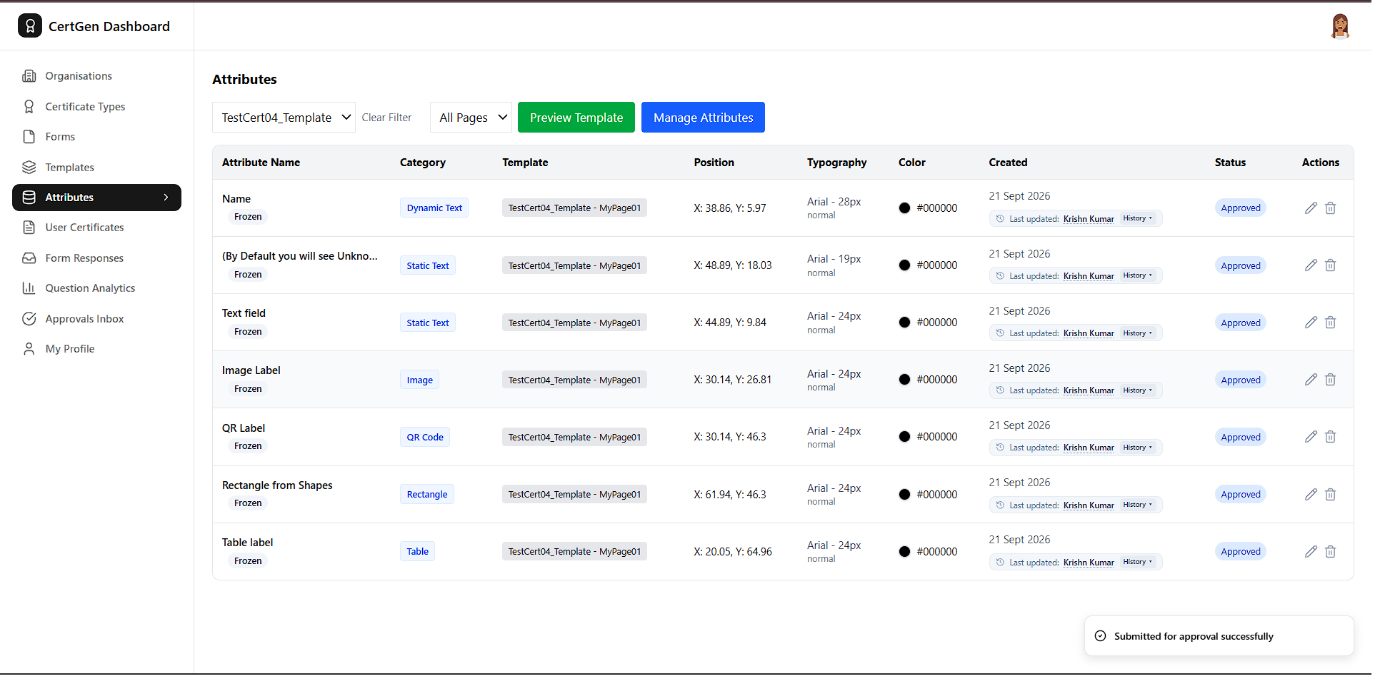
Once approved, each attribute shows an Approved status and is marked Frozen to prevent further edits.
Step 10.0.1: Open the Generate Certificate Page
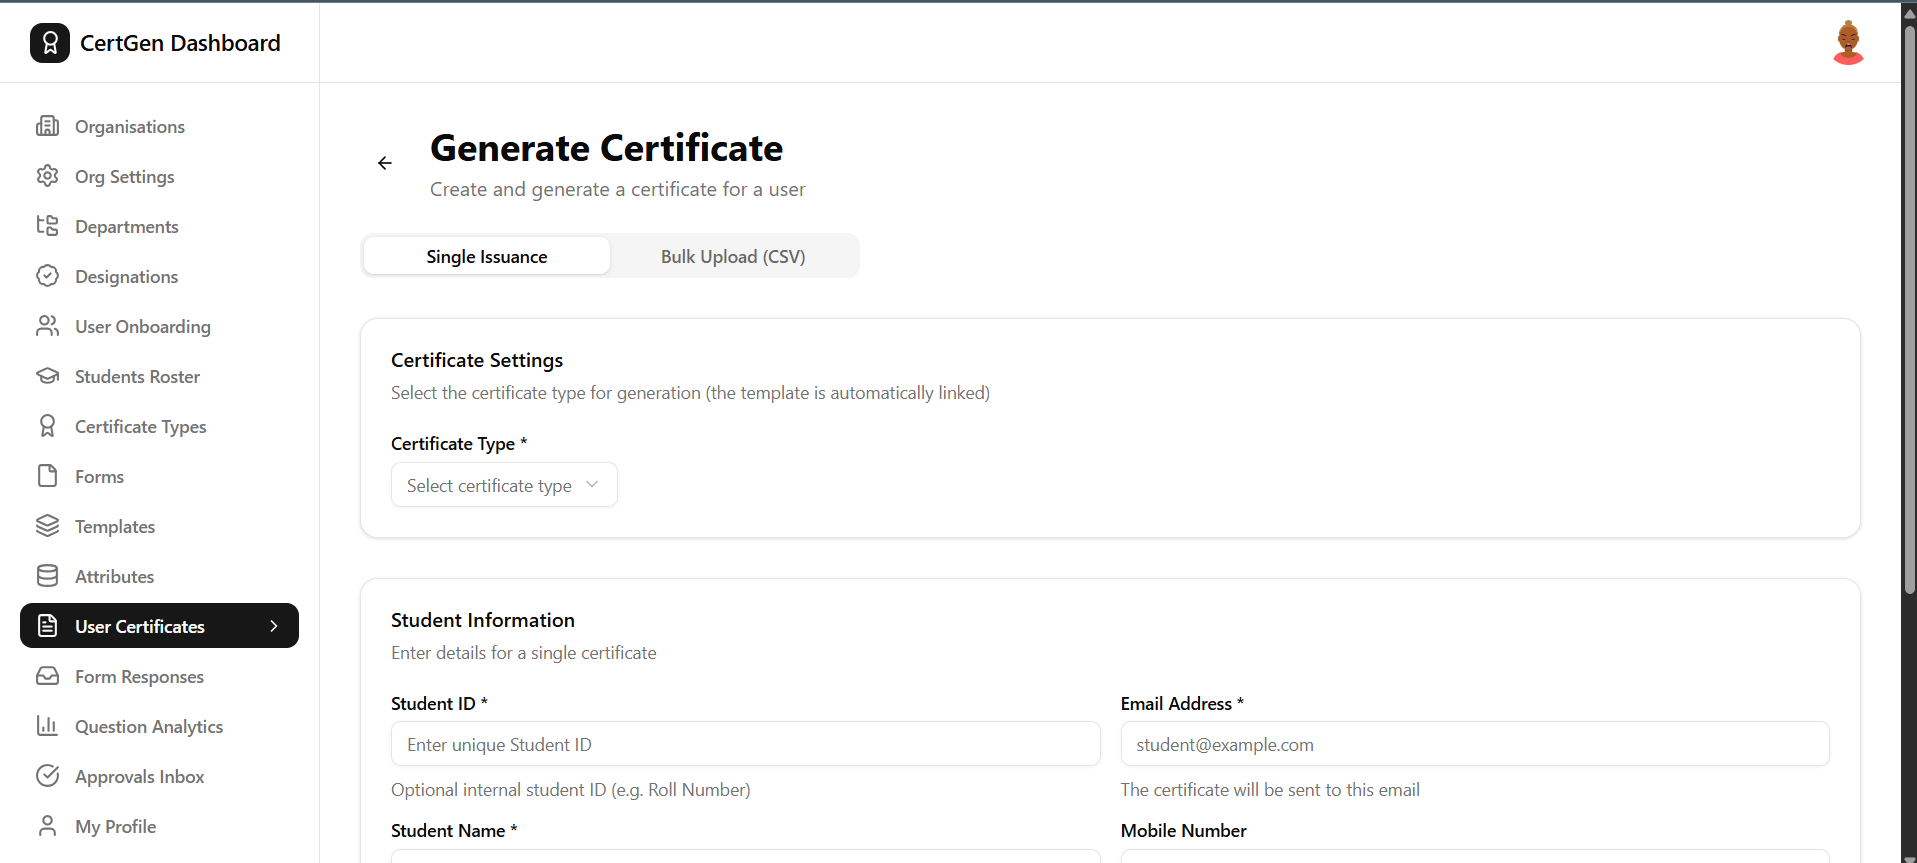
Go to User Certificates in the left menu and click New Certificate. The Generate Certificate page opens with the Single Issuance tab selected, showing the Certificate Settings and Student Information sections. Generating a Single Certificate
Step 10.0.2: Select a Certificate Type
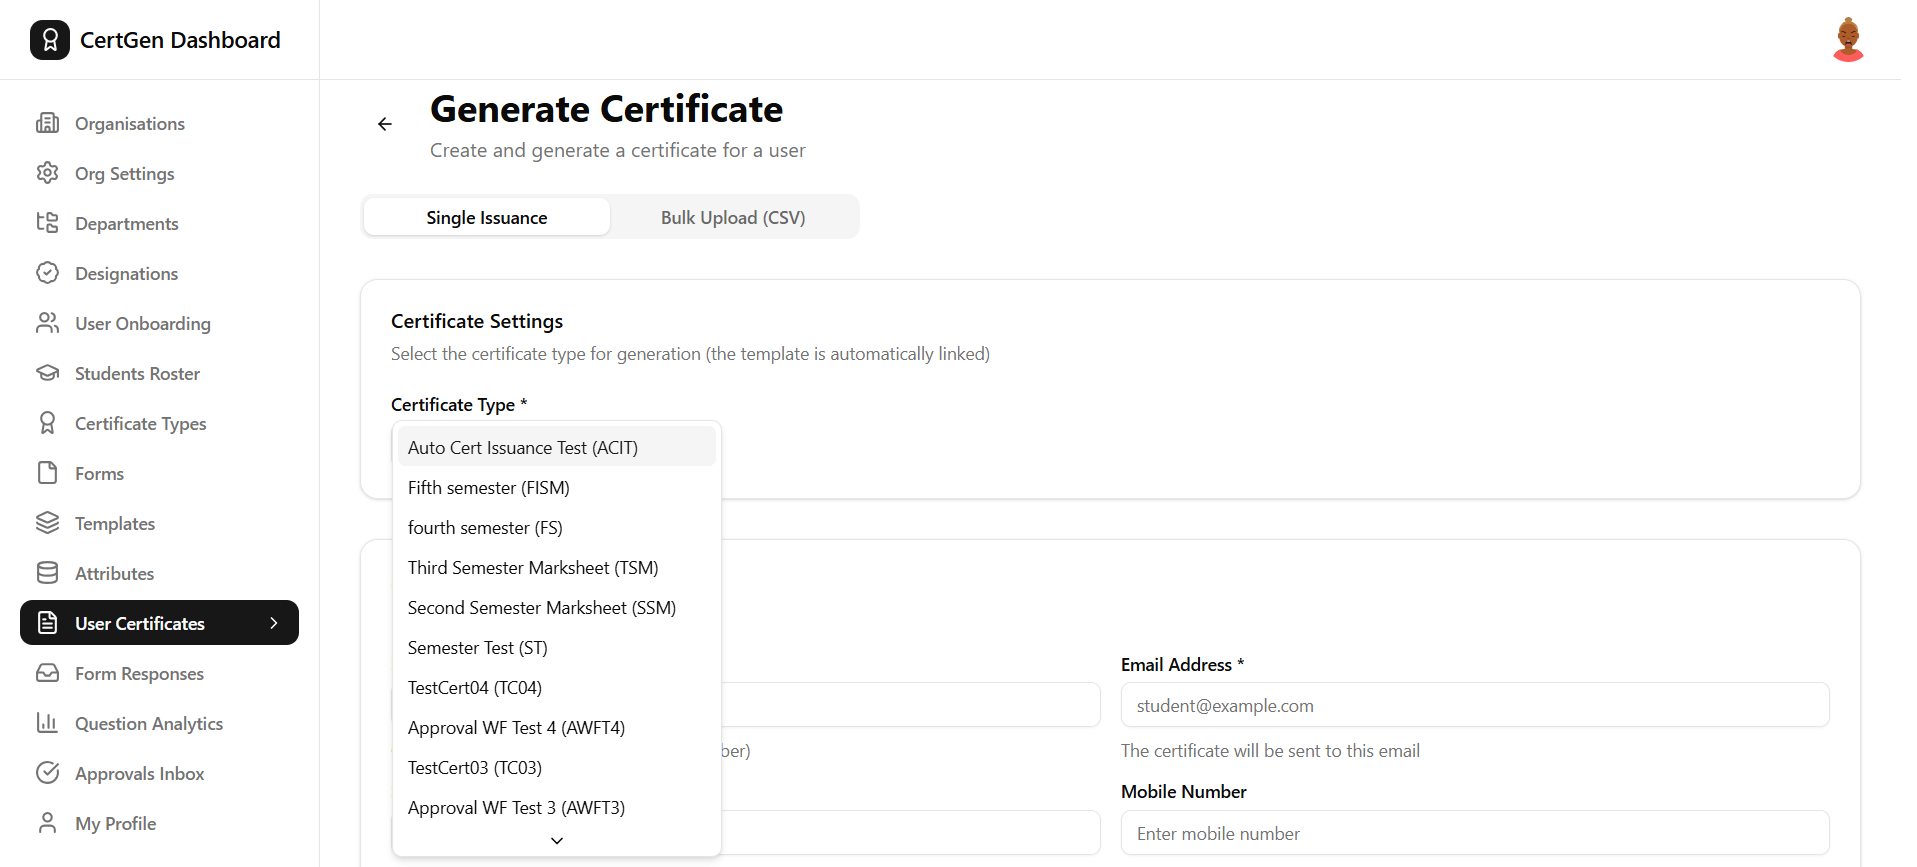
Click the Certificate Type dropdown and choose the certificate you want to issue from the list. The matching template is linked automatically once selected.
Step 10.0.3: Enter Student Information
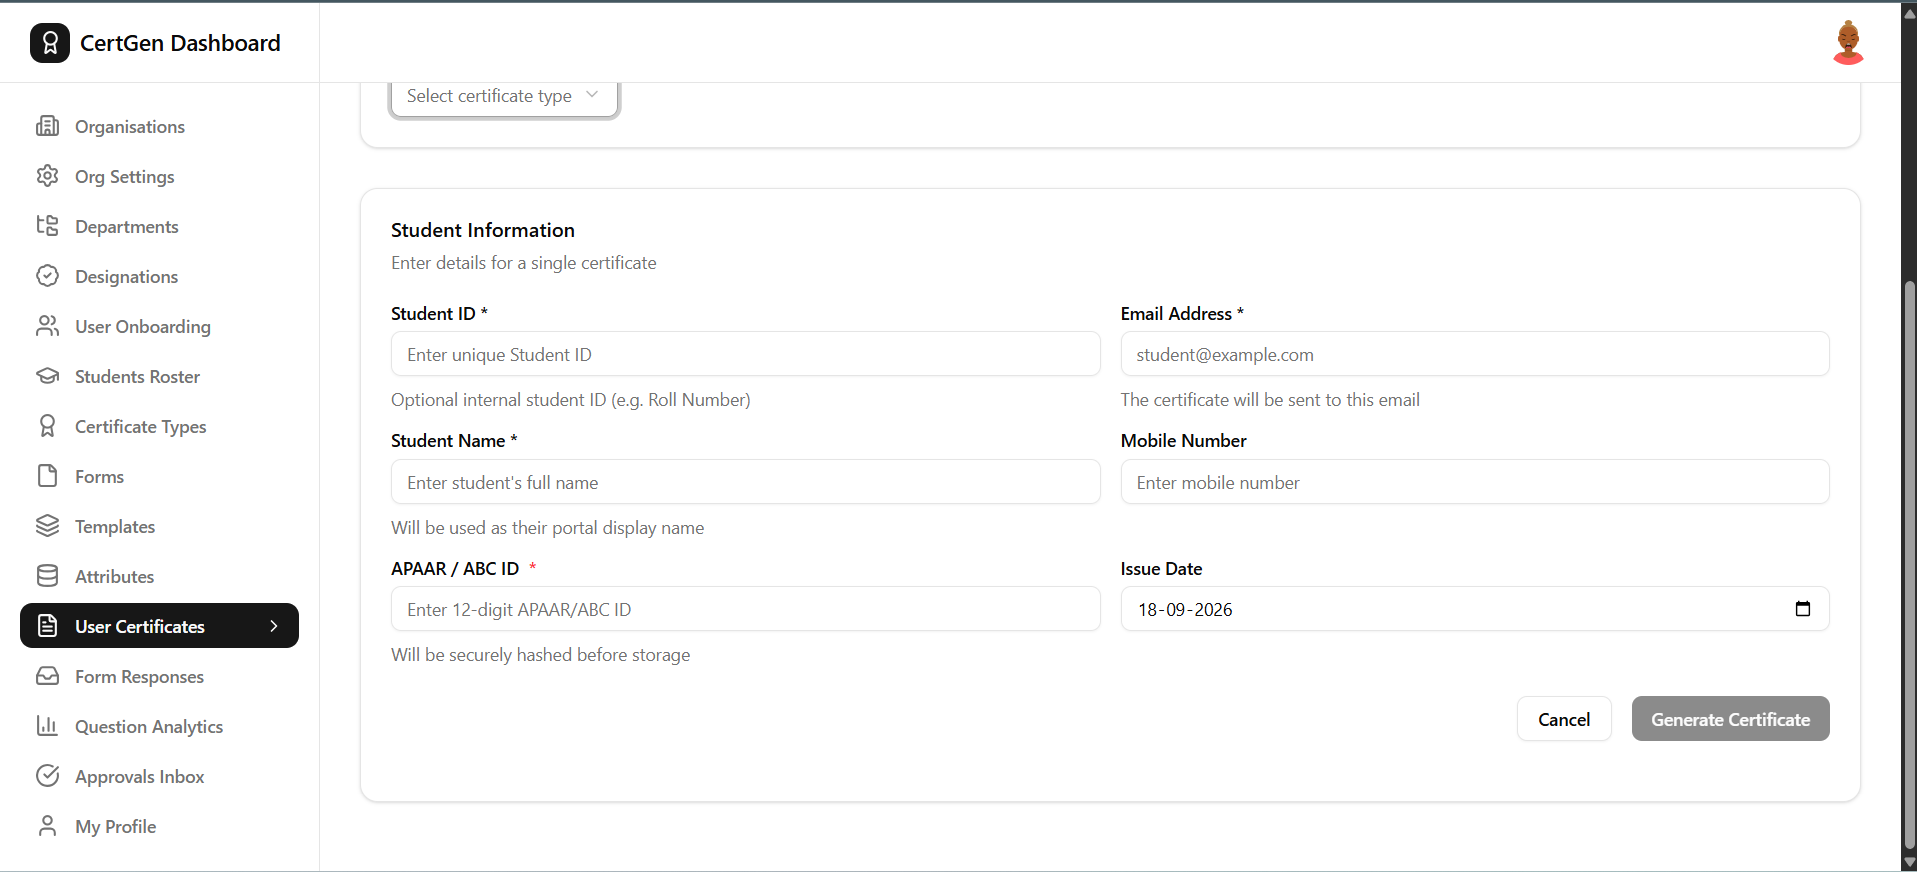
Fill in the required fields ? Student ID, Student Name, APAAR/ABC ID, Email Address and Issue Date ? then click Generate Certificate.
Step 10.0.4: Fill Additional Dynamic Fields
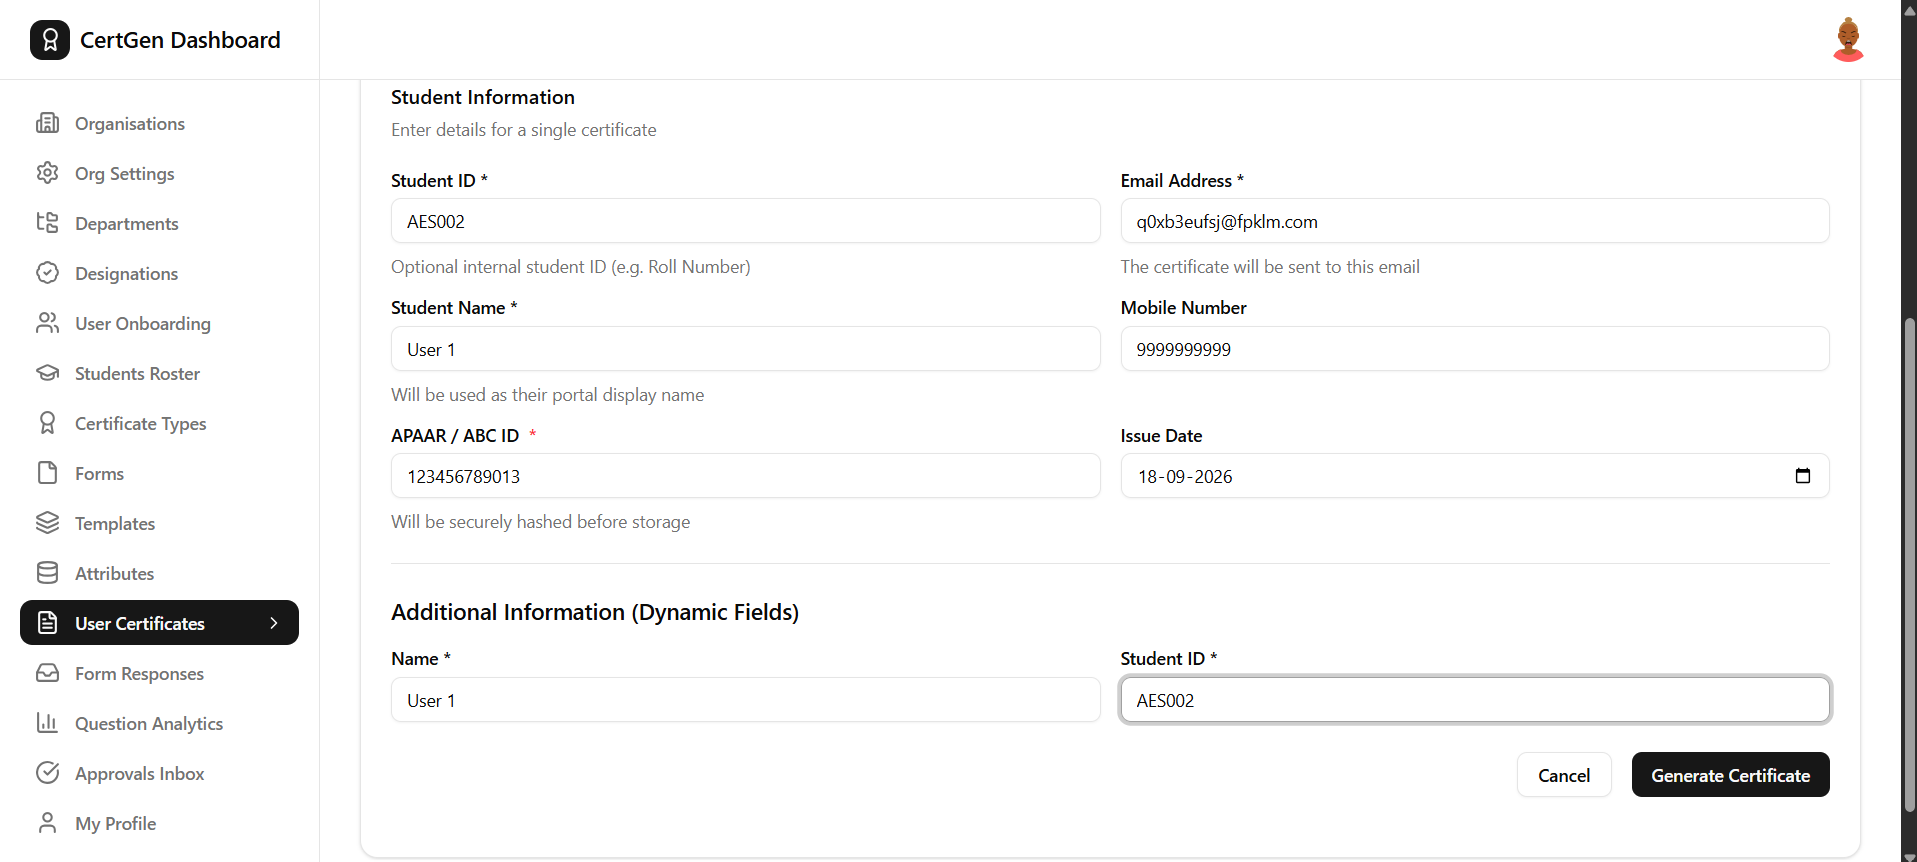
If the selected template needs extra details, an Additional Information (Dynamic Fields) section appears below the student fields. Fill these in before generating.
Step 10.0.5: Confirm Generation and Submit for Approval
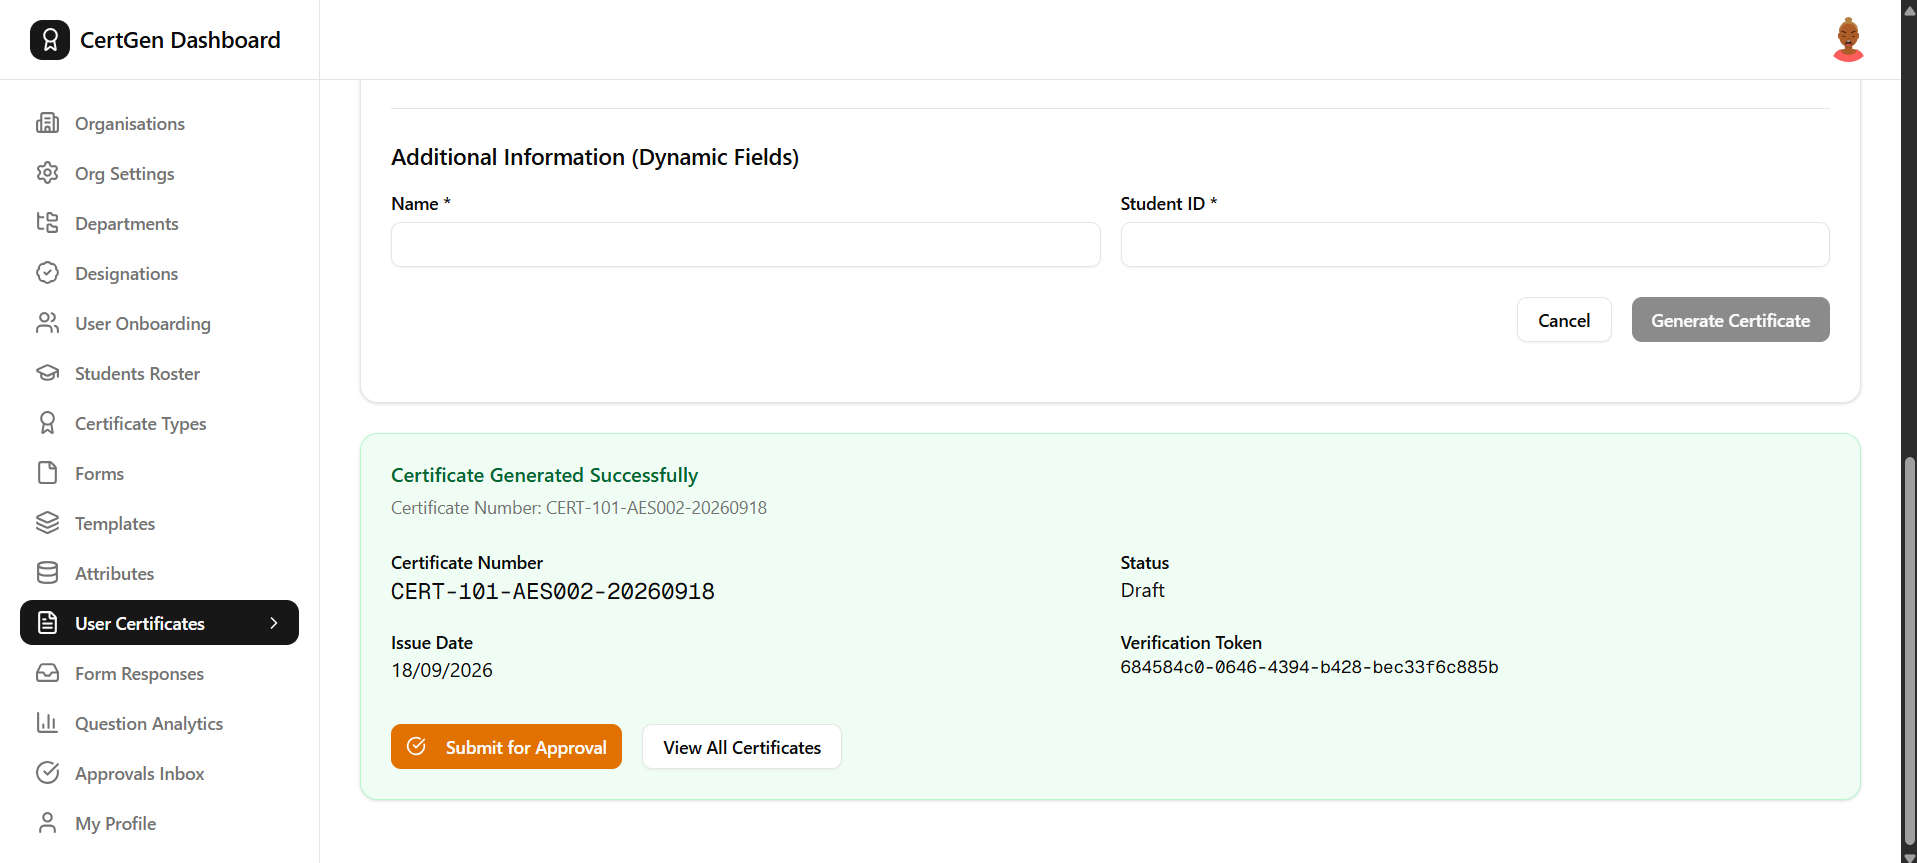
A green banner confirms the certificate was generated, showing its Certificate Number, Status and Verification Token. Click Submit for Approval to send it to an approver.
Step 10.1.1: Choose Approvers
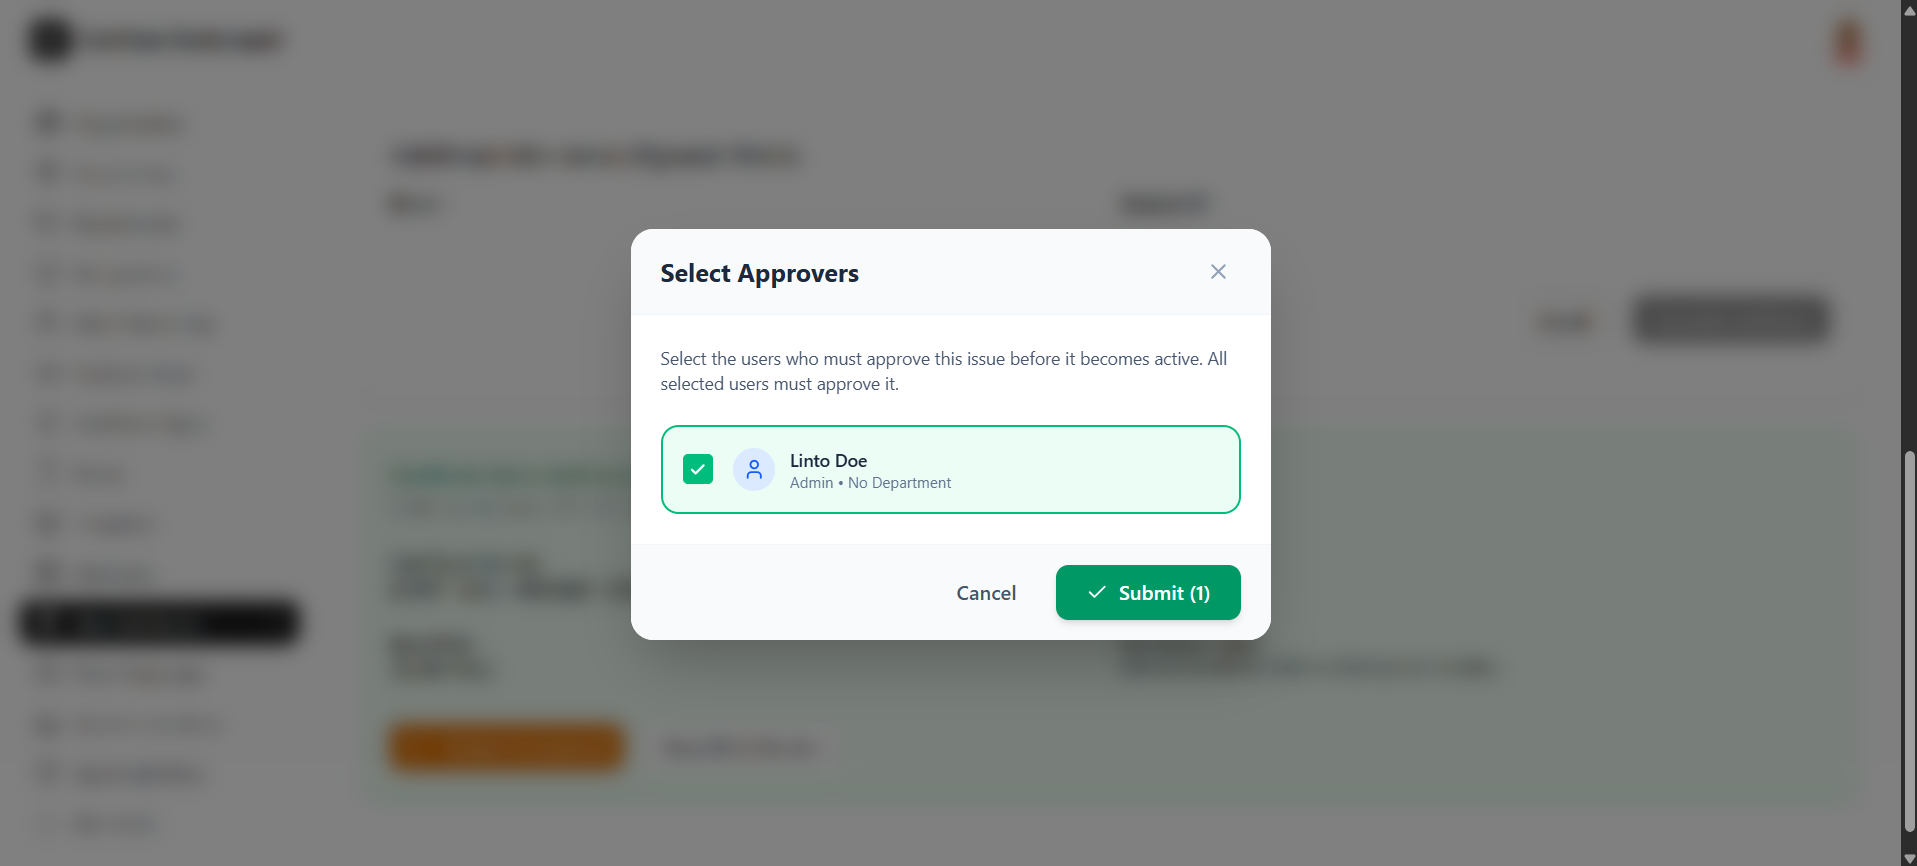
In the Select Approvers pop-up, check the user(s) who must approve the certificate, then click Submit to send it for approval.
Step 10.1.2: View the Certificate in the List
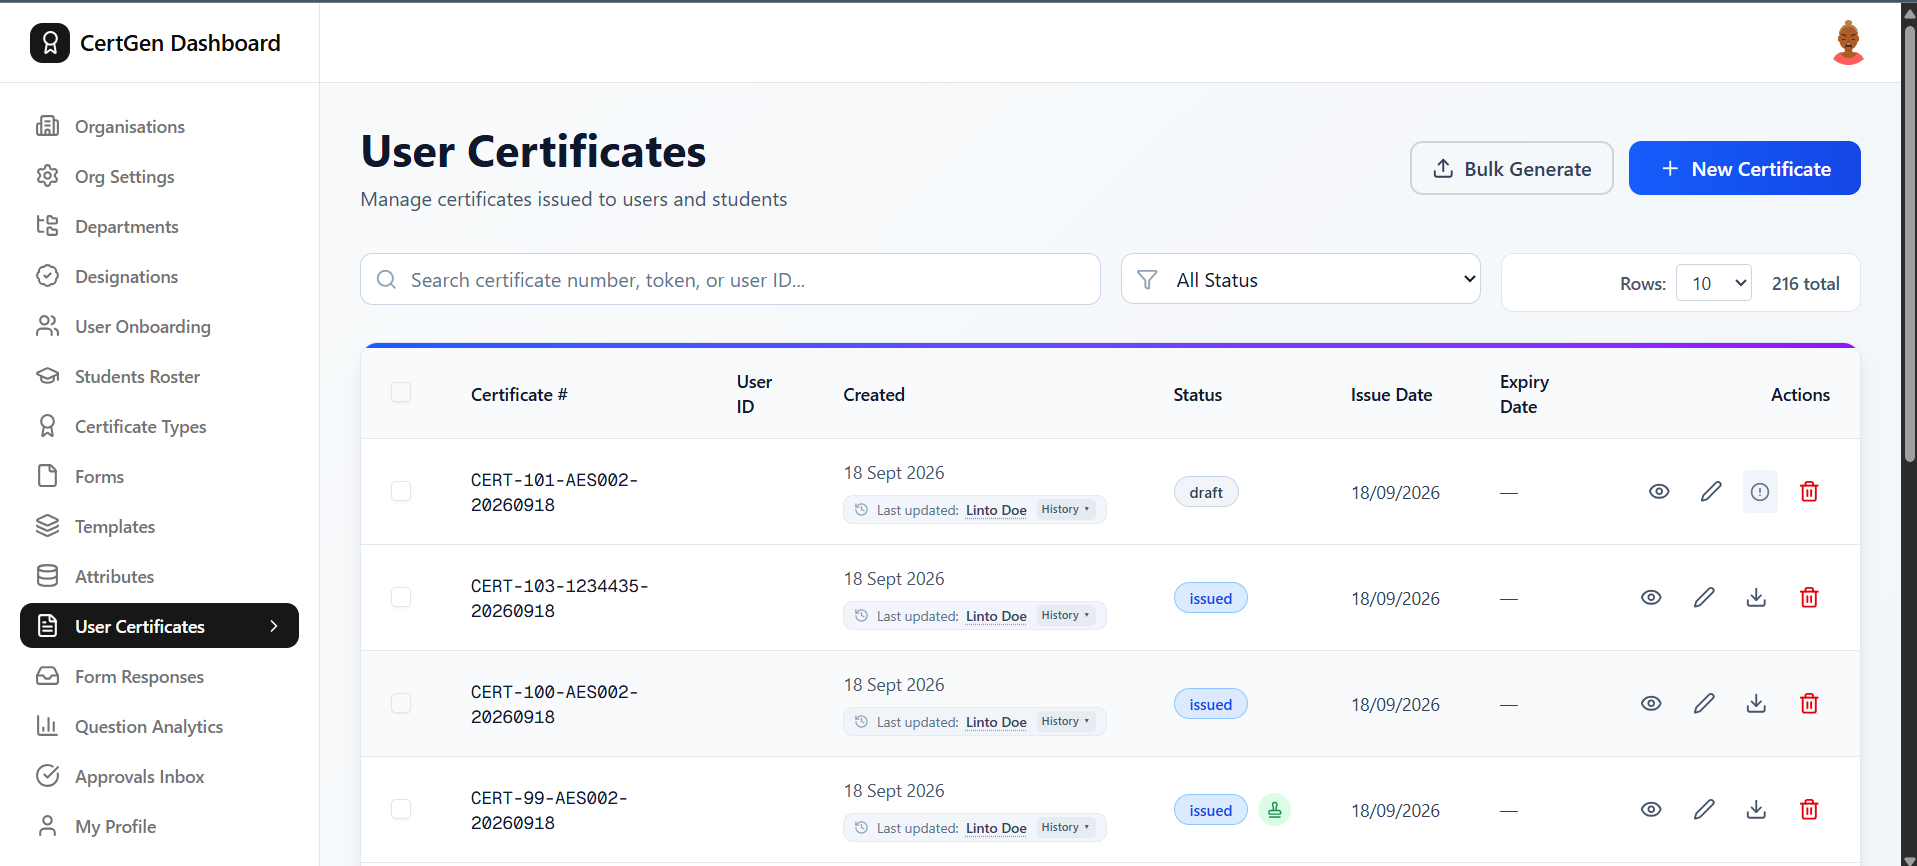
The certificate now appears in the User Certificates list with a draft status. Use the search bar, status filter and Rows control to find and manage certificates.
Step 10.1.3: Submit for Approval from the List
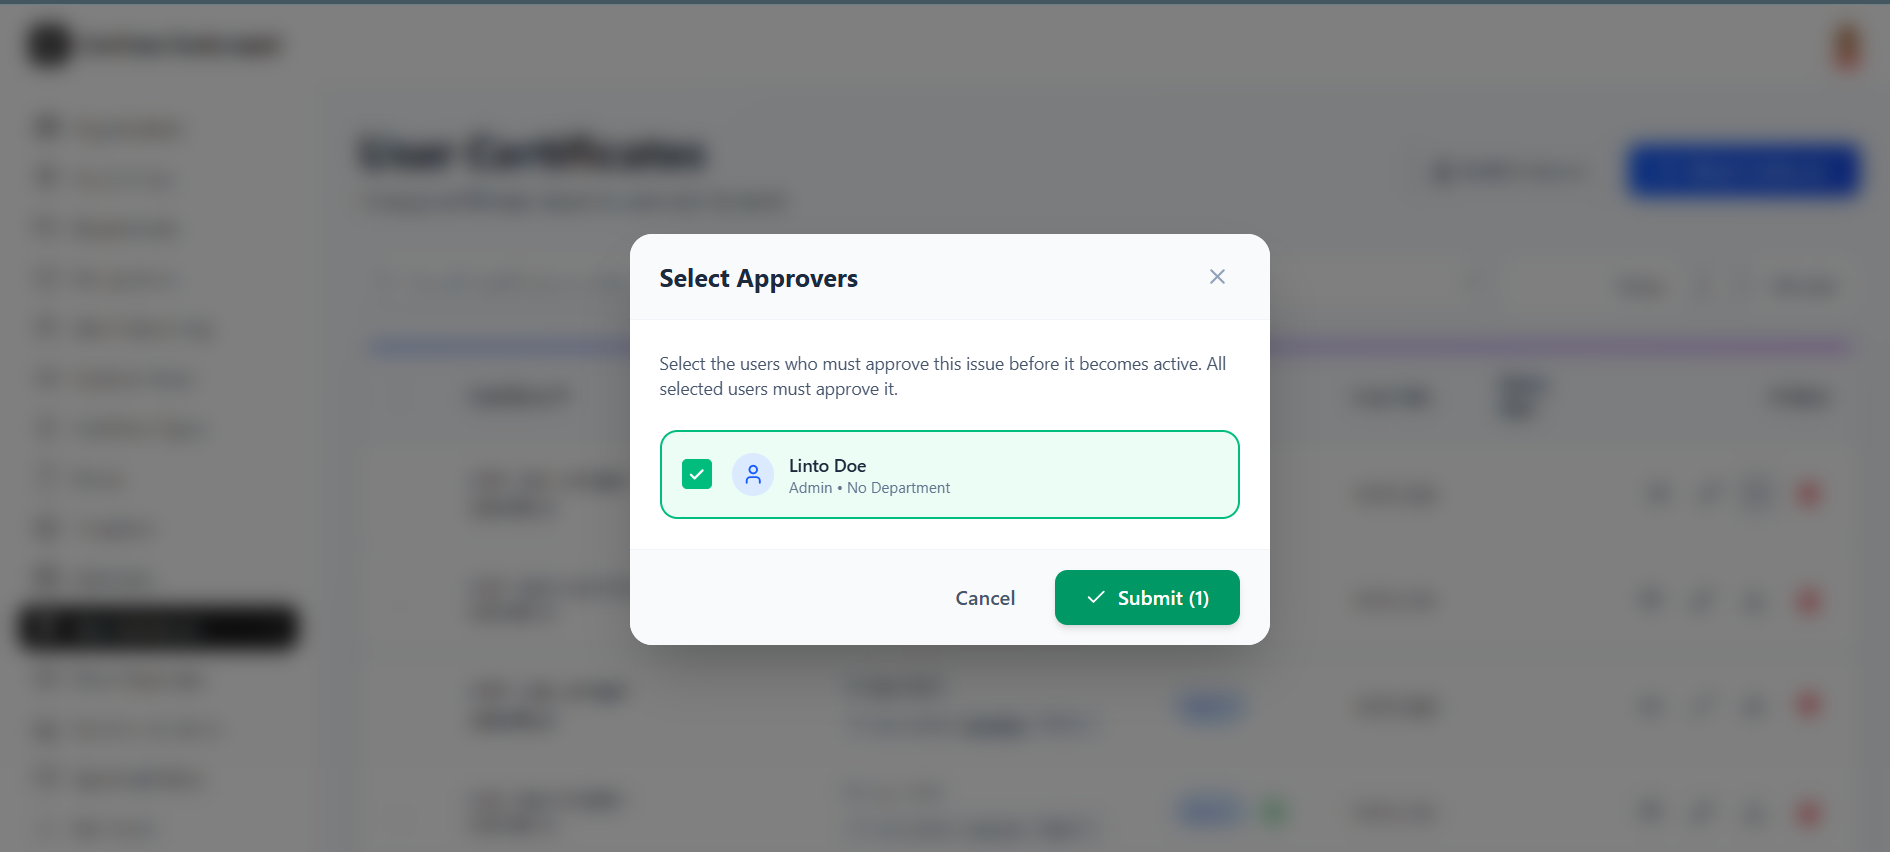
You can also start approval directly from the list. Click the info/submit icon on a certificate row to reopen the Select Approvers pop-up.
Step 10.1.4: Approval Confirmation
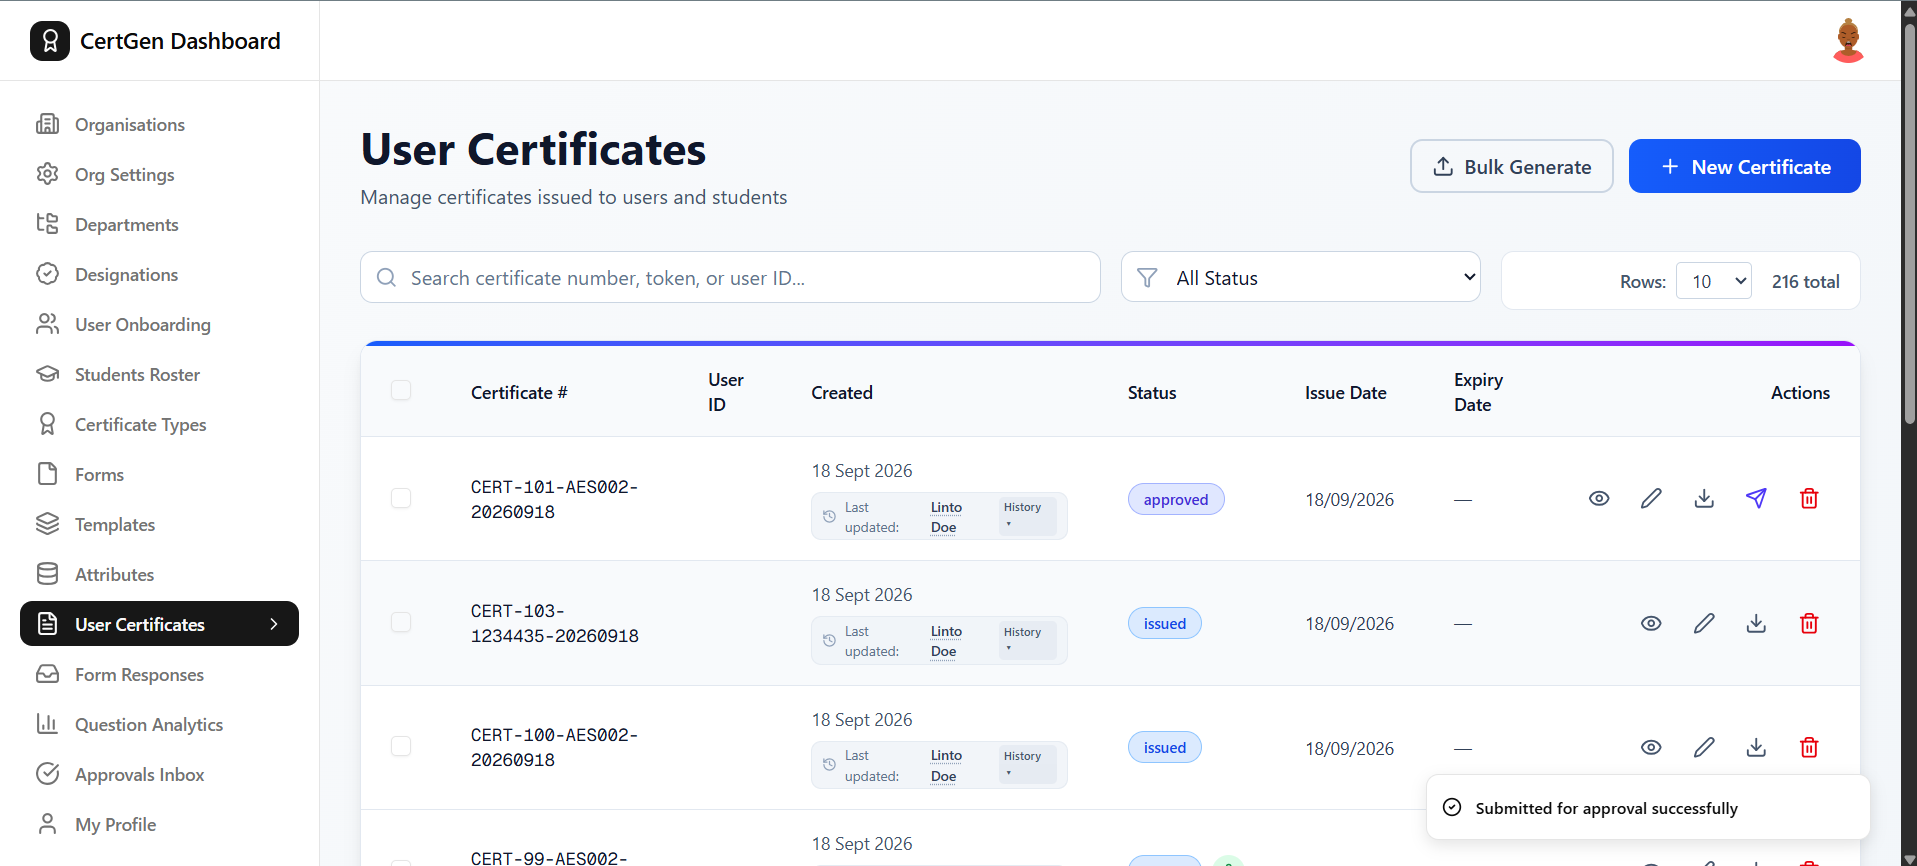
A confirmation toast, ?Submitted for approval successfully,? appears, and the certificate?s status updates to approved.
Step 10.1.5: Issue the Approved Certificate
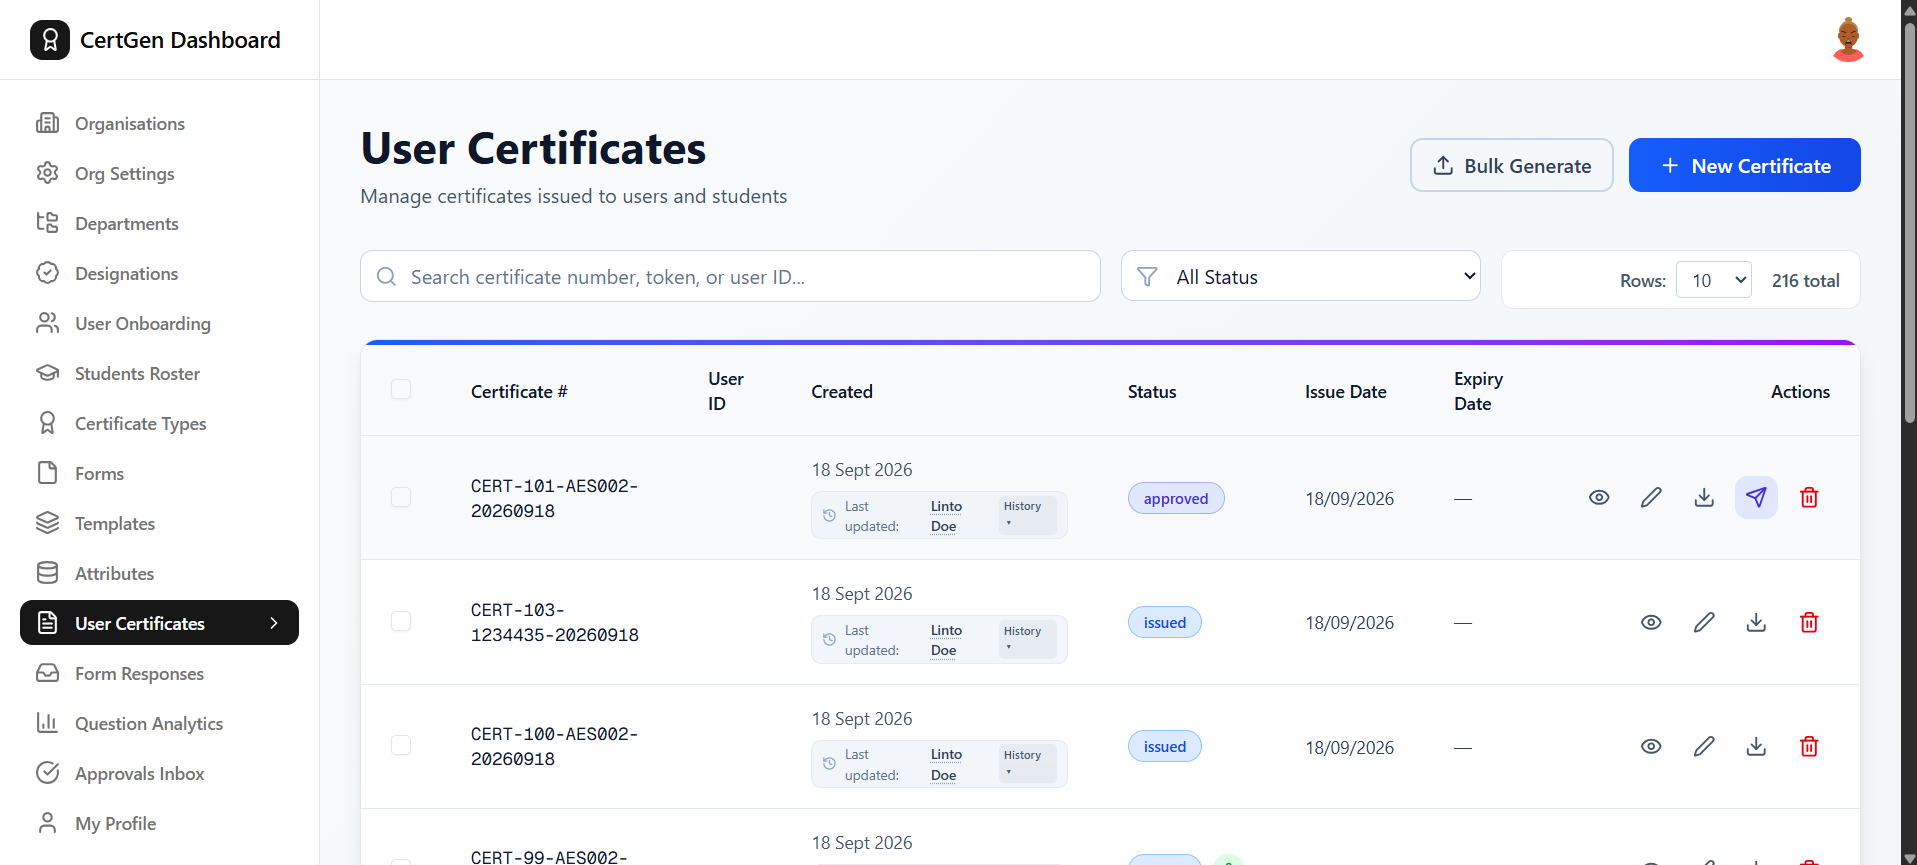
On the approved certificate?s row, click the send (paper plane) icon to issue the certificate to the student.
Step 10.1.6: Certificate Marked as Issued
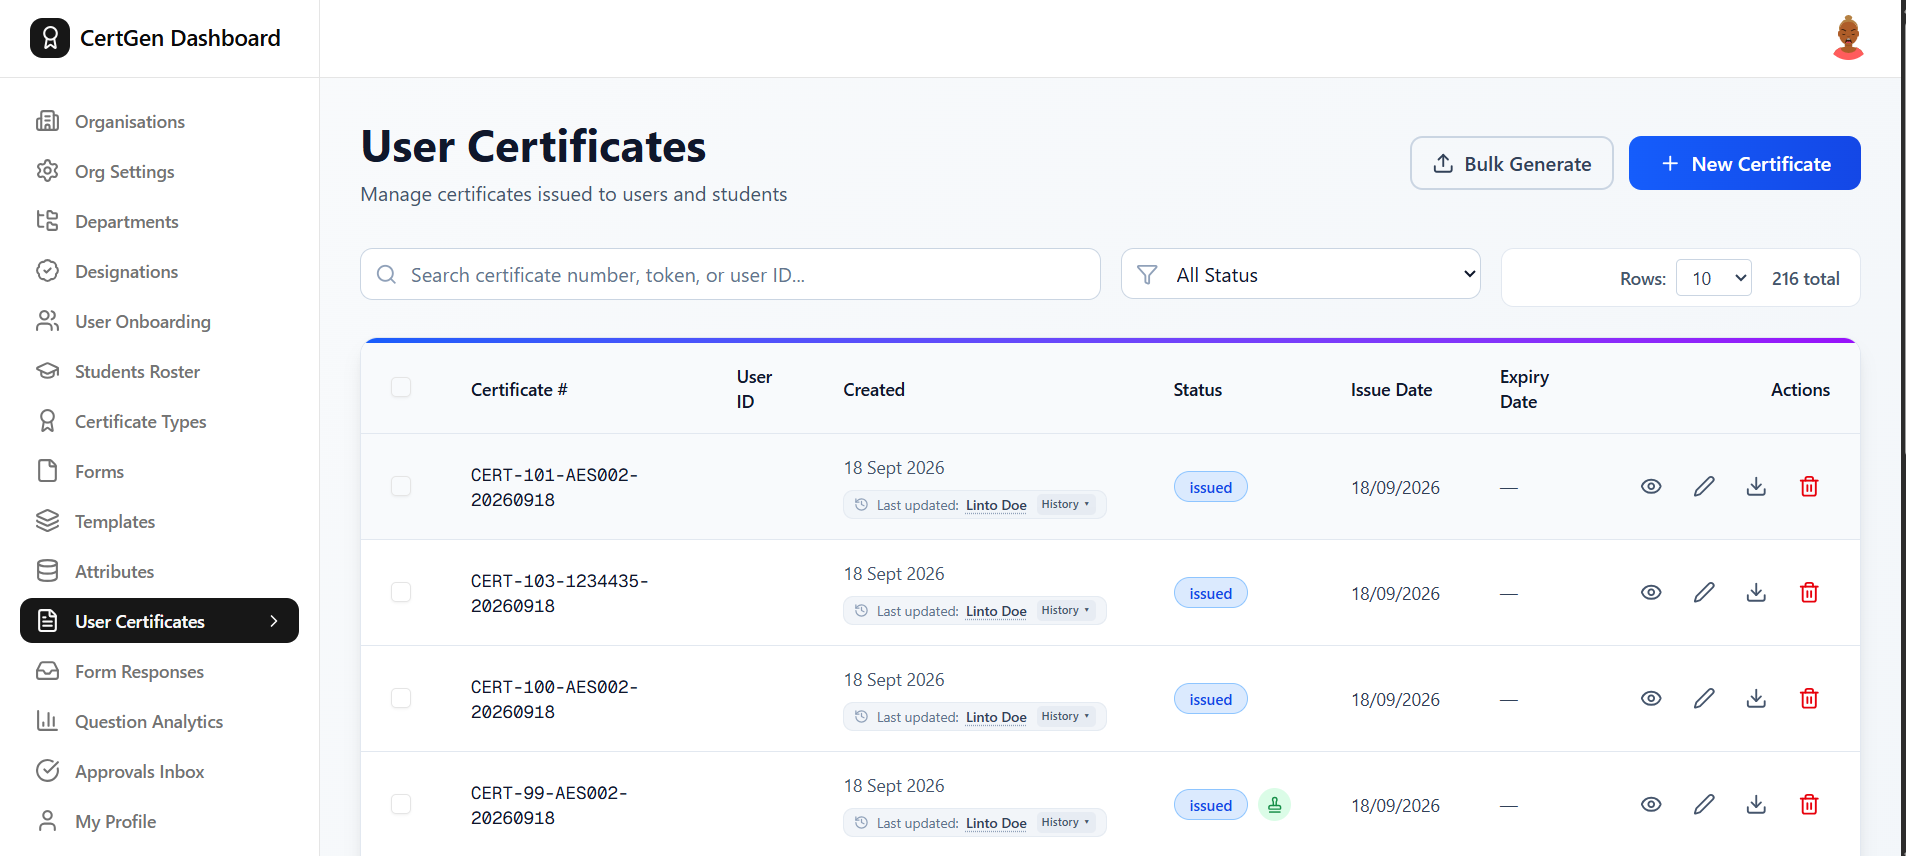
The certificate?s status changes to issued in the list, confirming it has been sent out.
Step 10.2.1: Check Signature Status
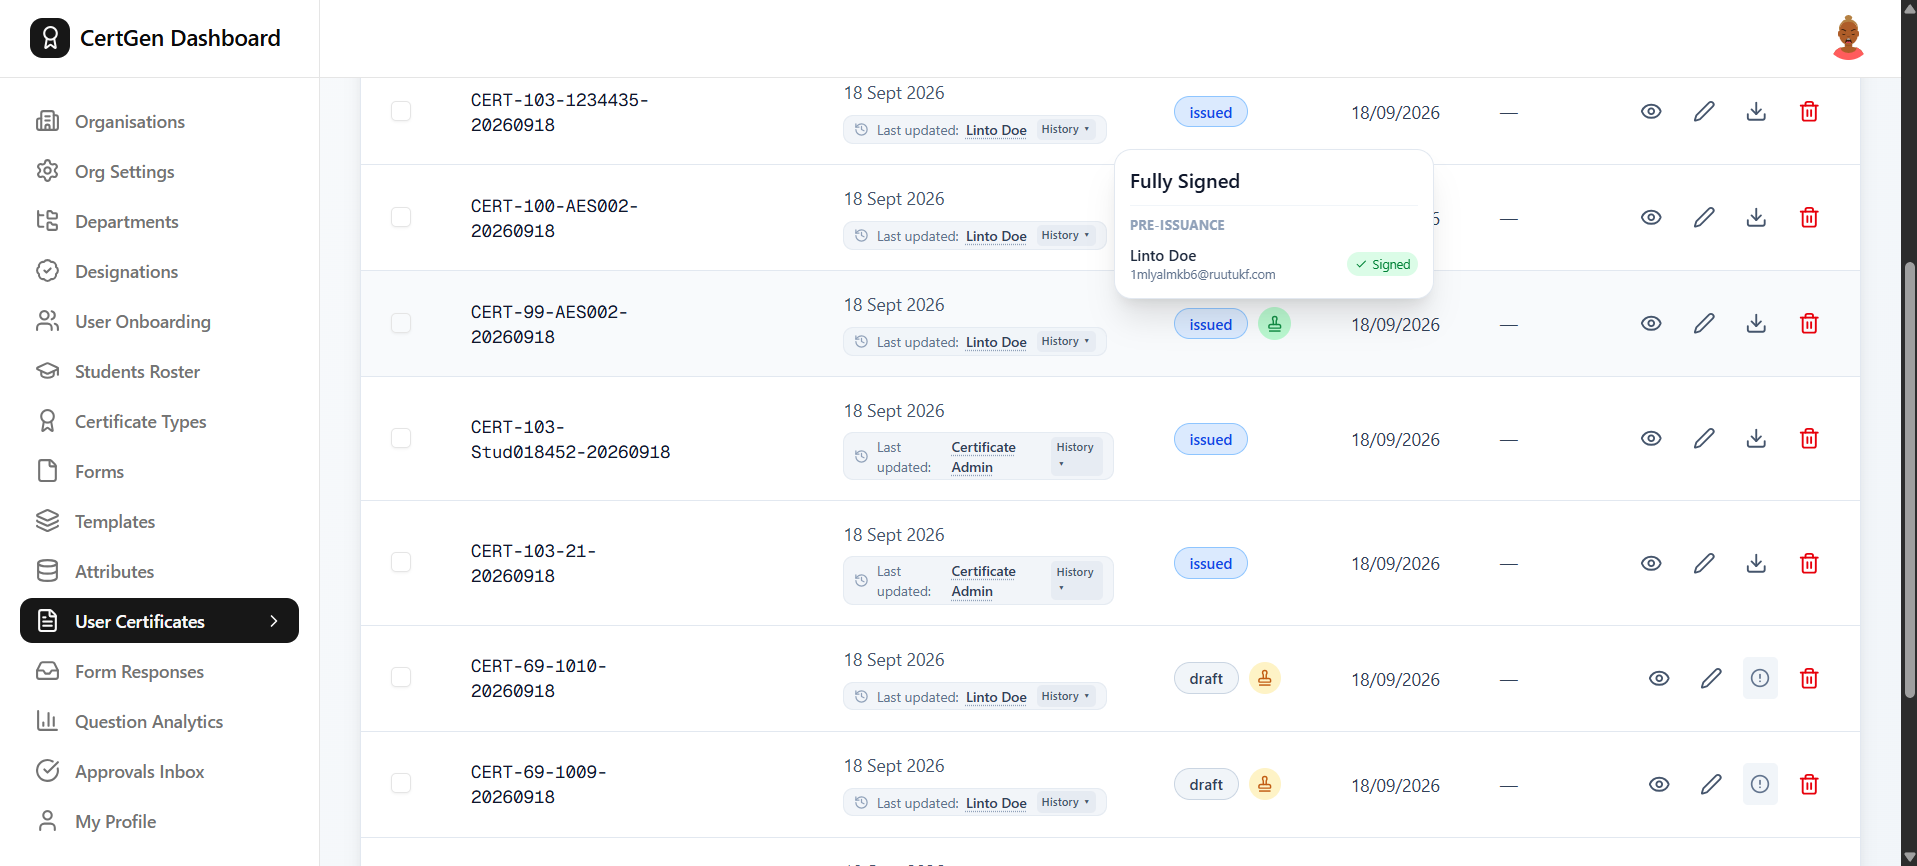
Hover over the signature icon next to an issued certificate to see whether pre-issuance signing is complete ? here it shows ?Fully Signed.?
Step 10.2.2: Spot Pending Signatures
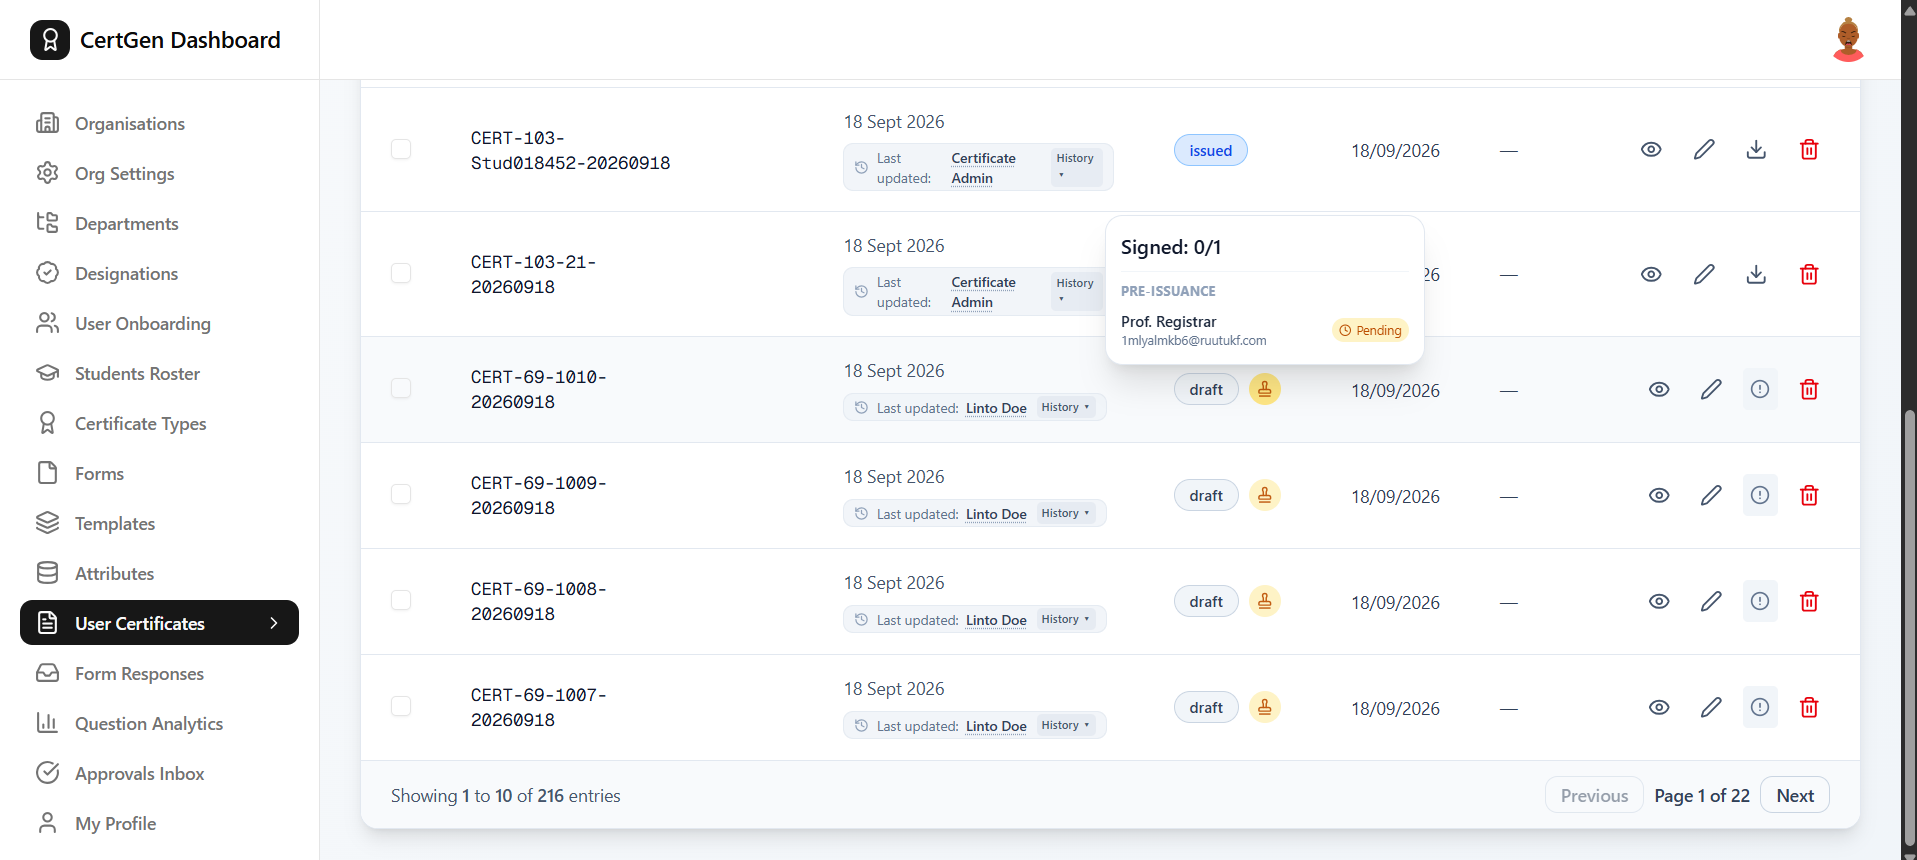
For certificates still awaiting a signature, the same icon shows ?Signed: 0/1? along with the pending signer?s name and status.
Step 10.2.3: Review Certificate and Signature Details
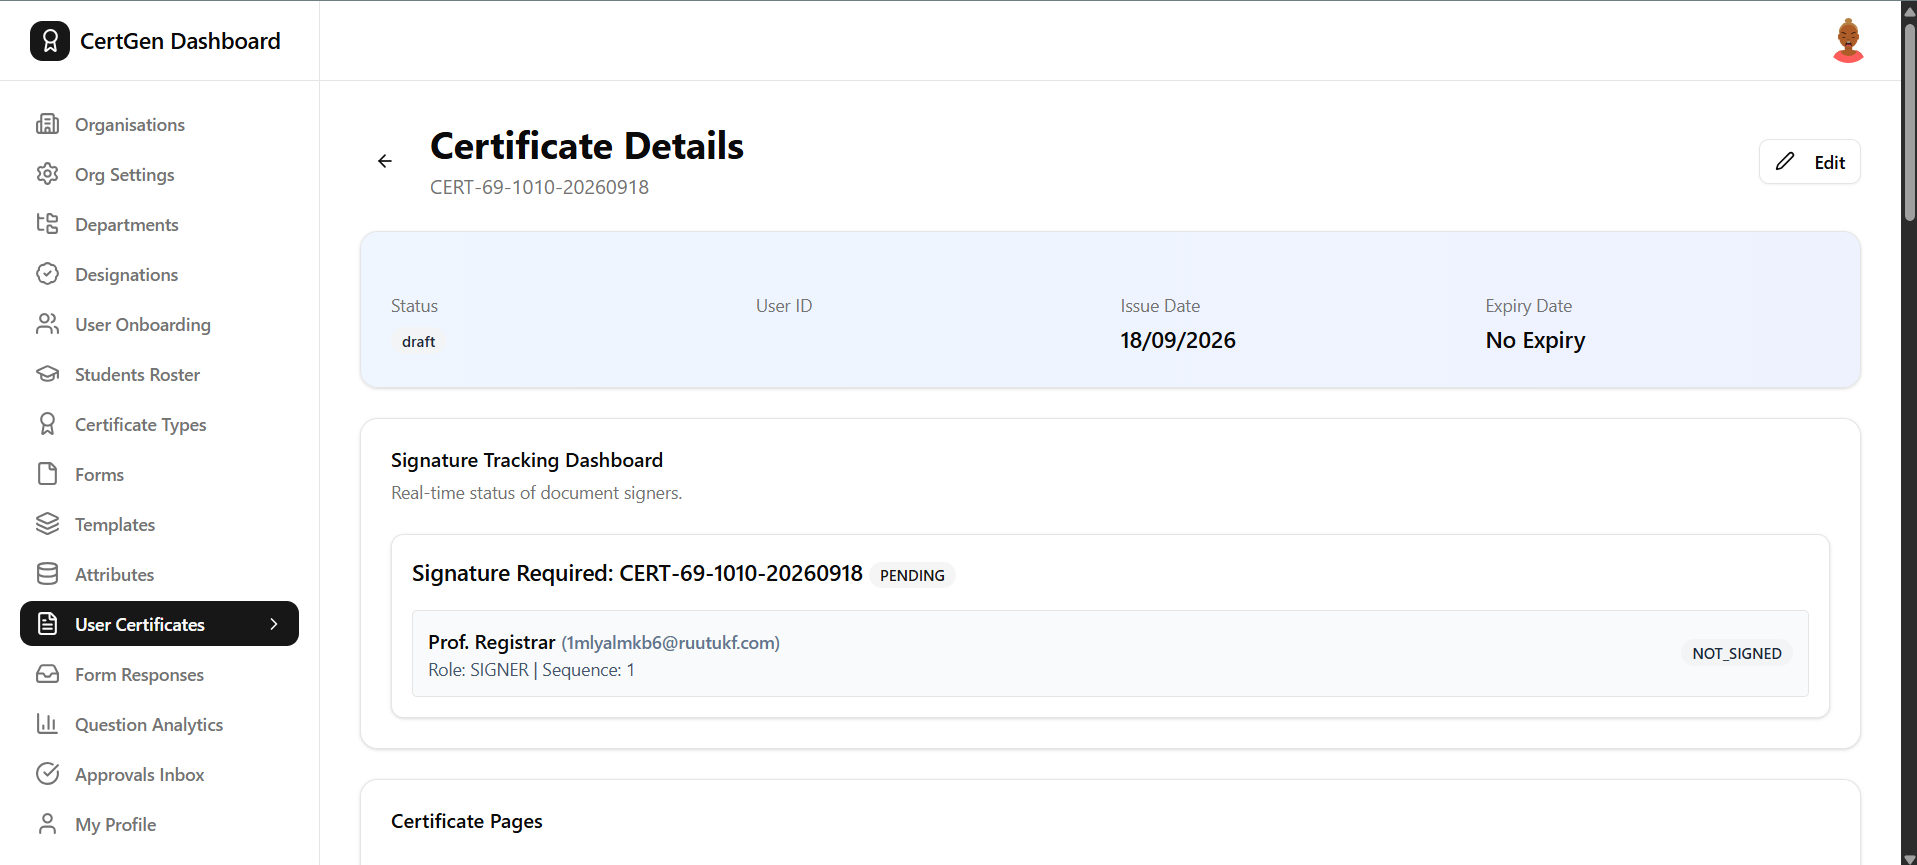
Click the eye icon on any certificate to open Certificate Details, including a Signature Tracking Dashboard listing each signer, role and sequence.
Step 10.3.1: Switch to Bulk Upload
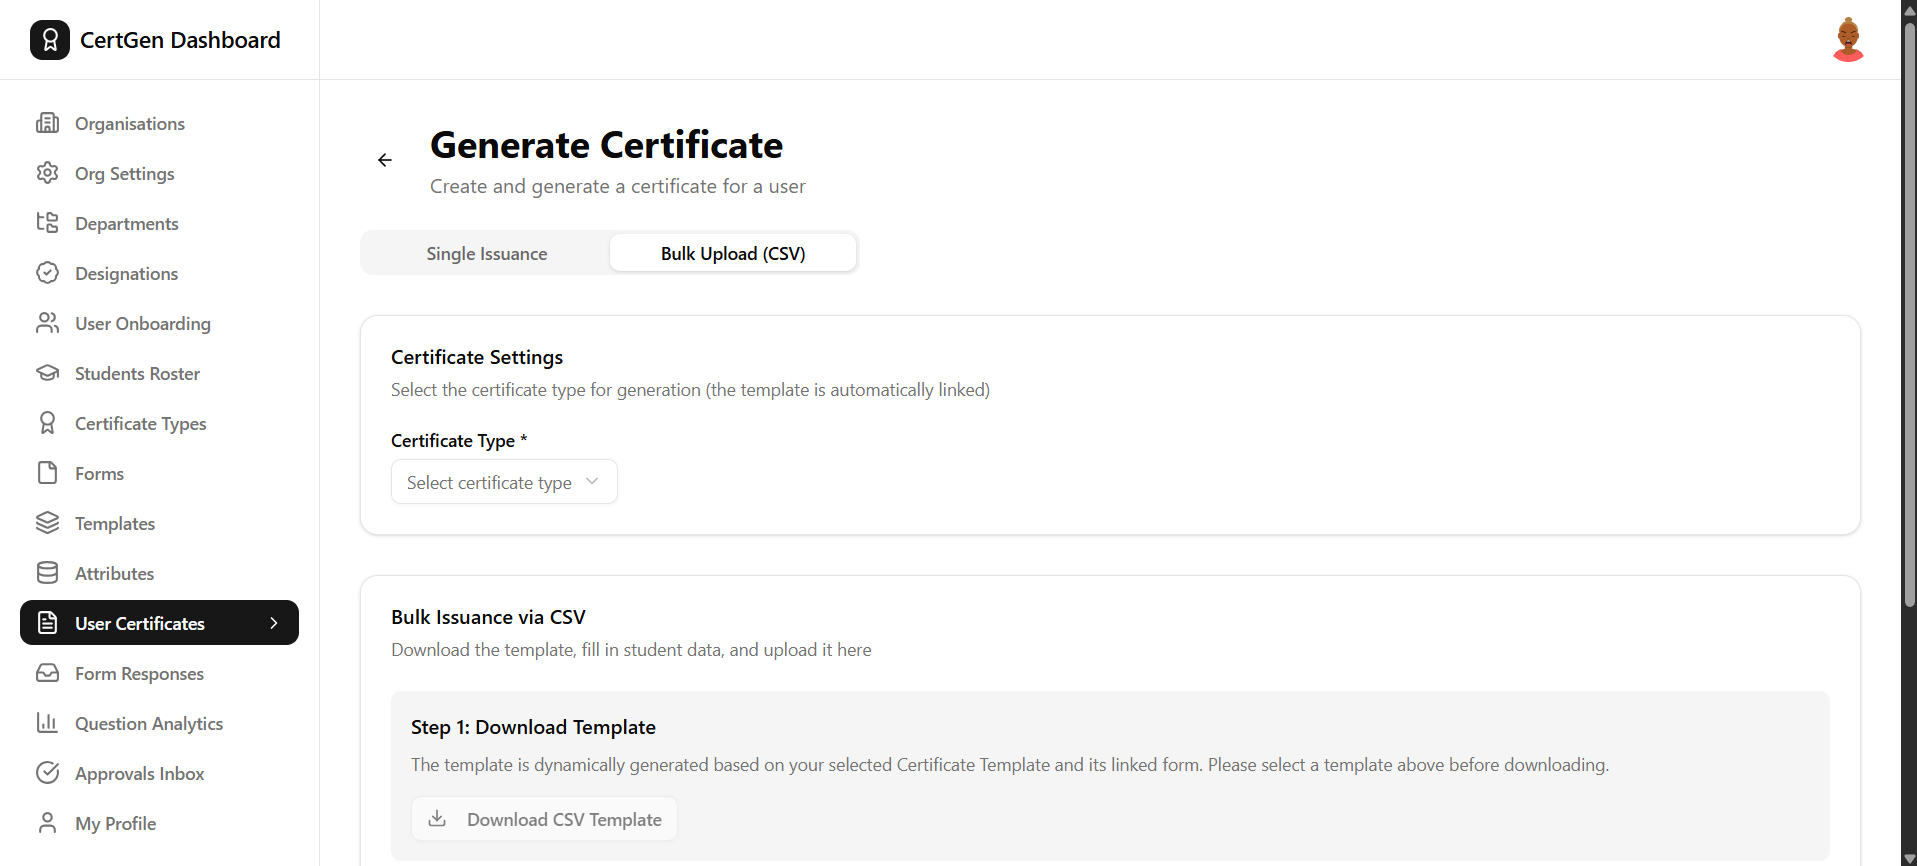
On the Generate Certificate page, click the Bulk Upload (CSV) tab, then select a Certificate Type as usual.
Step 10.3.2: Download Template, Upload CSV and Generate
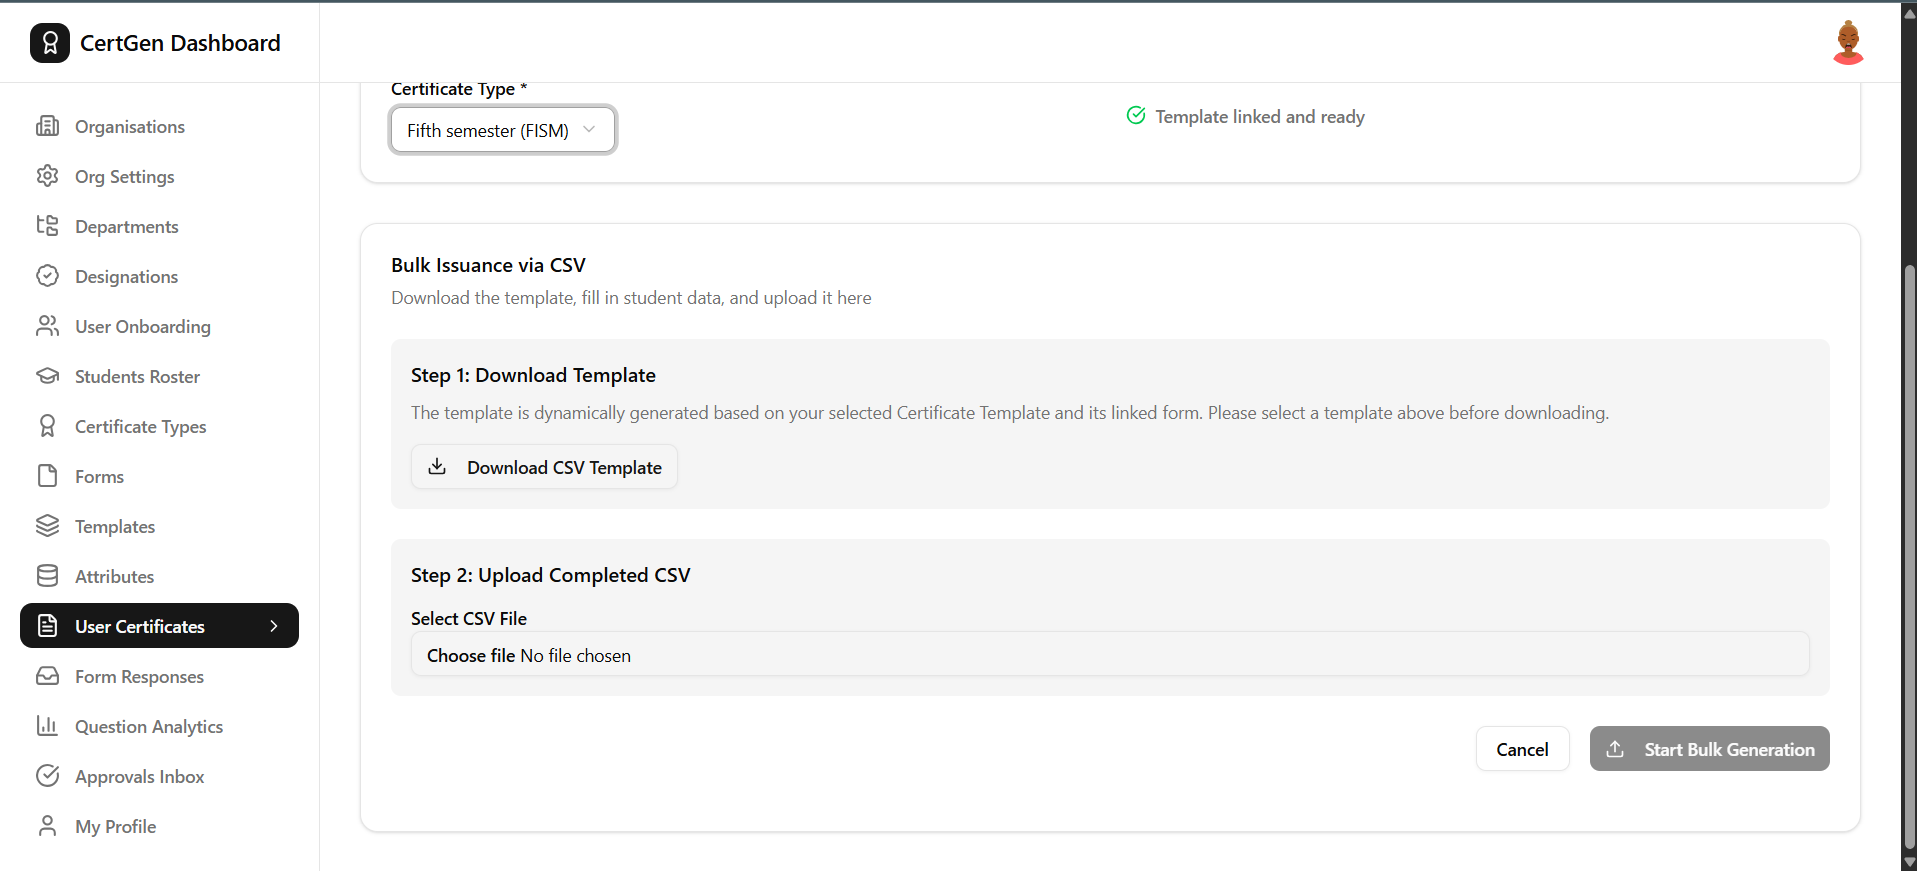
Once the template is linked, click Download CSV Template, fill in student data, choose the completed file, and click Start Bulk Generation.
Step 11.1.0: Open Form Responses
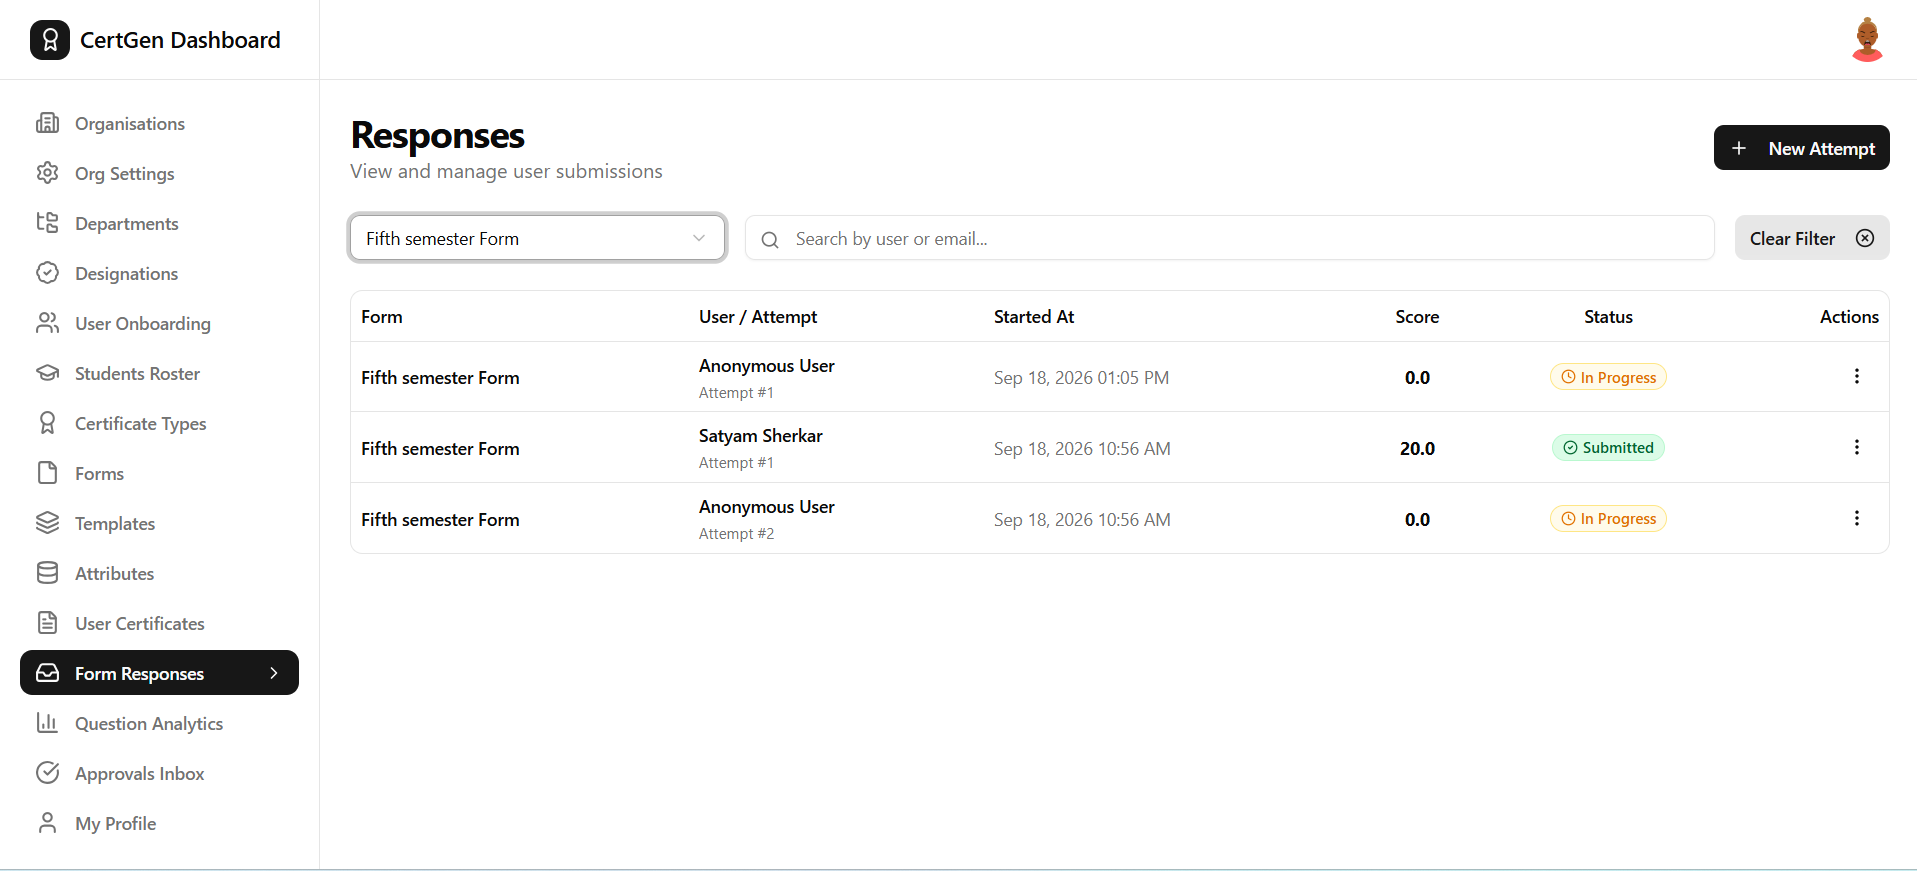
Go to Form Responses in the left menu and select a form from the dropdown to see all user attempts along with their status and score.
Step 11.2.0: View a Submission?s Details
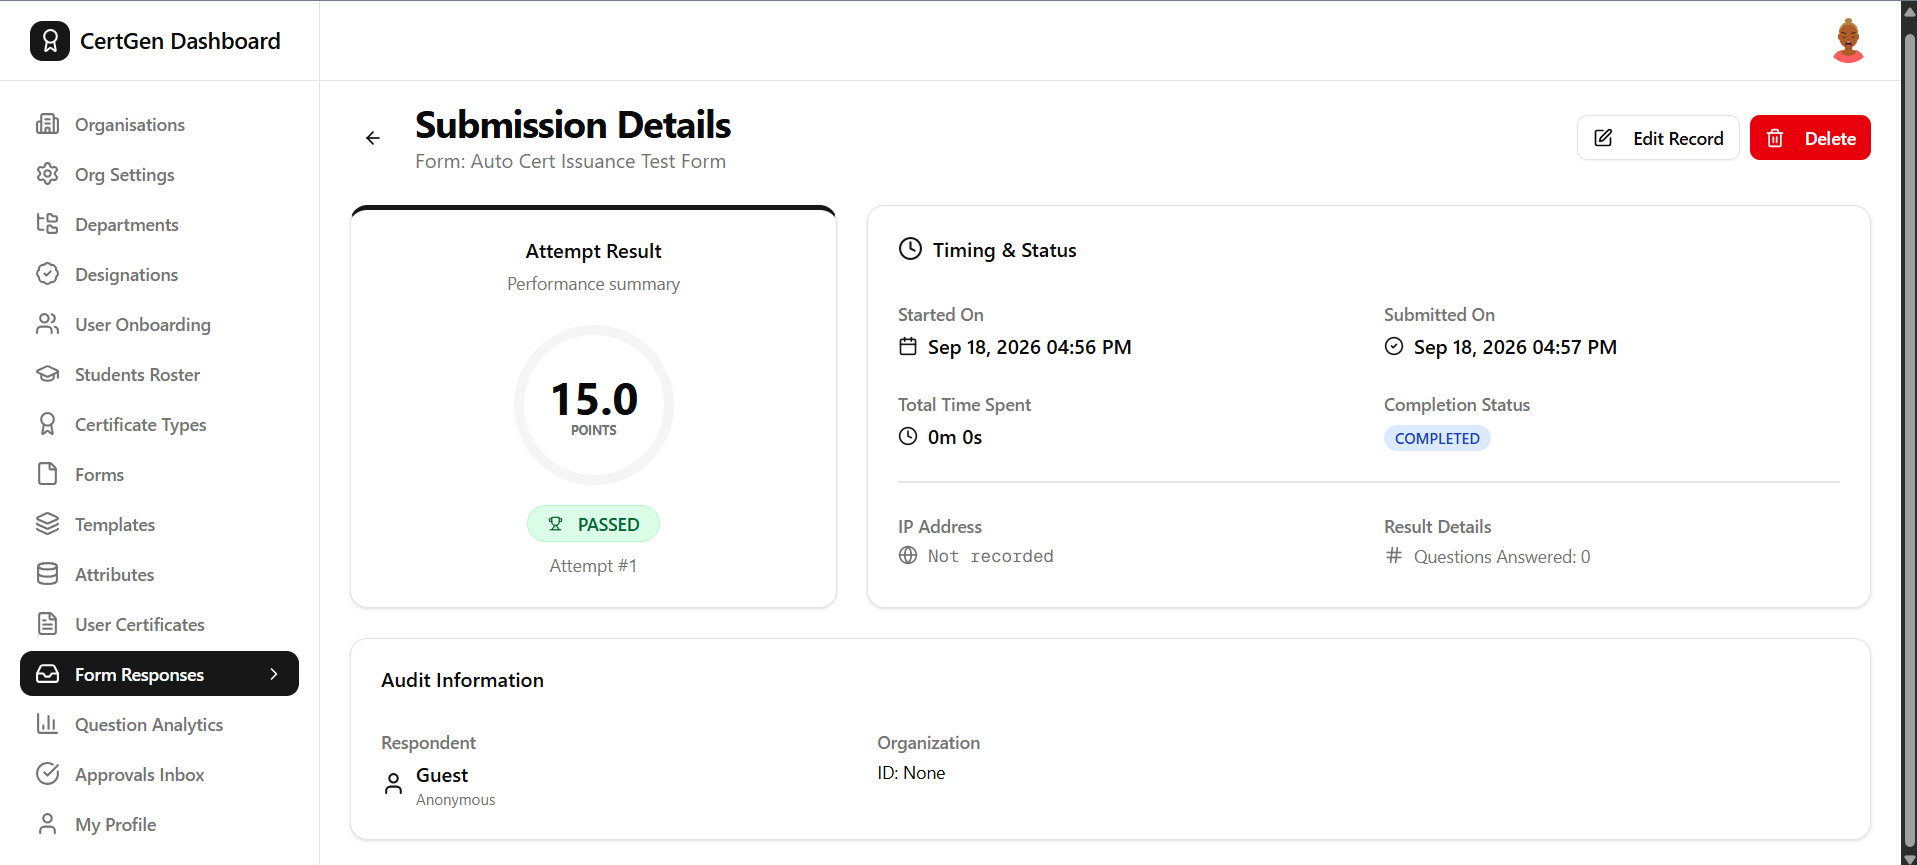
Click a row to open Submission Details, showing the attempt result, timing, completion status and respondent information.
Step 11.3.0: Return to the Responses List
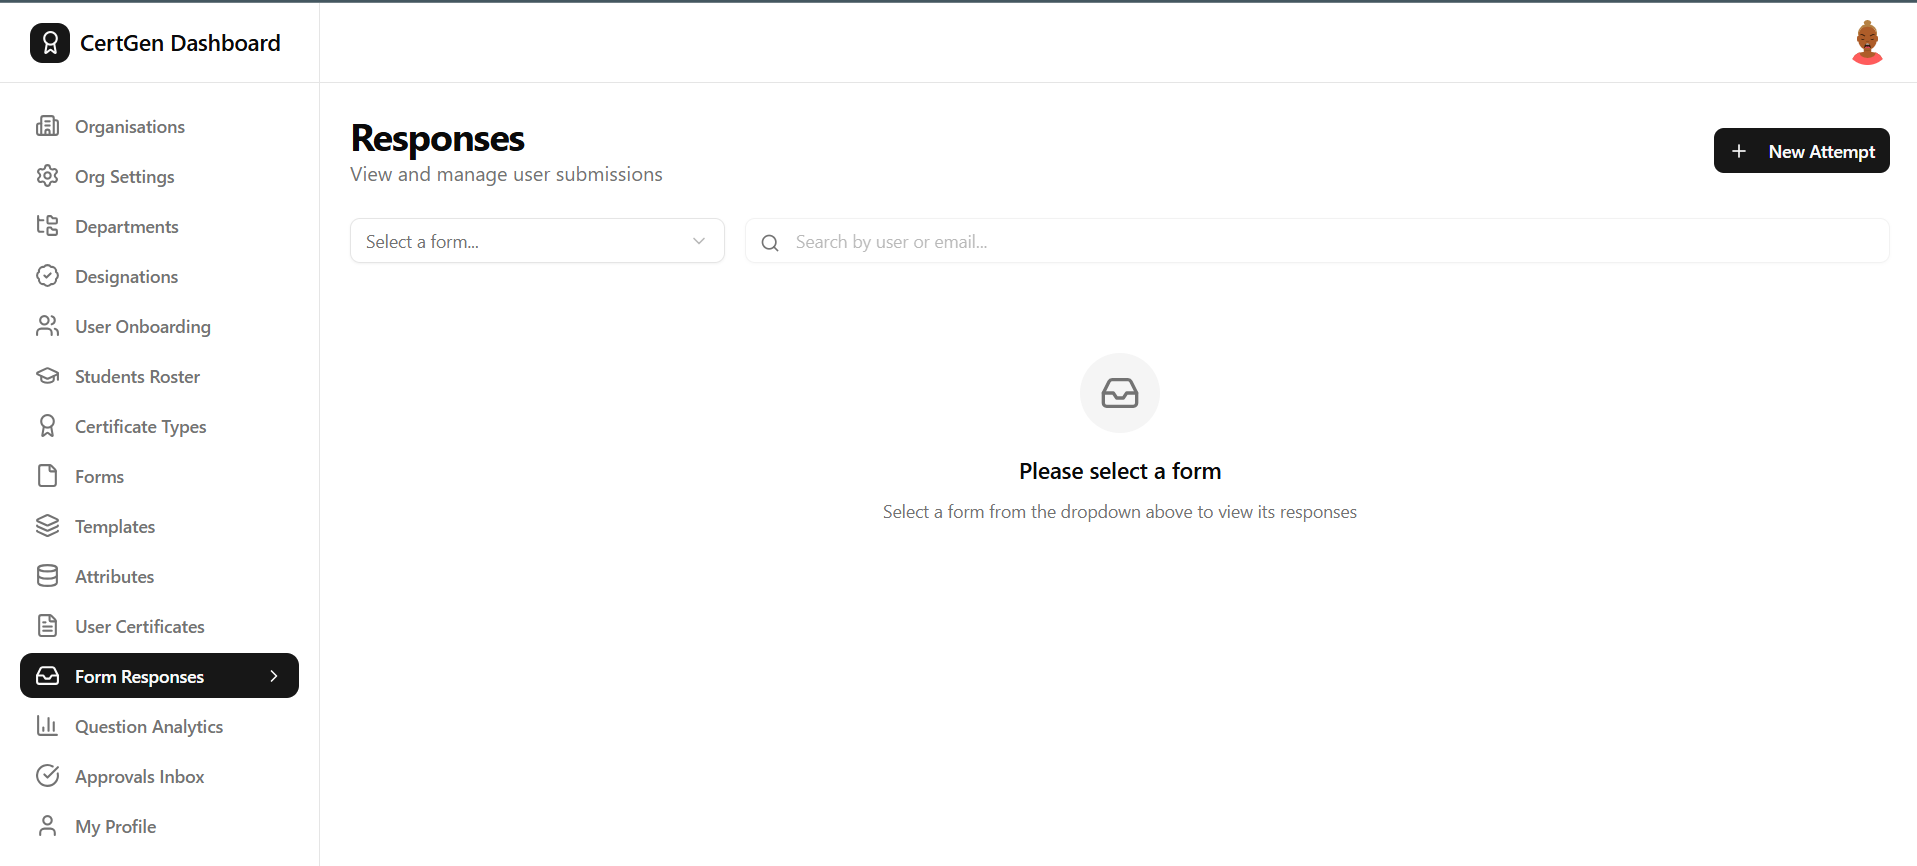
Click the back arrow to return to the Responses page, then select a different form from the dropdown to view its responses.
Step 12.1.0: Open Question Analytics
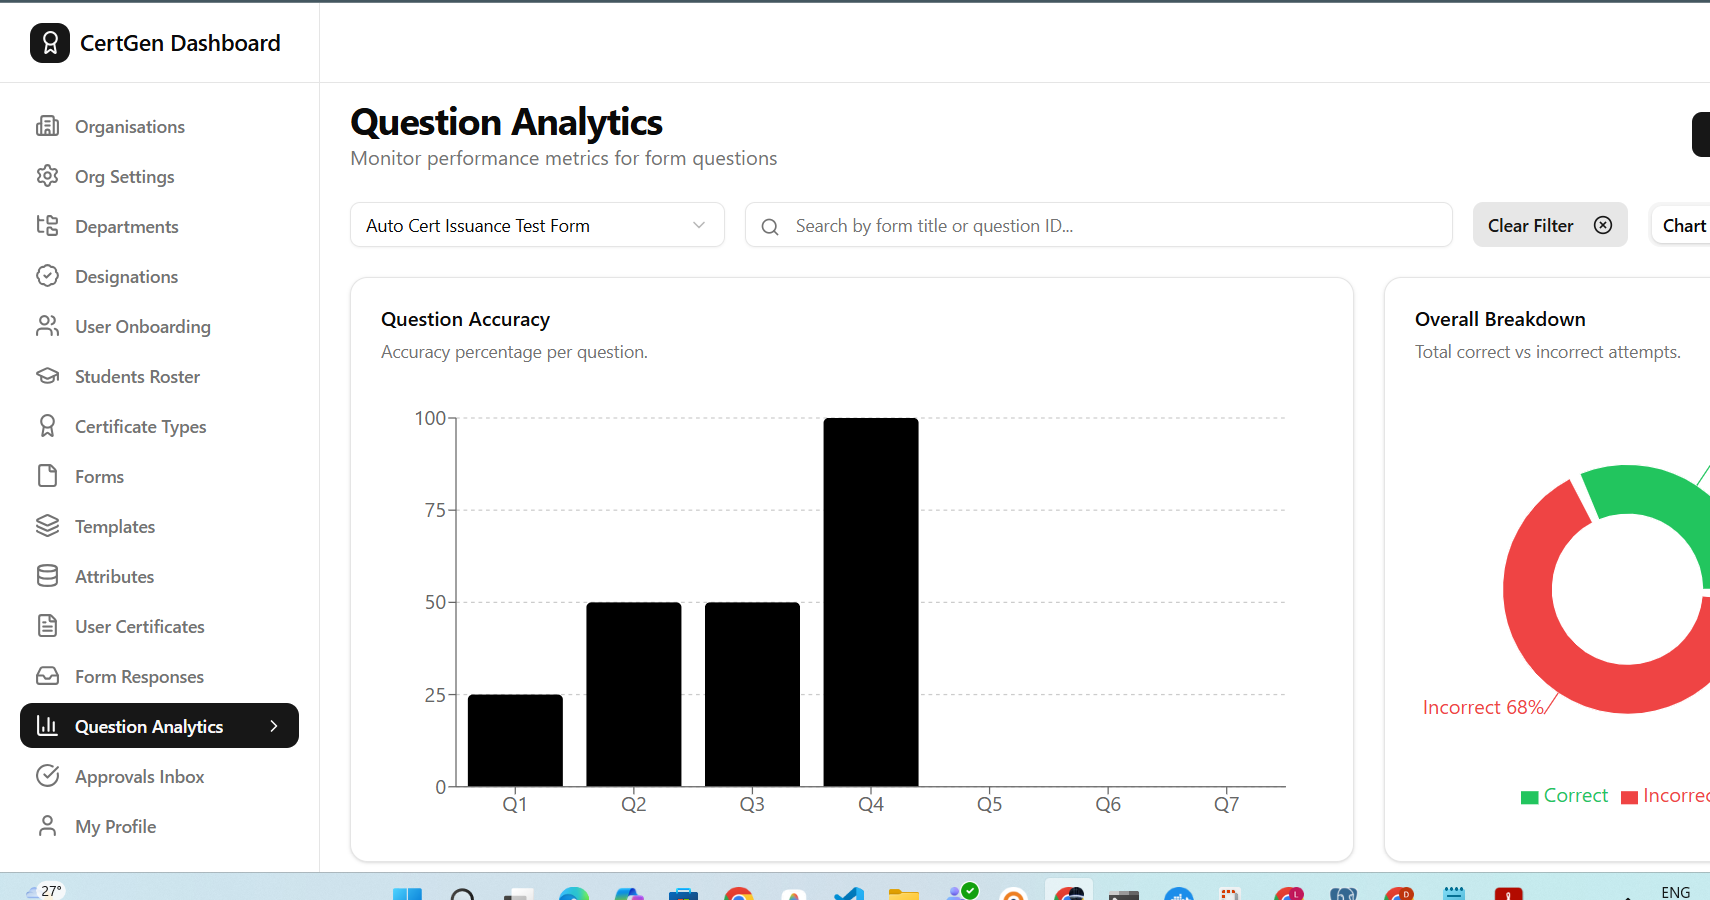
Go to Question Analytics and select a form to view the Question Accuracy chart alongside the Overall Breakdown of correct vs incorrect attempts.
Step 12.2.0: Review the Full Chart View
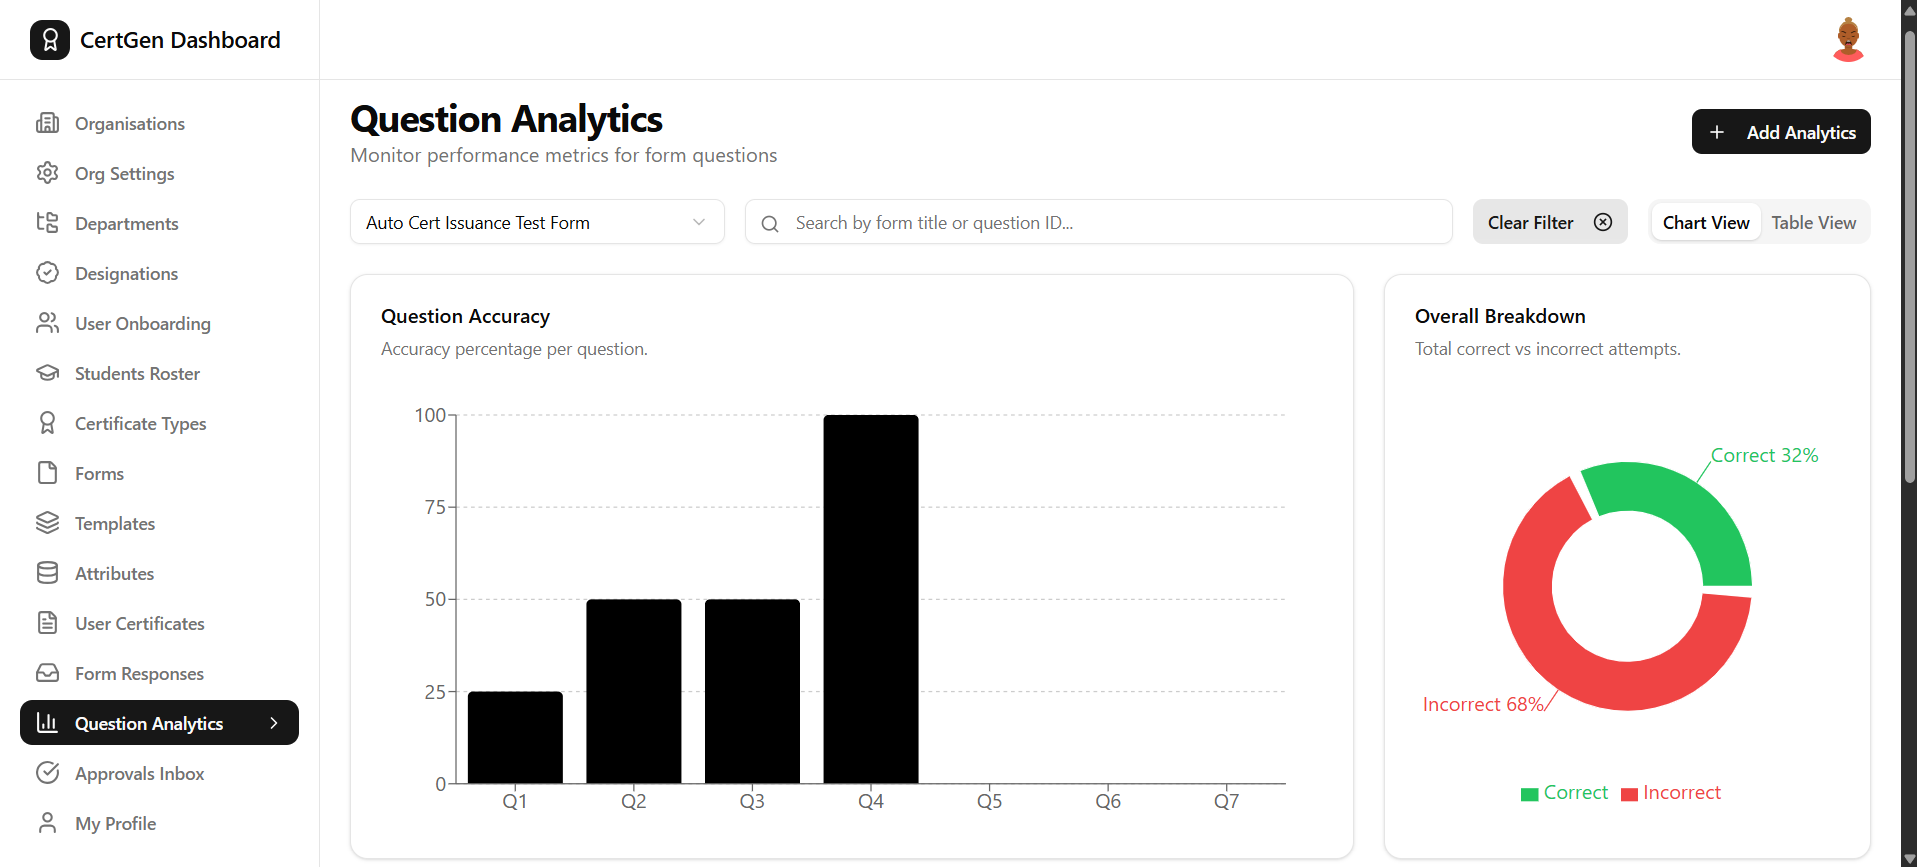
Expand the window or scroll to see the complete Question Accuracy bar chart and the Overall Breakdown donut chart with percentages.
Step 12.3.0: Check Attempts Breakdown
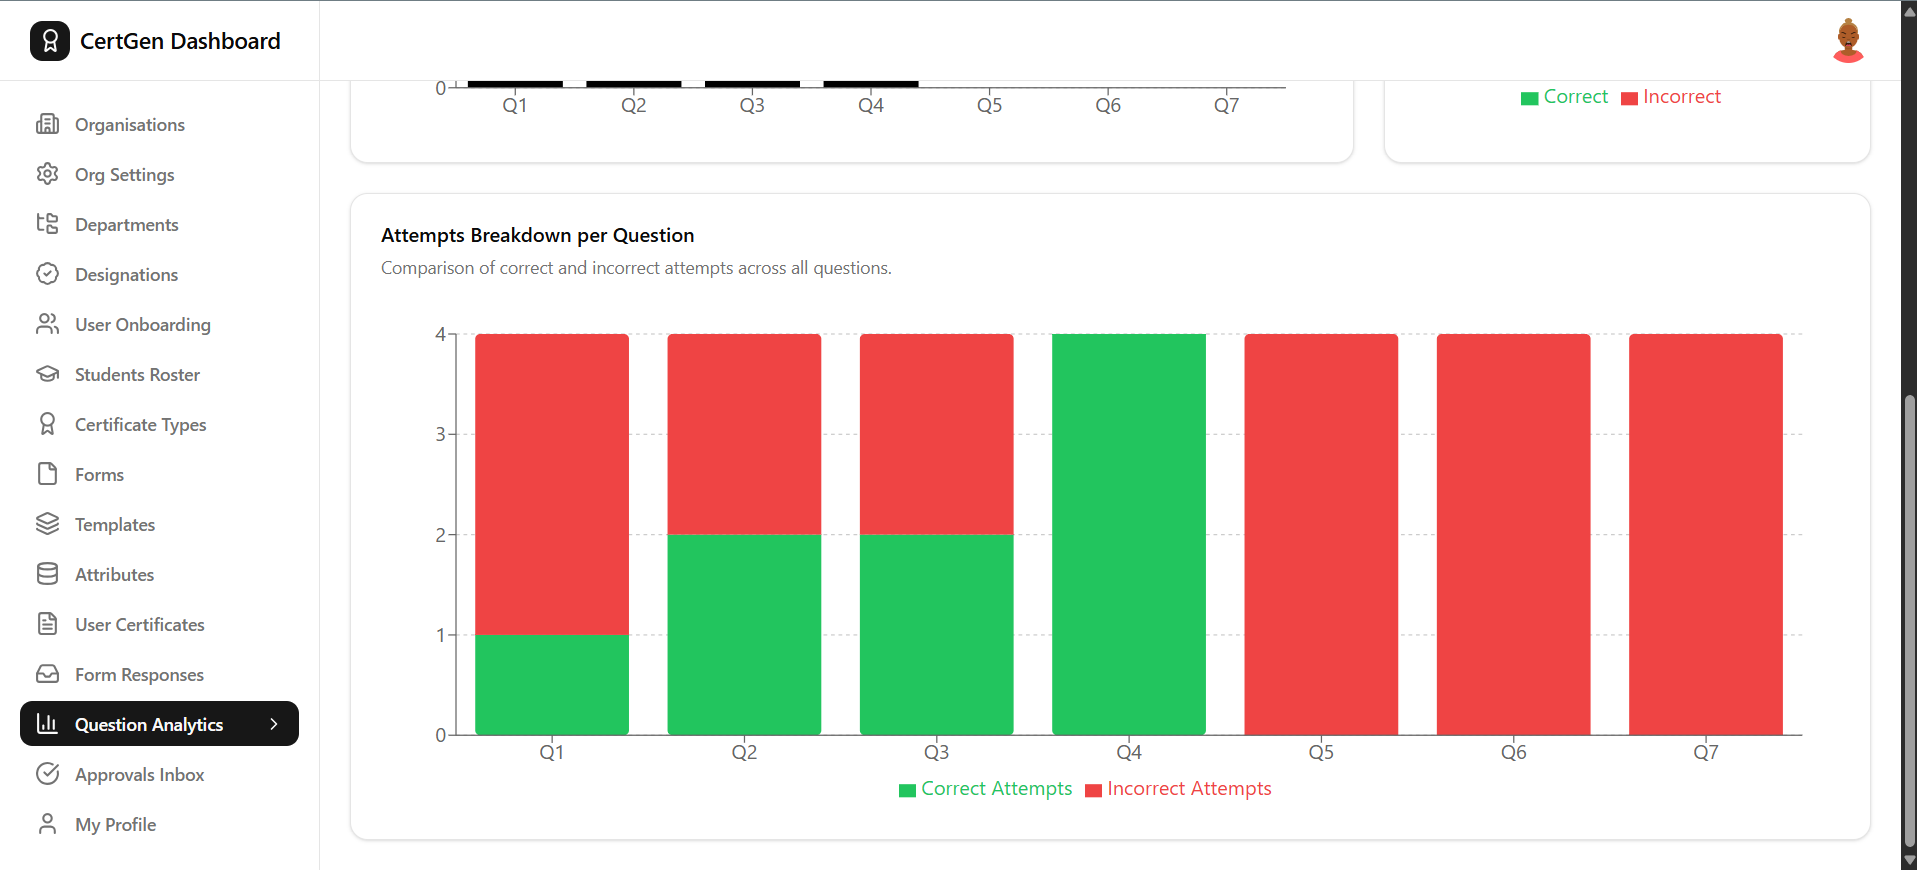
Scroll down to Attempts Breakdown per Question for a stacked view comparing correct and incorrect attempts for each question.
Step 12.4.0: Switch to Table View
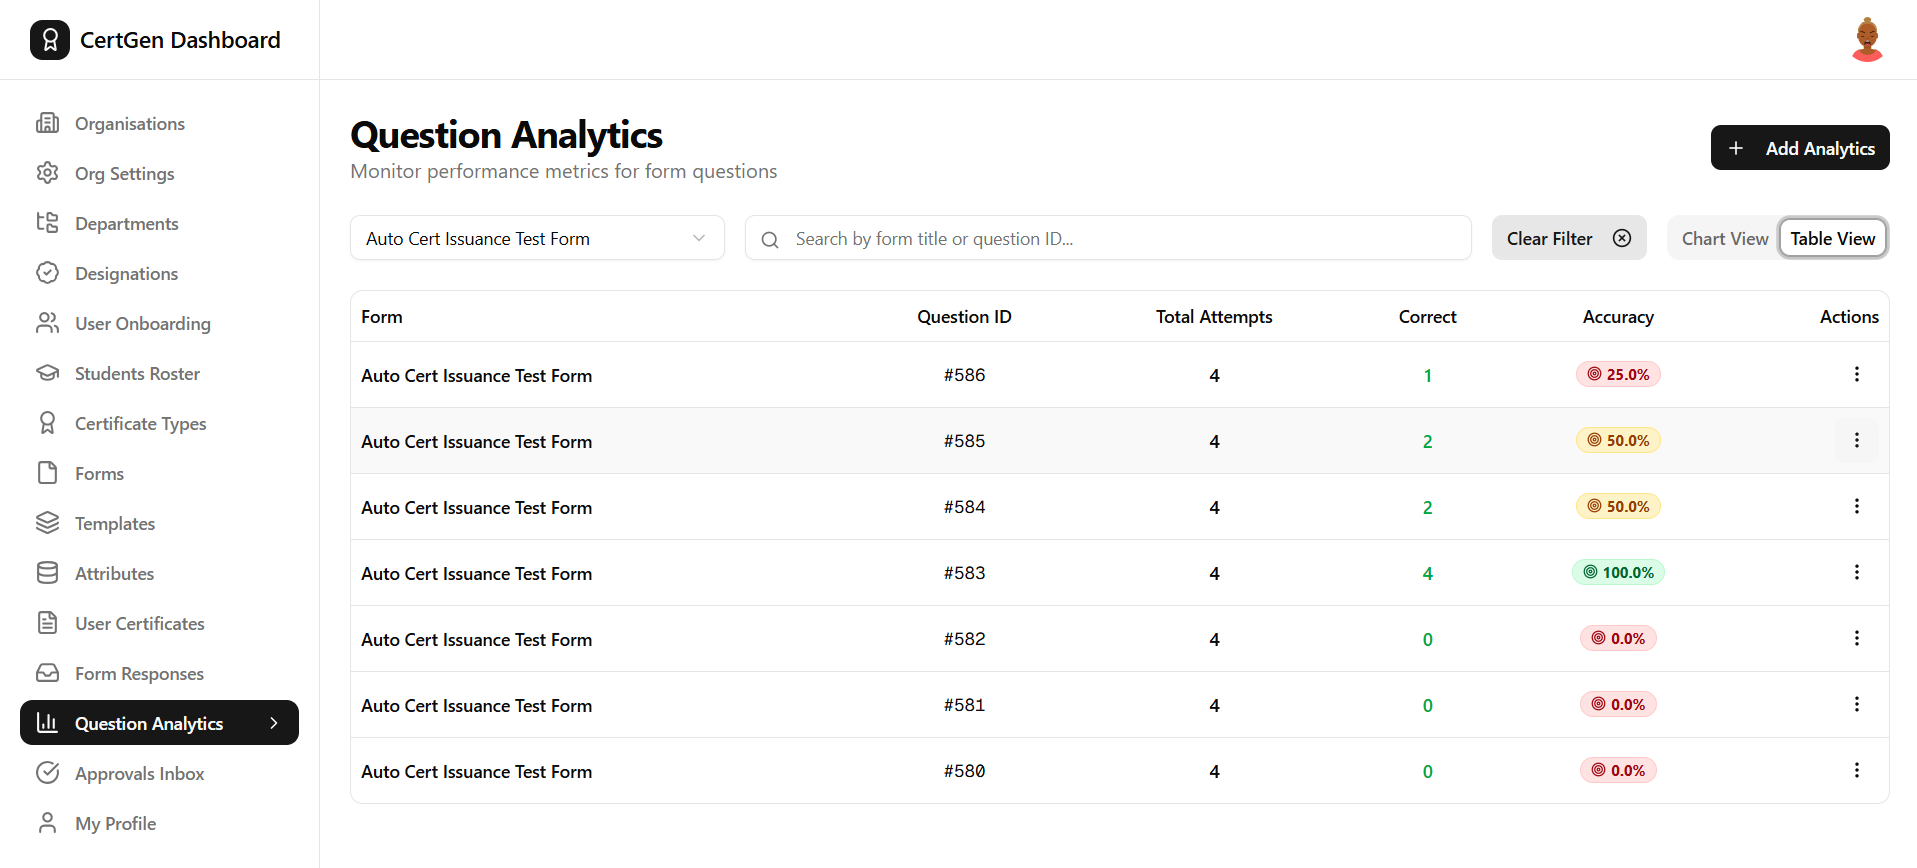
Click Table View to see the same analytics as a sortable table listing each question?s total attempts, correct count and accuracy.
Step 12.5.0: Open Row Actions
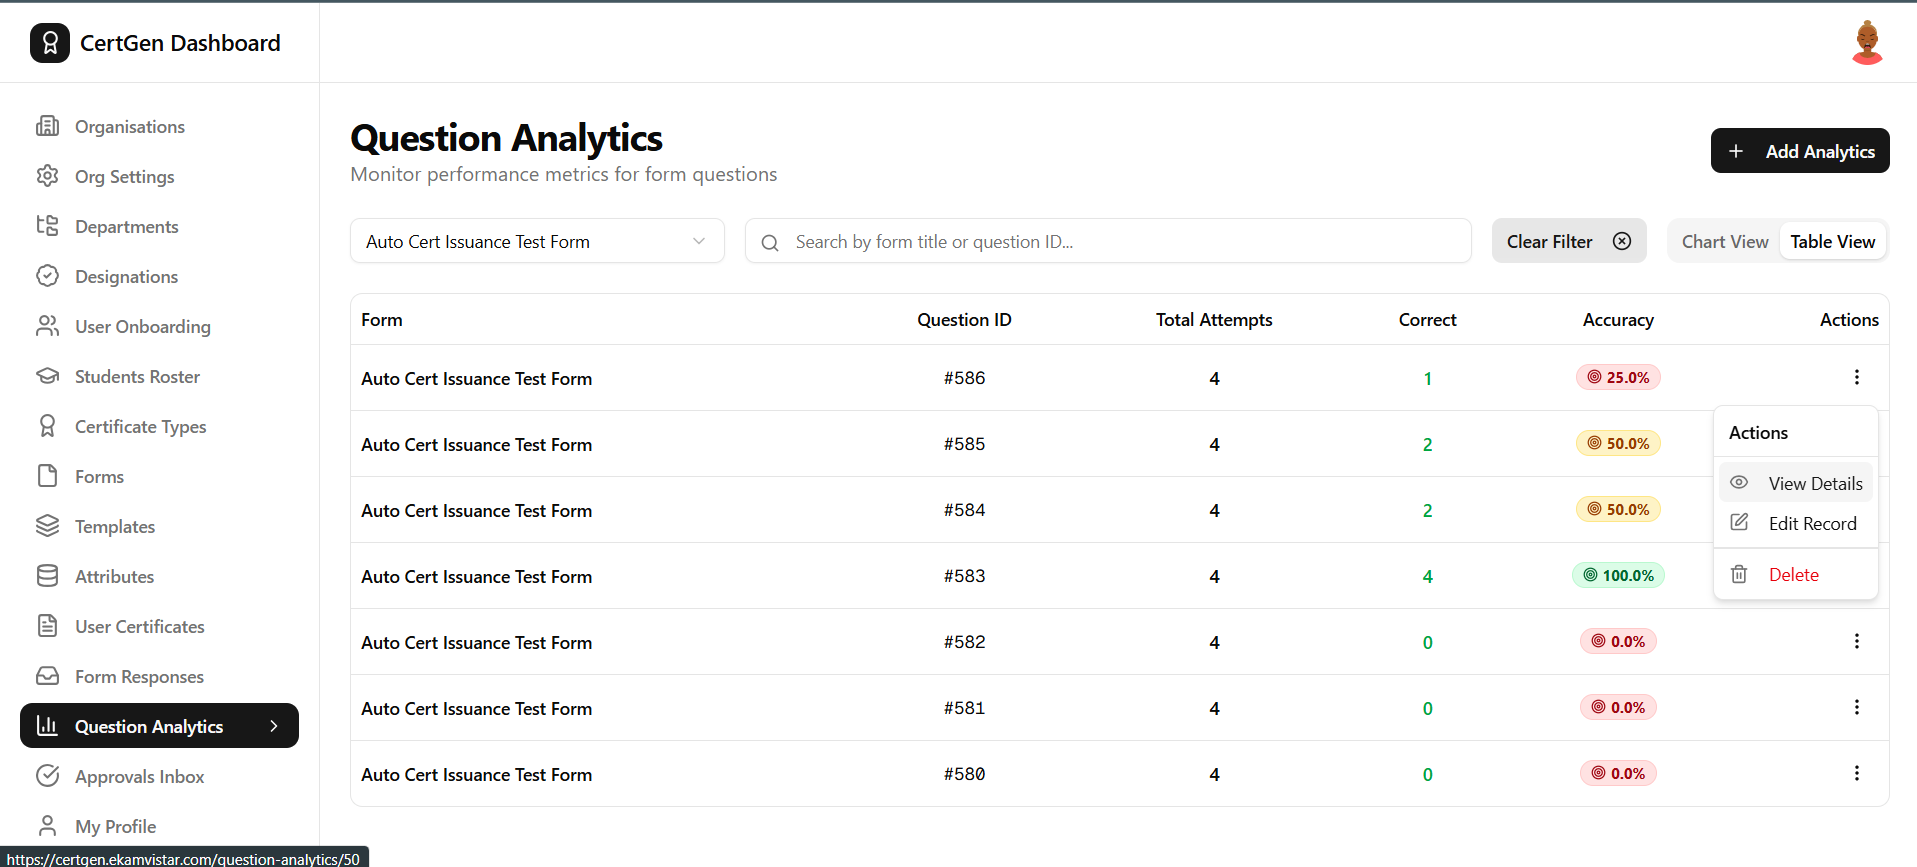
Click the ⋮ icon on any row to View Details, Edit Record or Delete that question?s analytics entry.
Step 12.6.0: Review Question Analytics Insight
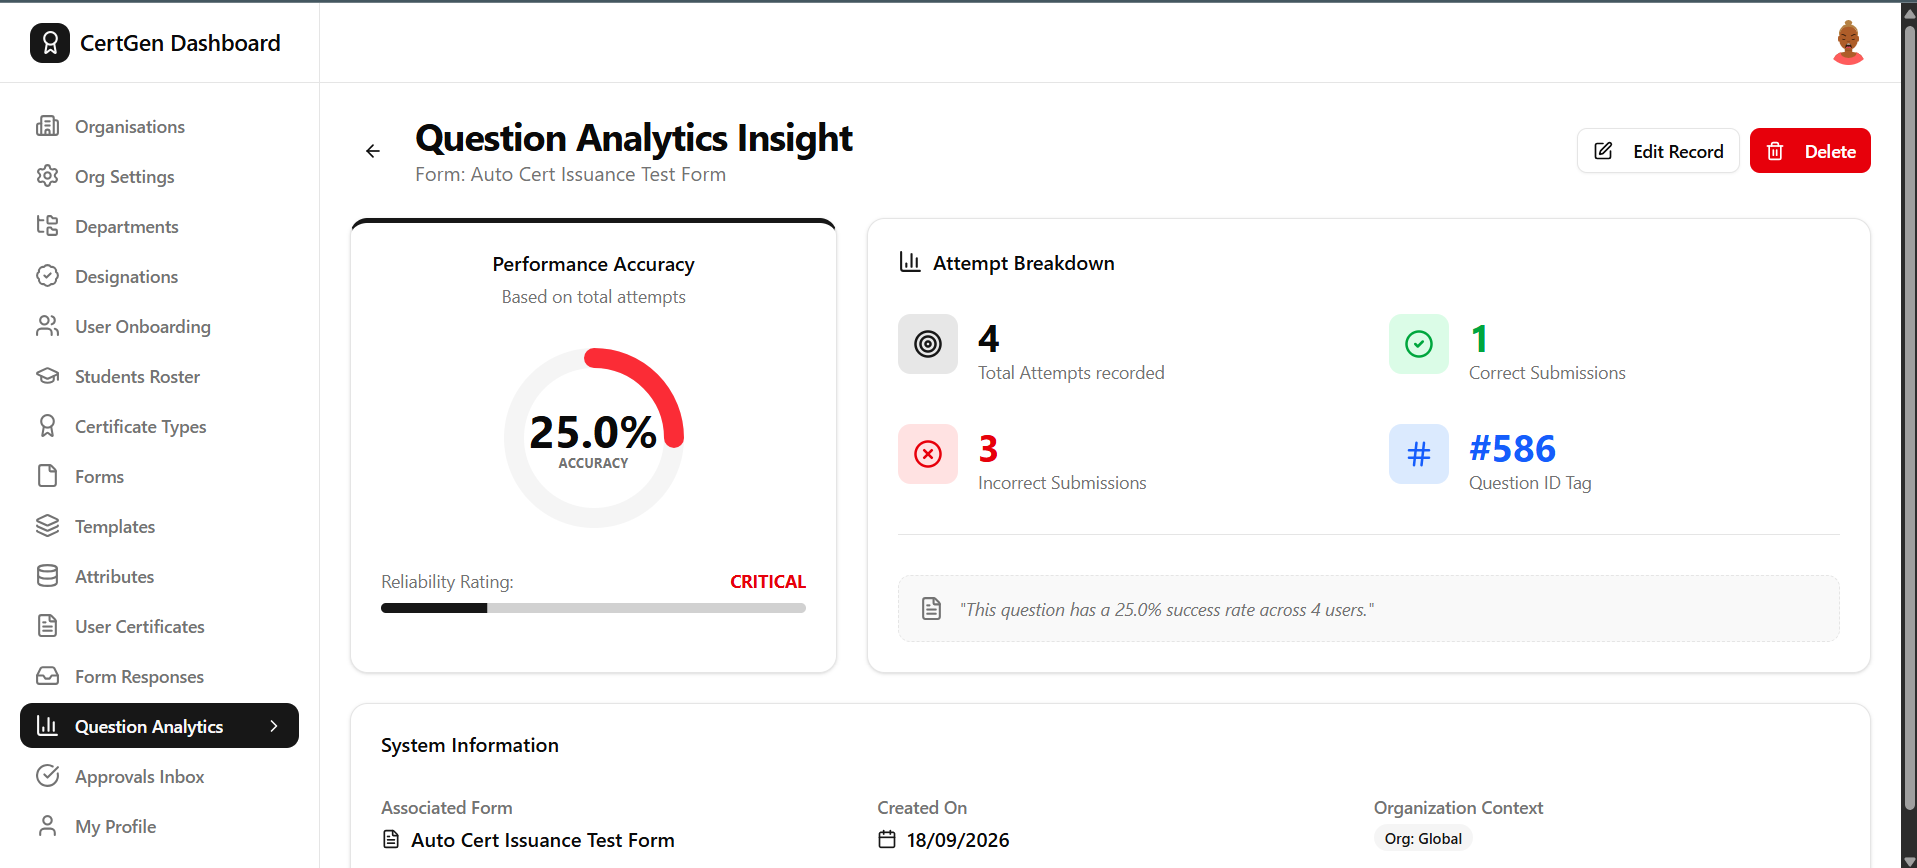
View Details opens the Question Analytics Insight page, showing performance accuracy, a reliability rating and a full attempt breakdown for that question.
Step 13.1.0: Check the Approvals Inbox
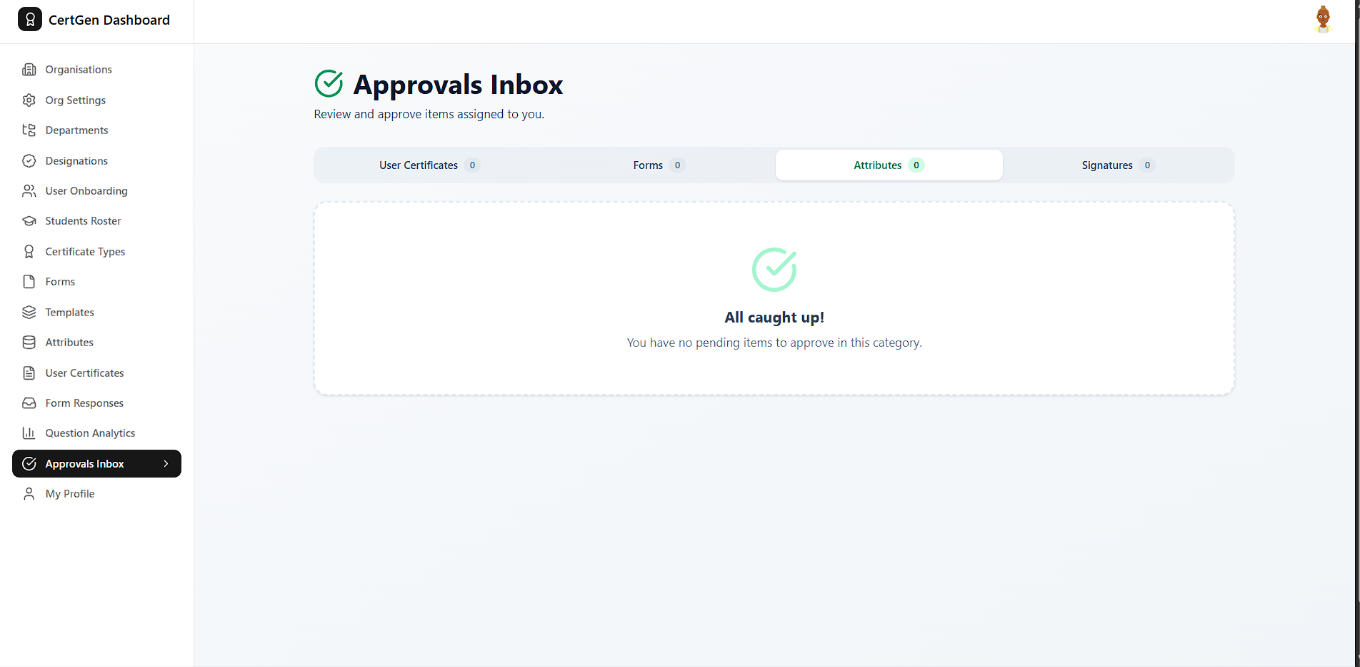
The Approvals Inbox shows pending items across User Certificates, Forms, Attributes and Signatures - or "All caught up!" when there's nothing to review.
Step 14.1.0: Manage Your Profile
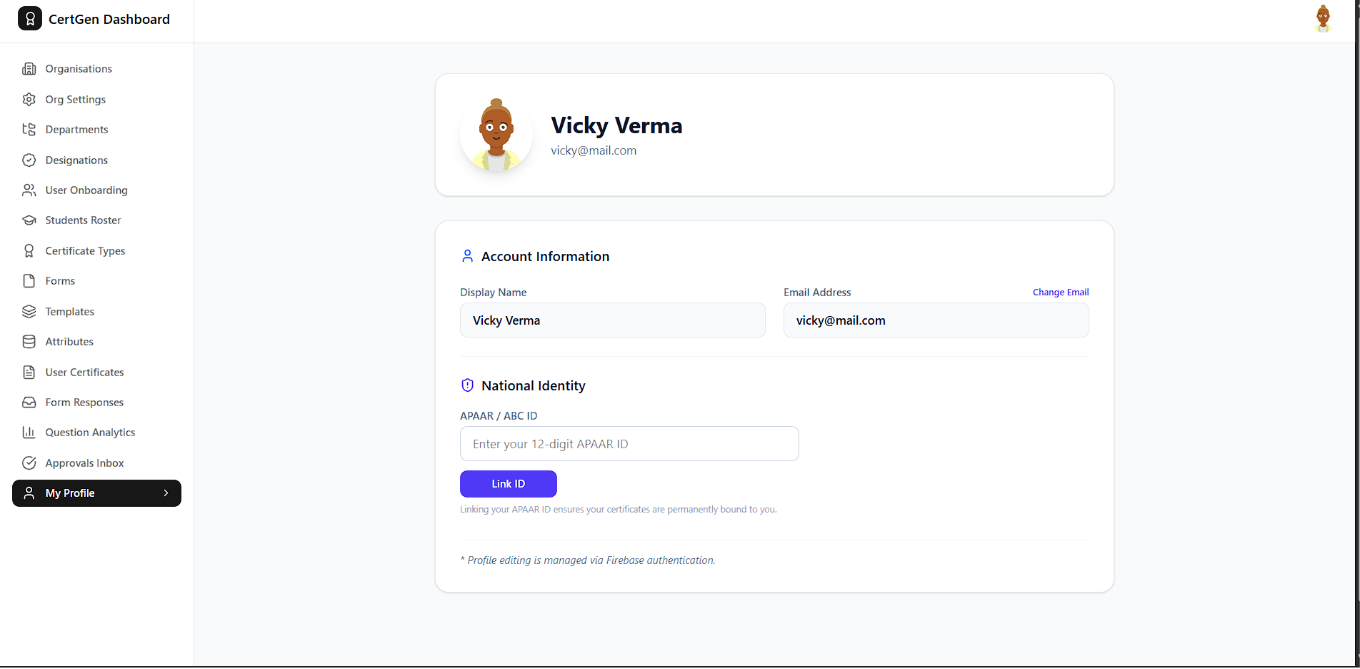
Go to My Profile to update your Display Name, Email, or link a National APAAR/ABC ID to your account.
Confidential Document
Printing this document is prohibited.